/.zvec-grep/`.
Restart the service after changing environment settings that affect its Embedding runtime.
For current options, run `zg help server` and `zg help environment`. If the service does not become ready, see [Troubleshooting](../troubleshooting/).
# Supported Content
Zvec-Grep assigns each admitted file to an extraction path. Structure-aware extractors preserve useful source context; other text files fall back to plain chunks.
## Structure-aware code [#structure-aware-code]
The following languages preserve symbols, signatures, breadcrumbs, and surrounding source:
* C and C++
* Go
* Java
* JavaScript and JSX
* TypeScript and TSX
* Python
* Rust
Vue and Svelte component scripts also use structural extraction where possible.
## Documents and structured text [#documents-and-structured-text]
| Content | Indexed representation |
| ---------------------------- | -------------------------------- |
| Markdown and MDX | Heading sections and breadcrumbs |
| TXT, RST, HTML, XML | Plain-text chunks |
| CSV, JSON, JSONC, TOML, YAML | Plain-text chunks |
| Other non-binary files | Plain-text fallback |
Other recognized code such as Ruby, PHP, Swift, Kotlin, C#, Scala, shell, SQL, and CSS currently uses plain-text chunks when no structural grammar is available.
## Images [#images]
Images are skipped by default. To index GIF, JPEG, PNG, or WebP files, include them explicitly and select an Embedding model that accepts images.
## Content currently skipped [#content-currently-skipped]
PDF and Office files, archives, compiled artifacts, audio, video, database files, empty files, binaries detected by extension or content sampling, and files above the configured size limit are not indexed.
Use `zg index --debug` to inspect skipped-file counts and samples. Scope discovery with `--glob`, file types, ignore files, depth, and maximum file size.
# Troubleshooting
Start with three checks:
```bash
zg version
zg status
zg help
```
## The `zg` Command Is Unavailable [#the-zg-command-is-unavailable]
Zvec-Grep requires Node.js 22 or newer:
```bash
node --version
npm install -g @zvec/zvec-grep
zg version
```
If npm succeeds but `zg` is still missing, add npm's global binary directory to your shell `PATH`.
## The Index Is Missing or Stale [#the-index-is-missing-or-stale]
Run commands from the intended workspace root:
```bash
zg status --check-ready
zg index
zg query "release checklist" --refresh wait
```
Use `--rebuild` only when changing the embedding model or intentionally replacing stored index settings.
## Search Results Are Empty or Weak [#search-results-are-empty-or-weak]
1. Use `--rg` for known text, identifiers, paths, or regex.
2. Use `--fts` for known terms that need ranking.
3. Use the default hybrid query when wording or location is unknown.
4. Restrict broad workspaces with `-g`, `-t`, or `-T`.
5. Confirm that the content is indexed and the model fits it.
```bash
zg query "authentication flow" --debug --trace
zg index --debug
```
See [Search Guide](../search/), [Supported Content](../supported-content/), and [Embedding Models](../embedding-models/).
## Explicit Server Mode Is Not Ready [#explicit-server-mode-is-not-ready]
This applies only when using `--mode server` or an HTTP MCP connection. Default stdio Agent integrations manage the service automatically.
```bash
zg server status --check-ready
zg server on
zg server status --check-ready
```
Run `zg server run` when you need foreground logs. See [Local Server](../server/) for lifecycle, client mode, listen address, and authentication.
## An Agent Cannot Use Zvec-Grep [#an-agent-cannot-use-zvec-grep]
```bash
zg install --target codex --yes
```
Restart the Agent or open a new session. Exact identifiers and filenames may correctly use its native grep instead of Zvec-Grep. See [Connect AI Agents](../agents/).
## Remote Embedding Is Denied [#remote-embedding-is-denied]
Inspect or grant the separate workspace authorization:
```bash
zg auth status
zg auth grant --capability embedding --scope workspace --embedding qwen/text-embedding-v4
```
Use `--allow-remote` for one command, or choose a local model when content must not leave the machine.
## Reset Safely [#reset-safely]
```bash
zg index --rebuild --embedding local/potion-code-16m-v2
zg index --drop --yes
```
`--drop` deletes the workspace index, not the source files. Indexed search remains unavailable until you build another index.
When reporting a problem, include the version, operating system, failing command, relevant `zg status`, and sanitized diagnostics. Remove credentials, private paths, and sensitive excerpts.
[Open a Zvec-Grep issue](https://github.com/zvec-ai/zvec-grep/issues)
# MCP Server
In the daily workflow of AI coding assistants (such as Claude Code and Qoder), developers frequently need to interact with vector databases — creating collections, inserting data, and running semantic searches. However, these operations typically require switching to a terminal to manually execute code, breaking the conversational flow with the AI.
Zvec MCP Server exposes the full capabilities of Zvec as standardized tools to AI assistants via the [MCP (Model Context Protocol)](https://modelcontextprotocol.io/). Once configured, the AI can directly invoke vector database operations within the conversation — no need to leave your editor, no need to write any code.
**GitHub**: [https://github.com/zvec-ai/zvec-mcp-server](https://github.com/zvec-ai/zvec-mcp-server)
**Prerequisites:** Make sure you have [uv](https://docs.astral.sh/uv/) installed. The MCP server is distributed via `uvx` and requires no manual dependency setup.
## Quick Setup [#quick-setup]
### Qoder (Recommended) [#qoder-recommended]
**Using Qoder CLI (one-click setup):**
```bash
# OpenAI
qodercli mcp add zvec-mcp uvx zvec-mcp-server \
-e OPENAI_API_KEY=sk-xxx \
-e OPENAI_BASE_URL=https://api.openai.com/v1 \
-e OPENAI_EMBEDDING_MODEL=text-embedding-3-small
# Or DashScope
qodercli mcp add zvec-mcp uvx zvec-mcp-server \
-e OPENAI_API_KEY=sk-xxx \
-e OPENAI_BASE_URL=https://dashscope.aliyuncs.com/compatible-mode/v1 \
-e OPENAI_EMBEDDING_MODEL=text-embedding-v4
```
**Manual configuration** (`~/.qoder/mcp.json`):
```json
{
"mcpServers": {
"zvec-mcp": {
"command": "uvx",
"args": ["zvec-mcp-server"],
"env": {
"OPENAI_API_KEY": "sk-xxx",
"OPENAI_BASE_URL": "https://api.openai.com/v1",
"OPENAI_EMBEDDING_MODEL": "text-embedding-3-small"
}
}
}
}
```
### Claude Code [#claude-code]
```bash
claude mcp add zvec-mcp uvx zvec-mcp-server \
-e OPENAI_API_KEY=sk-xxx \
-e OPENAI_BASE_URL=https://api.openai.com/v1 \
-e OPENAI_EMBEDDING_MODEL=text-embedding-3-small
```
### Claude Desktop [#claude-desktop]
Config file: `~/Library/Application Support/Claude/claude_desktop_config.json`
```json
{
"mcpServers": {
"zvec-mcp": {
"command": "uvx",
"args": ["zvec-mcp-server"],
"env": {
"OPENAI_API_KEY": "sk-xxx"
}
}
}
}
```
### Local Development [#local-development]
To run from source code locally:
```json
{
"mcpServers": {
"zvec-mcp": {
"command": "uv",
"args": ["run", "python", "-m", "zvec_mcp"],
"cwd": "/path/to/zvec-mcp-server",
"env": {
"OPENAI_API_KEY": "sk-xxx"
}
}
}
}
```
**Environment Variables:**
* `OPENAI_API_KEY` (required): Your API key
* `OPENAI_BASE_URL` (optional): Custom endpoint, e.g. DashScope
* `OPENAI_EMBEDDING_MODEL` (optional): Defaults to `text-embedding-3-small`
## Verify Connection [#verify-connection]
After configuration, enter the following prompt to verify:
```plain
List all available MCP tools
```
You should see 17 zvec-mcp tools returned. If not, check your configuration and restart the client.
## Quick Start (Log Troubleshooting Scenario) [#quick-start-log-troubleshooting-scenario]
**Part 1 — Create a Log Knowledge Base**
```plain
Create a collection named log_knowledge, stored in the ./data/log_kb directory,
for storing system log troubleshooting knowledge.
```
**Part 2 — Insert Database Fault Logs**
```plain
Insert the following fault cases into log_knowledge:
- "ERROR: Connection pool exhausted. Max connections (100) reached. Unable to acquire connection from pool within 30s timeout. Consider increasing max pool size or check for connection leaks."
- "WARN: Slow query detected (execution time: 15.3s). Query: SELECT * FROM large_table WHERE unindexed_column = 'value'. Consider adding index on unindexed_column."
```
**Part 3 — Insert Application-Layer Fault Logs**
```plain
Insert the following fault cases into log_knowledge:
- "ERROR: OutOfMemoryError: Java heap space. Heap dump triggered. Analysis shows 85% memory consumed by cached user sessions. Recommendation: review session timeout settings and implement LRU cache eviction."
- "WARN: Circuit breaker 'payment-service' opened after 50 consecutive failures. Fallback strategy activated. Root cause: payment-service timeout (5s) insufficient under high load."
```
**Part 4 — Insert Infrastructure Fault Logs**
```plain
Insert the following fault cases into log_knowledge:
- "ERROR: Disk full (99% usage) on /var/log. Log rotation failed due to permission denied on /etc/logrotate.d/app. Syslog daemon stopped accepting new messages."
- "CRITICAL: SSL certificate expired on 2024-01-15. HTTPS connections rejected. Renewal automation failed due to DNS challenge timeout."
```
### Semantic Search Examples [#semantic-search-examples]
**Search for solutions by error symptoms:**
```plain
Search log_knowledge for "database connection timeout"
```
**Filter by severity level:**
```plain
Search log_knowledge for "memory issues"
```
**Pinpoint by category:**
```plain
Search log_knowledge for "certificate-related errors"
```
**Combined query with output format:**
```plain
Search log_knowledge for "service unavailable", return in JSON format
```
## Tool Overview [#tool-overview]
| Category | Tools | Description |
| --------------------- | ----------------------------------------------------------------------------------------------------- | ---------------------------------- |
| Collection Management | `create_and_open_collection` / `open_collection` / `get_collection_info` / `destroy_collection` | Create / open / delete collections |
| Document Operations | `insert_documents` / `upsert_documents` / `update_documents` / `delete_documents` / `fetch_documents` | CRUD operations |
| Vector Query | `vector_query` / `multi_vector_query` | Single / multi-vector search |
| Index Management | `create_index` / `drop_index` / `optimize_collection` | Index management |
| AI Embedding | `generate_dense_embedding` / `embedding_write` / `embedding_search` | Text embedding & search |
## Troubleshooting [#troubleshooting]
| Issue | Solution |
| -------------------- | ------------------------------------------------------------------- |
| Tools not showing | Check config file path, restart the client |
| Embedding errors | Verify `OPENAI_API_KEY` and environment variables |
| Collection not found | Open the collection first with `open_collection` |
| Dimension mismatch | Check the dimension definition in `get_collection_info` |
| No search results | Ensure data exists, index is built, and filter conditions are valid |
# Skills
MCP enables AI assistants to *operate* the vector database, but it doesn't understand Zvec's best practices — which index to use for which scenario? How to design a Schema properly? How should documents be chunked and stored? This kind of experiential knowledge cannot be obtained through tool calls alone.
Zvec Agent Skills injects Zvec domain knowledge into AI assistants, enabling them not only to call tools but also to think like a developer who is deeply familiar with Zvec. Once installed, you simply describe your business scenario and the AI will provide complete Schema designs, indexing strategies, and runnable code.
**GitHub**: [https://github.com/zvec-ai/zvec-agent-skills](https://github.com/zvec-ai/zvec-agent-skills)
**Prerequisites:** Install the Zvec SDK for your language (Python or Node.js) before using the skill.
## Installation [#installation]
### Install the Skill [#1-install-the-skill]
```bash
npx skills add github:zvec-ai/zvec-agent-skills --skill "zvec"
```
### Install Zvec Dependencies [#2-install-zvec-dependencies]
Choose the installation method based on your development language:
**Python:**
```bash
pip install zvec
```
**Node.js:**
```bash
npm install @zvec/zvec
```
## Using with Qoder/Claude [#using-with-qoderclaude]
### Starting a Conversation [#starting-a-conversation]
Qoder/Claude automatically detects installed skills. You can directly ask Zvec-related questions during a conversation:
```plain
I want to build a RAG document retrieval system using Zvec
```
```plain
How do I perform hybrid search (vector + filter conditions) with Zvec?
```
```plain
Help me create a Collection for storing product information with name, price, and vector fields
```
### Best Practices [#best-practices]
#### Specify Your Development Language [#1-specify-your-development-language]
When chatting with Qoder/Claude, start by stating your development language to get accurate code examples:
```plain
I'm using Python and want to implement semantic search with Zvec...
```
```plain
I need to use Zvec's multi-vector search in my Node.js project...
```
#### Describe Your Use Case [#2-describe-your-use-case]
Provide specific business scenarios so Qoder/Claude can give more targeted advice:
```plain
I need to build an e-commerce product search system with the following requirements:
- Support semantic search by product description
- Filter by price range and stock status
- Approximately 500K product records
```
#### Ask for Decision Guidance [#3-ask-for-decision-guidance]
For technology selection questions, you can directly ask Qoder/Claude for recommendations:
```plain
I have 5 million records — what index type should I use?
```
```plain
In a RAG system, how should documents be chunked and stored in Zvec?
```
## Typical Use Case Examples [#typical-use-case-examples]
### Scenario 1: RAG Document Retrieval System [#scenario-1-rag-document-retrieval-system]
**User input:**
```plain
I want to build a RAG document retrieval system using Python and Zvec for a technical support knowledge base.
The documents are in Markdown format and need to support semantic search.
```
**Qoder/Claude will provide:**
* Collection Schema design recommendations
* Document chunking strategy
* Vector generation and storage code
* Retrieval query examples
### Scenario 2: E-Commerce Product Search [#scenario-2-e-commerce-product-search]
**User input:**
```plain
I need to implement e-commerce product search in a Node.js project:
- Support semantic search on product names and descriptions
- Filter by price, category, and brand
- Support multimodal (image + text) search
```
**Qoder/Claude will provide:**
* Multi-field Schema definition
* Hybrid search (vector + scalar filtering) code
* Multi-vector query and weighted ranking examples
## Prompt Tips [#prompt-tips]
### Effective Question Templates [#effective-question-templates]
#### Template 1: Quick Start [#template-1-quick-start]
```plain
I'm a [Python/Node.js] developer and want to use Zvec for [use case].
Please give me a complete quick-start code example.
```
#### Template 2: Specific Problem [#template-2-specific-problem]
```plain
I'm having an issue with Zvec:
- Language: [Python/Node.js]
- Problem: [specific description]
- Current code: [relevant code snippet]
- Error message: [if any]
```
#### Template 3: Architecture Consultation [#template-3-architecture-consultation]
```plain
I need to design a [system description] using Zvec as the vector database.
- Data scale: [volume]
- Query types: [search/filter/hybrid]
- Performance requirements: [latency/throughput]
Please help me design the Schema and indexing strategy.
```
## Related Resources [#related-resources]
* [Zvec Documentation](/en/docs/db/)
* [Zvec Python API](/api-reference/python/)
* [Zvec Node.js API](/api-reference/nodejs/)
* [Zvec GitHub](https://github.com/alibaba/zvec)
# Building from Source
This section provides instructions on how to compile and install the project directly from the source code.
Building from source is recommended if you need to:
* 🧪 **Test** the latest unreleased features.
* 🐛 **Debug** issues at the source level.
* ⚙️ **Customize** the build for specific hardware or environments.
* 🤝 **Contribute** to the project development.
If you only need to use the stable version of the library, we recommend installing via package managers (e.g., `pip` or `npm`) instead.
# Node.js
This guide walks you through installing the Node.js SDK from source.
## Prerequisites [#prerequisites]
Before you begin, ensure your environment meets the following requirements:
* **Node.js**: Latest LTS version recommended
* **Compiler**: A C++17 compatible compiler
* **CMake**: `>=3.26, <4.0`
* **GNU Make**: Required to compile the native components
* **Platform**:
* **Linux** (ARM64/x86\_64)
* **macOS** (ARM64/x86\_64)
* **Windows** (x86\_64) — Note: Currently tested with MSVC 2022 (Visual Studio 17.0+) only
* **Git**: Required to clone the repository with submodules
## Install from Source [#install-from-source]
```bash
# Clone the repository
git clone --recurse-submodules https://github.com/zvec-ai/zvec-node.git
cd zvec-node
# Install dependencies
npm install
# Run the local packing script.
# This compiles the native code from source and generates a standalone tarball in the project root.
npm run pack-local
```
The repository uses **Git submodules**. Cloning may take a few minutes depending on your network.
If your **build environment** is in **Mainland China**, you can speed up third-party downloads (e.g., resources required by **Arrow**) by enabling the OSS mirror:
```bash
USE_OSS_MIRROR=ON npm run pack-local
```
# Python
This guide walks you through installing the Python SDK from source.
## Prerequisites [#prerequisites]
Before you begin, ensure your environment meets the following requirements:
* **Python**: Version 3.9 or higher (64-bit only)
* **Compiler**: A C++17 compatible compiler
* **CMake**: `>=3.26, <4.0`
* **Platform**:
* **Linux** (x86\_64/ARM64)
* **macOS** (x86\_64/ARM64)
* **Windows** (x86\_64) — Note: Currently tested with MSVC 2022 (Visual Studio 17.0+) only
* **Git**: Required to clone the repository with submodules
* **scikit-build** (installed automatically as a build dependency, but may require manual configuration in some environments)
## Install from Source [#install-from-source]
```bash
# Clone the repository
git clone --recurse-submodules https://github.com/alibaba/zvec.git
cd zvec
# Install from source
pip install .
```
The repository uses **Git submodules**. Cloning may take a few minutes depending on your network.
If your **build environment** is in **Mainland China**, you can speed up third-party downloads (e.g., resources required by **Arrow**) by enabling the OSS mirror:
```bash
USE_OSS_MIRROR=ON pip install .
```
## (Optional) Build Configuration [#optional-build-configuration]
### Build Directory [#build-directory]
If you encounter issues during the build process, try setting a custom build directory for **scikit-build**. This can help avoid cache inconsistencies and makes it easier to inspect detailed build logs:
```bash
export SKBUILD_BUILD_DIR=/tmp/build # Or other directory
pip install .
```
After the build attempt, you can examine the contents of **/tmp/build** (or your chosen directory) to review compiler output and diagnose errors.
### Build System [#build-system]
By default, **scikit-build** uses **Ninja** as the build system, which automatically compiles using all available CPU cores. To use **Unix Makefiles** instead, set:
```bash
export CMAKE_GENERATOR="Unix Makefiles"
pip install .
```
* When using **Make**, you need to manually configure parallel compilation to speed up the build:
```bash
# Option 1: Set parallel level via environment variable
export CMAKE_BUILD_PARALLEL_LEVEL=32
export CMAKE_GENERATOR="Unix Makefiles"
pip install .
# Option 2: Pass parallel flag via config settings
export CMAKE_GENERATOR="Unix Makefiles"
pip install . --config-settings=build.tool-args="-j$(nproc)"
```
# Destroy
Destroying a collection **permanently deletes it from disk**. This operation **cannot be undone**.
**Warning**: All data in the collection will be lost. Ensure you no longer need the collection or have created a backup before calling `destroy()`.
Python
Node.js
```python title="Destroy a collection"
import zvec
collection = zvec.open(path="/path/to/my/collection")
# Permanently delete the collection
collection.destroy() # [!code highlight]
```
```ts title="Destroy a collection"
import { ZVecCollection, ZVecOpen } from "@zvec/zvec";
const collection: ZVecCollection = ZVecOpen("/path/to/my/collection");
// Permanently delete the collection
collection.destroySync(); // [!code highlight]
```
After calling `destroy()`, the collection directory and its contents are removed from the filesystem.
Do not use the `collection` object afterward — it is no longer valid.
# Collections
A [**collection**](../concepts/data-modeling/#collections) is a named container for [documents](../concepts/data-modeling/#documents) in Zvec.
Think of a collection as a table in a relational database: it's where you **store, organize, and query your data**.
This section covers the operations for managing collections.
# Inspect
Once you've opened a collection, you can inspect its structure, configuration, and runtime state to better understand how it's organized and performing. This is especially helpful during development, debugging, or system monitoring.
Python
Node.js
```python title="Open a collection"
import zvec
# [!code word:collection]
collection = zvec.open(path="/your/specified/path/")
print(collection.schema) # View the schema [!code highlight]
```
```ts title="Open a collection"
import { ZVecCollection, ZVecOpen } from "@zvec/zvec";
// [!code word:collection]
const collection: ZVecCollection = ZVecOpen("/your/specified/path/");
console.log(collection.schema.toString()); // View the schema [!code highlight]
```
***
## Quick Reference [#quick-reference]
| Property | Description |
| ------------------- | -------------------------------------------------------------------------------- |
| `Collection.schema` | Collection structure and field definitions (e.g., vector dimensions, data types) |
| `Collection.stats` | Runtime metrics such as document count and index completeness |
| `Collection.option` | Runtime settings (e.g., read-only mode, memory mapping) |
| `Collection.path` | Filesystem path to the collection directory |
***
## Collection Schema [#collection-schema]
To view the [schema](../create/schema):
Python
Node.js
```python
print(collection.schema)
```
```ts
console.log(collection.schema.toString());
```
Python
Node.js
```json
// [!code word:fields]
// [!code word:vectors]
{
"name": "my_collection",
"fields": {
"price": {
"name": "price",
"data_type": "INT32",
"nullable": false,
"index_param": {
"enable_range_optimization": true,
"enable_extended_wildcard": false
}
},
"category": {
"name": "category",
"data_type": "ARRAY_STRING",
"nullable": true,
"index_param": {
"enable_range_optimization": false,
"enable_extended_wildcard": false
}
},
"image_url": {
"name": "image_url",
"data_type": "STRING",
"nullable": true,
"index_param": null
}
},
"vectors": {
"image_embedding": {
"name": "image_embedding",
"data_type": "VECTOR_FP32",
"dimension": 256,
"index_param": {
"type": "HNSW",
"metric_type": "COSINE",
"m": 50,
"ef_construction": 500,
"quantize_type": "UNDEFINED"
}
}
}
}
```
```bash
# [!code word:scalar]
# [!code word:vector]
CollectionSchema{
name: 'my_collection',
max_doc_count_per_segment: 10000000,
fields: [
FieldSchema[vector]{
name: 'image_embedding',
data_type: VECTOR_FP32,
dimension: 256,
index_params: HnswIndexParams{metric:COSINE,quantize:UNDEFINED,m:50,ef_construction:500}
},
FieldSchema[scalar]{
name: 'price',
data_type: INT32,
nullable: false,
index_params: InvertIndexParams{enable_range_optimization:true, enable_extended_wildcard:false}
},
FieldSchema[scalar]{
name: 'category',
data_type: ARRAY_STRING,
nullable: true,
index_params: InvertIndexParams{enable_range_optimization:false, enable_extended_wildcard:false}
},
FieldSchema[scalar]{
name: 'image_url',
data_type: STRING,
nullable: true,
index_params: null
}
]
}
```
1. `"name": "my_collection"`: The name of the collection.
2. **Scalar fields**:
* `"price"`: A **required** 32-bit integer, with inverted index and range query optimization enabled.
* `"category"`: An **optional** array of strings with an inverted index enabled; range query optimization is disabled (not meaningful for array types).
* `"image_url"`: An **optional** string, with no indexing applied.
If `index_param` is **non-null** for a scalar field, that field has an [inverted index](../../concepts/inverted-index/).
3. **Vector fields**:
* `"image_embedding"`: A **256-dimensional** floating-point vector indexed with [HNSW](../../concepts/vector-index/hnsw-index/) using cosine similarity and no quantization.
To view **scalar fields**:
Python
Node.js
```python
print(collection.schema.fields)
```
```ts
console.log(collection.schema.fields());
```
This will return an array of scalar fields.
Python
Node.js
```json
[{
"name": "price",
"data_type": "INT32",
"nullable": false,
"index_param": {
"enable_range_optimization": true,
"enable_extended_wildcard": false
}
}, {
"name": "category",
"data_type": "ARRAY_STRING",
"nullable": true,
"index_param": {
"enable_range_optimization": false,
"enable_extended_wildcard": false
}
}, {
"name": "image_url",
"data_type": "STRING",
"nullable": true,
"index_param": null
}]
```
```json
[
{
name: 'price',
dataType: 4,
nullable: false,
indexParams: {
indexType: 10,
enableRangeOptimization: true,
enableExtendedWildcard: false
}
},
{
name: 'category',
dataType: 41,
nullable: true,
indexParams: {
indexType: 10,
enableRangeOptimization: false,
enableExtendedWildcard: false
}
},
{ name: 'image_url', dataType: 2, nullable: true }
]
```
To view **vector fields**:
Python
Node.js
```python
print(collection.schema.vectors)
```
```ts
console.log(collection.schema.vectors());
```
This will return an array of vector fields.
Python
Node.js
```json
[{
"name": "image_embedding",
"data_type": "VECTOR_FP32",
"dimension": 256,
"index_param": {
"type": "HNSW",
"metric_type": "COSINE",
"m": 50,
"ef_construction": 500,
"quantize_type": "UNDEFINED"
}
}]
```
```json
[
{
name: 'image_embedding',
dataType: 23,
dimension: 256,
indexParams: {
indexType: 1,
metricType: 3,
m: 50,
efConstruction: 500,
quantizeType: 0
}
}
]
```
***
## Collection Statistics [#collection-statistics]
The `stats` property provides real-time operational insights:
Python
Node.js
```python
print(collection.stats)
```
```ts
console.log(collection.stats);
```
Python
Node.js
```json
{"doc_count":100, "index_completeness":{"image_embedding":1.000000}}
```
```json
{ docCount: 100, indexCompleteness: { image_embedding: 1 } }
```
1. `doc_count`: Total number of documents currently stored.
2. `index_completeness`: Fraction (0.0\~1.0) indicating how much of the vector data has been indexed. A value of 1.0 means indexing is complete.
***
## Collection Options [#collection-options]
Runtime behavior is governed by the options used when opening the collection:
Python
Node.js
```python
print(collection.option)
```
```ts
console.log(collection.options);
```
Python
Node.js
```json
{"enable_mmap":1, "read_only":0}
```
```json
{ readOnly: false, enableMMAP: true }
```
1. `enable_mmap: 1/true` → Memory-mapped I/O is enabled for faster access.
2. `read_only: 0/false` → The collection is open for both reads and writes.
***
## Collection Path [#collection-path]
The `path` property returns the on-disk location of the collection:
Python
Node.js
```python
print(collection.path)
```
```ts
console.log(collection.path);
```
```text
./my_collection/
```
This is the same path passed to `open()`.
# Open
To open an existing collection, use the `open()` function to load it from disk.
The specified path **must point to an existing Zvec collection**. If no valid collection is found, `open()` will raise an error.
## Usage [#usage]
Python
Node.js
```python title="Open a collection"
import zvec
existing_collection = zvec.open( # [!code highlight]
path="/path/to/my/collection",
option=zvec.CollectionOption(read_only=False, enable_mmap=True),
)
```
```ts title="Open a collection"
import { ZVecCollection, ZVecOpen } from "@zvec/zvec";
const existingCollection: ZVecCollection = ZVecOpen( // [!code highlight]
"/path/to/my/collection",
{ readOnly: false, enableMMAP: true }
);
```
## Parameters [#parameters]
* `path`: The filesystem path to the collection directory.
* `option`: Settings that control runtime behavior.
* `read_only`: Opens the collection in read-only mode. Attempts to write will raise an error.
Use read-only mode when sharing a collection across multiple processes — it ensures safe concurrent access without risking data corruption.
* `enable_mmap`: Uses memory-mapped I/O for faster access (defaults to `True`). This trades slightly higher memory cache usage for improved performance.
# Optimize
The `optimize()` method **improves search performance** by building the configured vector index from vectors accumulated in a temporary flat buffer. It runs **in the background** and **does not block reads or writes**, ensuring your application remains fully responsive.
***
## Why Optimization is Needed [#why-optimization-is-needed]
In Zvec, newly inserted vectors are **not added directly** to the configured vector index. Instead, they are first staged in a lightweight [flat index (brute-force)](../../concepts/vector-index/flat-index/) buffer.
This design choice offers important benefits — but also a trade-off:
* ✅ **Strengths**
* **Maximum write throughput**: Enables high-speed data ingestion.
* **Streaming inserts**: Supports real-time insertion for index types like [IVF](../../concepts/vector-index/ivf-index/) that don't natively allow incremental updates.
* ⚠️ **Trade-off**
* **Slower searches over time**: As the flat buffer grows, search performance degrades.
🔁 **Solution**
Call `optimize()` periodically. This triggers a background worker that merges the staged vectors into the configured vector index — **without interrupting ongoing reads or writes**. 🚀
`optimize()` **does not lock the collection**. Other threads and operations can continue reading, writing, and querying without delay while optimization is running — your application stays fully responsive.
***
## Usage Example [#usage-example]
Python
Node.js
```python title="Optimize a collection"
import zvec
collection = zvec.open(path="/path/to/my/collection")
# Insert some documents
for i in range(1000):
doc = zvec.Doc(id=f"doc_{i}", vectors={"embedding": [i + 0.1, i + 0.2, i + 0.3]})
collection.insert(doc)
# Optimize the collection
collection.optimize() # [!code highlight]
```
```ts title="Optimize a collection"
import { ZVecCollection, ZVecDocInput, ZVecOpen } from "@zvec/zvec";
const collection: ZVecCollection = ZVecOpen("/path/to/my/collection");
// Insert some documents
for (let i = 0; i < 1000; i++) {
const doc: ZVecDocInput = { id: `doc_${i}`, vectors: { embedding: [i + 0.1, i + 0.2, i + 0.3] } };
collection.insertSync(doc);
}
// Optimize the collection (sync)
collection.optimizeSync(); // [!code highlight]
// Optimize the collection (async)
await collection.optimize(); // [!code highlight]
```
***
## Check Indexing Status [#check-indexing-status]
Use the `stats` property to get real-time insights into your collection's indexing state:
Python
Node.js
```python
print(collection.stats)
```
```ts
console.log(collection.stats);
```
Python
Node.js
```json
{"doc_count":1000, "index_completeness":{"embedding":1.000000}}
```
```json
{ docCount: 1000, indexCompleteness: { embedding: 1 } }
```
1. `doc_count`: Total number of documents currently stored.
2. `index_completeness`: Fraction (0.0\~1.0) indicating how much of the vector data has been indexed.
* `1.0` → All vectors for that vector field are fully indexed using the configured index
* `0.0` → No indexing has occurred; all vectors remain in the flat buffer and are searched via brute force
* **Values in between** → Indexing is partial or in progress
***
## When to Call `optimize()` [#when-to-call-optimize]
Optimize **regularly — but not too often**:
* **Too infrequent** → Flat buffers grow large, degrading search performance
* **Too frequent** → Wastes resources optimizing small batches prematurely
Find a balance based on your **data ingestion rate** and **query latency requirements**.
**Best practice:**\
Check your collection's indexing status if searches feel slow.\
As a general guideline, consider optimizing when you have **100,000+ unindexed documents** — but adjust based on your specific use case.
# Schema Evolution
Zvec supports **dynamic schema evolution**, allowing you to modify a collection's structure after it has been created — without downtime, data re-ingestion, or reindexing.
You can:
* ✅ **Add or drop scalar fields**
* ✅ **Rename fields** or **change their data types** ((as long as the change is safe — e.g., from `INT32` to `INT64`)
* ✅ **Create or drop indexes on fields**
* ❌ Add or drop vector fields (🔜 coming soon)
***
## Data Definition Language (DDL) [#data-definition-language-ddl]
In Zvec, schema changes are performed using **Data Definition Language (DDL)** methods, grouped into two categories:
* **Column DDL**: defines *what data you store*.\
It manages the structure of your collection by [adding](#add-a-column), [removing](#drop-a-column), [renaming or altering](#alter-a-column) fields.
* **Index DDL**: defines *how you search that data*.\
It controls the [creation](#create-an-index) and [removal](#drop-an-index) of indexes on fields.
💡 **Indexing Rules in Zvec**
* **Every vector field must be indexed** using an appropriate [vector index](../../concepts/vector-index/) to enable similarity search.
* **Scalar fields are optionally indexed** — but you should build [inverted indexes](../../concepts/inverted-index/) on any scalar field you plan to use in filtering queries (e.g., `WHERE category = 'music'`).
***
## Prerequisites [#prerequisites]
This guide assumes you have opened a collection and have a `collection` object ready.
This example collection includes a scalar field `publish_year`.
Python
Node.js
```python title="Open a collection"
import zvec
collection_schema = zvec.CollectionSchema( # [!code highlight]
name="example_collection",
# [!code word:publish_year]
fields=[zvec.FieldSchema(name="publish_year", data_type=zvec.DataType.INT64)],
vectors=[
zvec.VectorSchema(
name="dense_embedding",
data_type=zvec.DataType.VECTOR_FP32,
dimension=768,
index_param=zvec.HnswIndexParam(metric_type=zvec.MetricType.COSINE),
),
],
)
collection = zvec.open(path="/path/to/collection") # [!code highlight]
```
```ts title="Open a collection"
import { ZVecCollection, ZVecCollectionSchema, ZVecDataType, ZVecIndexType, ZVecMetricType, ZVecOpen } from "@zvec/zvec";
const collectionSchema: ZVecCollectionSchema = new ZVecCollectionSchema({ // [!code highlight]
name: "example_collection",
// [!code word:publish_year]
fields: [{ name: "publish_year", dataType: ZVecDataType.INT64 }],
vectors: [
{
name: "dense_embedding",
dataType: ZVecDataType.VECTOR_FP32,
dimension: 768,
indexParams: { indexType: ZVecIndexType.HNSW, metricType: ZVecMetricType.COSINE },
}
]
});
const collection: ZVecCollection = ZVecOpen("/path/to/collection"); // [!code highlight]
```
***
## Column DDL [#column-ddl]
### Add a Column [#add-a-column]
To add a new scalar field to an existing collection, use `add_column()`:
Python
Node.js
```python title="Add a column"
import zvec
new_field = zvec.FieldSchema(name="rating", data_type=zvec.DataType.INT32)
collection.add_column(field_schema=new_field, expression="5") # [!code highlight]
```
```ts title="Add a column"
import { ZVecCollection, ZVecDataType, ZVecFieldSchema, ZVecOpen } from "@zvec/zvec";
const newField: ZVecFieldSchema = { name: "rating", dataType: ZVecDataType.INT32 };
collection.addColumnSync({ fieldSchema: newField, expression: "5" }); // [!code highlight]
```
* `field_schema`:\
Defines the name and data type of the new field. See [scalar field schema](../create/schema/#scalar-fields-step) for details.
* `expression`:\
Specifies the default value for existing documents. Since they don't already have a `rating` field, Zvec uses this `expression` to fill in the missing values — in this case, setting `rating = 5` for all current documents.
Currently, only **numerical scalar fields** can be added via `add_column()`. Support for `string` and `boolean` types is coming soon.\
Accordingly, the `expression` must evaluate to a number — it can be a single numerical literal (like `"5"`) or a simple arithmetic expression involving existing numerical fields (e.g., `"publish_year + 1"`).
### Drop a Column [#drop-a-column]
To permanently remove a scalar field, use `drop_column()`:
Python
Node.js
```python title="Drop a column"
# [!code word:drop_column]
collection.drop_column(field_name="publish_year")
```
```ts title="Drop a column"
// [!code word:dropColumnSync]
collection.dropColumnSync("publish_year");
```
This **deletes the field and all its data from every document** in the collection. The operation is **irreversible**.
### Alter a Column [#alter-a-column]
To rename a column or update its schema, use `alter_column()`:
Python
Node.js
```python title="Alter a column"
# Rename
collection.alter_column(old_name="publish_year", new_name="release_year") # [!code highlight]
# Change type (if compatible)
updated = zvec.FieldSchema(name="rating", data_type=zvec.DataType.FLOAT)
collection.alter_column(field_schema=updated) # [!code highlight]
```
```ts title="Alter a column"
// Rename
collection.alterColumnSync({ columnName: "publish_year", newColumnName: "release_year" }); // [!code highlight]
// Change type (if compatible)
const updated: ZVecFieldSchema = { name: "rating", dataType: ZVecDataType.FLOAT };
collection.alterColumnSync({ columnName: "rating", fieldSchema: updated }); // [!code highlight]
```
### View the Current Schema [#view-the-current-schema]
After making changes, you can always check your collection's current structure by printing its schema:
Python
Node.js
```python title="View the current schema"
print(collection.schema)
```
```ts title="View the current schema"
console.log(collection.schema.toString());
```
See [schema example](../inspect/#collection-schema) for more details.
## Index DDL [#index-ddl]
### Create an Index [#create-an-index]
To accelerate search performance, you can create (or replace) indexes on both **vector** and **scalar** fields using `create_index()`:
Python
Node.js
```python title="Create an index"
import zvec
# Replace the existing HNSW index with a FLAT index
collection.create_index( # [!code highlight]
field_name="dense_embedding",
index_param=zvec.FlatIndexParam(metric_type=zvec.MetricType.COSINE),
)
# Create an inverted index
collection.create_index( # [!code highlight]
field_name="publish_year",
index_param=zvec.InvertIndexParam(),
)
```
```ts title="Create an index"
// Replace the existing HNSW index with a FLAT index
collection.createIndexSync({ // [!code highlight]
fieldName: "dense_embedding",
indexParams: { indexType: ZVecIndexType.FLAT, metricType: ZVecMetricType.COSINE }
});
// Create an inverted index
collection.createIndexSync({ // [!code highlight]
fieldName: "publish_year",
indexParams: { indexType: ZVecIndexType.INVERT }
});
```
* **Vector fields** must use one of the following index types:
* [`HnswIndexParam`](../../concepts/vector-index/hnsw-index/#index-time-parameters)
* [`HnswRabitqIndexParam`](../../concepts/vector-index/hnsw-rabitq-index/#index-time-parameters)
* [`IVFIndexParam`](../../concepts/vector-index/ivf-index/#index-time-parameters)
* `FlatIndexParam`
* **Scalar fields** use `InvertIndexParam` to enable efficient filtering.
### Drop an Index [#drop-an-index]
To remove an index from a scalar field, use `drop_index()`:
Python
Node.js
```python title="Drop an index"
# [!code word:drop_index]
collection.drop_index(field_name="publish_year")
```
```ts title="Drop an index"
// [!code word:dropIndexSync]
collection.dropIndexSync("publish_year");
```
**It is not allowed to drop the index of a vector field**.\
In Zvec, every vector field must always have exactly one index to support similarity search.
# Data Modeling
In Zvec, data is organized into **collections** and **documents**.
***
## Collections [#collections]
A **collection** is a named container for [documents](#documents) — similar to a **table** in a relational database system such as MySQL, where each **document** represents a **row** in a table. A collection is where you store, organize, and query your data.
Every collection is governed by a **schema** that defines the scalar fields and vectors it contains, along with their [types](#data-types) and [indexing settings](#indexes).
 **All documents within a collection conform to the same schema**.
The collection schema in Zvec is **dynamic**: you can add or remove scalar fields and vectors at any time without recreating the collection.
**No cross-collection queries**: Joins, unions, or multi-collection searches are **not supported**. Design your data model accordingly.
### Why Use Collections? [#why-use-collections]
Collections provide **isolation** by ensuring that each use case operates with its own dedicated schema and index configuration. This separation prevents interference between unrelated use cases and allows each to evolve independently.
For example:
* A **Retrieval-Augmented Generation (RAG) collection** might store text embeddings together with metadata — such as title, section, source URL, and last-updated timestamp.
* An **image search collection** could hold high-dimensional image embeddings along with associated fields like image ID, file path, or caption.
### Persistence [#persistence]
* **Each collection is persisted independently on disk in its own dedicated directory**, providing isolation between different use cases.
* Each collection is **self-contained within its directory**. This means you can relocate a collection's directory and Zvec will still be able to open it when provided with the correct path.
***
## Documents [#documents]
A document is the fundamental unit of data storage — think of it as a single record or row in a relational database table. Each document lives inside a [collection](#collections) and must conform to that collection's schema.
### Structure of a Document [#structure-of-a-document]
A document is a **structured** object composed of three core components.
* 🔑 `id`: A unique string identifier for the document, cannot be changed after insertion
* 📐 `vectors`: A named set of vectors
* 🗂️ `fields`: A named set of scalar (non-vector) fields, which can include strings, numbers, booleans, or arrays of these types
### Example Document [#example-document]
This document belongs to a collection with a schema that defines:
1. Two dense vector: `vector_1` (4-dimensional) and `vector_2` (6-dimensional)
2. One sparse vector: `vector_3`
3. Scalar fields: `category` (string), `price` (integer), and `languages` (array of strings)
```json
{
// Unique identifier for this document
// [!code word:id]
"id": "my_doc_123",
// A named set of vectors
// [!code word:vectors]
"vectors": {
// A 4-dimensional dense vector, represented as a list
"vector_1": [ 0.1, 0.2, 0.3, 0.4 ],
// A 6-dimensional dense vector, represented as a list
"vector_2": [ -0.6, -0.5, -0.4, -0.3, -0.2, -0.1 ],
// A sparse vector, represented as a map
"vector_3": { 11: 0.02, 37: 0.41, 1701: 0.13 }
},
// A named set of scalar fields
// [!code word:fields]
"fields": {
"category": "music", // A string field
"price": 99, // A numeric field
"languages": [ "English", "Chinese", "Korean" ] // An array field
}
}
```
**All fields must conform to their declared types in the schema**. Vectors must exactly match the specified type (dense or sparse) and dimensionality (e.g., a 768-dimensional dense vector cannot accept a 512-dimensional vector).
Once inserted, documents can be updated via [`upsert()`](../../data-operations/upsert/) or partial [`update()`](../../data-operations/update/) operations, but all modifications must still adhere to the collection's schema constraints.
***
## Data Types [#data-types]
Zvec uses a strongly typed schema system based on the `DataType` enumeration. The supported types fall into two categories:
1. **Scalar types** — strings, integers, floats, booleans, and arrays of these types
2. **Vector types** — dense or sparse numeric representations for vector embeddings
**Type safety is enforced at ingestion**: every field within a document must strictly conform to its declared `DataType`.
### Scalar Types [#scalar-types]
* Elementary Types
| `STRING` | `BOOL` | `INT32` | `INT64` | `UINT32` | `UINT64` | `FLOAT` | `DOUBLE` |
| -------- | ------ | ------- | ------- | -------- | -------- | ------- | -------- |
* Array Types
| `ARRAY_STRING` | `ARRAY_BOOL` | `ARRAY_INT32` | `ARRAY_INT64` | `ARRAY_UINT32` | `ARRAY_UINT64` | `ARRAY_FLOAT` | `ARRAY_DOUBLE` |
| -------------- | ------------ | ------------- | ------------- | -------------- | -------------- | ------------- | -------------- |
Arrays cannot contain mixed types or nested structures. All elements must match the declared array element type.
### Vector Types [#vector-types]
* [Dense Vector](../vector-embedding/#dense-vectors): represented as fixed-length numeric arrays, e.g., `[0.1, -0.5, ..., 0.9]`
| `VECTOR_FP16` | `VECTOR_FP32` | `VECTOR_INT8` |
| ------------- | ------------- | ------------- |
* [Sparse Vector](../vector-embedding/#sparse-vectors): represented as maps from integer indices to float values, e.g., `{ 42: 0.85, 1024: 0.13 }`
| `SPARSE_VECTOR_FP32` | `SPARSE_VECTOR_FP16` |
| -------------------- | -------------------- |
***
## Indexes [#indexes]
Indexes accelerate data retrieval beyond basic storage of scalar fields and vectors. In Zvec:
* **Every vector field must be indexed** using an appropriate [vector index](../vector-index/) to enable similarity search.
* **Scalar fields are optionally indexed** — but you should build [inverted indexes](../inverted-index/) on any scalar field you plan to use in filtering queries (e.g., `WHERE category = 'music'`).
You can define indexes at [collection creation](../../collections/create/) by specifying `index_param` in the schema for each field or vector.\
Alternatively, you can add indexes after collection creation by calling [`create_index()`](../../collections/schema-evolution/#create-an-index) dynamically — no data re-ingestion required.
Python
Node.js
```python title="Create a collection"
import zvec
# Define the collection schema with one scalar field and one vector field, both
# configured with indexes via "index_param".
# [!code word:index_param]
schema = zvec.CollectionSchema( # [!code highlight]
name="my_collection",
fields=[
zvec.FieldSchema(
name="price",
data_type=zvec.DataType.INT32,
index_param=zvec.InvertIndexParam(enable_range_optimization=True),
),
],
vectors=[
zvec.VectorSchema(
name="vector",
data_type=zvec.DataType.VECTOR_FP32,
dimension=256,
index_param=zvec.HnswIndexParam(metric_type=zvec.MetricType.COSINE),
),
],
)
collection = zvec.create_and_open(path="/path/to/my/collection", schema=schema) # [!code highlight]
```
```ts title="Create a collection"
import { ZVecCollectionSchema, ZVecCreateAndOpen, ZVecDataType, ZVecIndexType, ZVecMetricType } from "@zvec/zvec";
// Define the collection schema with one scalar field and one vector field, both
// configured with indexes via "indexParams".
// [!code word:indexParams]
const schema = new ZVecCollectionSchema( // [!code highlight]
{
name: "my_collection",
fields: [
{
name: "price",
dataType: ZVecDataType.INT32,
indexParams: { indexType: ZVecIndexType.INVERT, enableRangeOptimization: true }
}
],
vectors: [
{
name: "vector",
dataType: ZVecDataType.VECTOR_FP32,
dimension: 256,
indexParams: { indexType: ZVecIndexType.HNSW, metricType: ZVecMetricType.COSINE }
}
],
}
);
const collection = ZVecCreateAndOpen("/path/to/my/collection", schema); // [!code highlight]
```
# Full-Text Index
A full-text index is a data structure designed for ***efficient keyword-based search over text content***.
It breaks text fields into terms (tokens), builds an inverted mapping from terms to documents, and uses BM25 scoring to return results **ranked by relevance** — without scanning every document.
## When to Use a Full-Text Index [#when-to-use-a-full-text-index]
Use a full-text index when you need to **search text content by keywords and rank results by relevance**. It excels in scenarios such as:
* ✅ Natural language queries: users type everyday language to find content
* ✅ Exact phrase matching: `"vector database"` matches the complete phrase, not individual words
* ✅ Boolean retrieval: `+machine -neural` to require or exclude specific terms
* ✅ Multi-language support: built-in tokenizers for English-like languages and Chinese
* ✅ Text-only use cases: build a full-text search collection with no vector fields at all
How does this differ from an [inverted index](../inverted-index/)? An **inverted index** accelerates exact-value filtering on scalar fields (e.g., `status = "active"`), while a **full-text index** tokenizes text content for keyword retrieval with relevance ranking.
## How Does It Work? [#how-does-it-work]
Imagine you have a collection of articles:
| Doc ID | Content |
| ------ | ------------------------------------------------------------ |
| 1 | Training and optimizing machine learning models |
| 2 | Applications of deep learning in natural language processing |
| 3 | Combining vector databases with machine learning |
**All documents within a collection conform to the same schema**.
The collection schema in Zvec is **dynamic**: you can add or remove scalar fields and vectors at any time without recreating the collection.
**No cross-collection queries**: Joins, unions, or multi-collection searches are **not supported**. Design your data model accordingly.
### Why Use Collections? [#why-use-collections]
Collections provide **isolation** by ensuring that each use case operates with its own dedicated schema and index configuration. This separation prevents interference between unrelated use cases and allows each to evolve independently.
For example:
* A **Retrieval-Augmented Generation (RAG) collection** might store text embeddings together with metadata — such as title, section, source URL, and last-updated timestamp.
* An **image search collection** could hold high-dimensional image embeddings along with associated fields like image ID, file path, or caption.
### Persistence [#persistence]
* **Each collection is persisted independently on disk in its own dedicated directory**, providing isolation between different use cases.
* Each collection is **self-contained within its directory**. This means you can relocate a collection's directory and Zvec will still be able to open it when provided with the correct path.
***
## Documents [#documents]
A document is the fundamental unit of data storage — think of it as a single record or row in a relational database table. Each document lives inside a [collection](#collections) and must conform to that collection's schema.
### Structure of a Document [#structure-of-a-document]
A document is a **structured** object composed of three core components.
* 🔑 `id`: A unique string identifier for the document, cannot be changed after insertion
* 📐 `vectors`: A named set of vectors
* 🗂️ `fields`: A named set of scalar (non-vector) fields, which can include strings, numbers, booleans, or arrays of these types
### Example Document [#example-document]
This document belongs to a collection with a schema that defines:
1. Two dense vector: `vector_1` (4-dimensional) and `vector_2` (6-dimensional)
2. One sparse vector: `vector_3`
3. Scalar fields: `category` (string), `price` (integer), and `languages` (array of strings)
```json
{
// Unique identifier for this document
// [!code word:id]
"id": "my_doc_123",
// A named set of vectors
// [!code word:vectors]
"vectors": {
// A 4-dimensional dense vector, represented as a list
"vector_1": [ 0.1, 0.2, 0.3, 0.4 ],
// A 6-dimensional dense vector, represented as a list
"vector_2": [ -0.6, -0.5, -0.4, -0.3, -0.2, -0.1 ],
// A sparse vector, represented as a map
"vector_3": { 11: 0.02, 37: 0.41, 1701: 0.13 }
},
// A named set of scalar fields
// [!code word:fields]
"fields": {
"category": "music", // A string field
"price": 99, // A numeric field
"languages": [ "English", "Chinese", "Korean" ] // An array field
}
}
```
**All fields must conform to their declared types in the schema**. Vectors must exactly match the specified type (dense or sparse) and dimensionality (e.g., a 768-dimensional dense vector cannot accept a 512-dimensional vector).
Once inserted, documents can be updated via [`upsert()`](../../data-operations/upsert/) or partial [`update()`](../../data-operations/update/) operations, but all modifications must still adhere to the collection's schema constraints.
***
## Data Types [#data-types]
Zvec uses a strongly typed schema system based on the `DataType` enumeration. The supported types fall into two categories:
1. **Scalar types** — strings, integers, floats, booleans, and arrays of these types
2. **Vector types** — dense or sparse numeric representations for vector embeddings
**Type safety is enforced at ingestion**: every field within a document must strictly conform to its declared `DataType`.
### Scalar Types [#scalar-types]
* Elementary Types
| `STRING` | `BOOL` | `INT32` | `INT64` | `UINT32` | `UINT64` | `FLOAT` | `DOUBLE` |
| -------- | ------ | ------- | ------- | -------- | -------- | ------- | -------- |
* Array Types
| `ARRAY_STRING` | `ARRAY_BOOL` | `ARRAY_INT32` | `ARRAY_INT64` | `ARRAY_UINT32` | `ARRAY_UINT64` | `ARRAY_FLOAT` | `ARRAY_DOUBLE` |
| -------------- | ------------ | ------------- | ------------- | -------------- | -------------- | ------------- | -------------- |
Arrays cannot contain mixed types or nested structures. All elements must match the declared array element type.
### Vector Types [#vector-types]
* [Dense Vector](../vector-embedding/#dense-vectors): represented as fixed-length numeric arrays, e.g., `[0.1, -0.5, ..., 0.9]`
| `VECTOR_FP16` | `VECTOR_FP32` | `VECTOR_INT8` |
| ------------- | ------------- | ------------- |
* [Sparse Vector](../vector-embedding/#sparse-vectors): represented as maps from integer indices to float values, e.g., `{ 42: 0.85, 1024: 0.13 }`
| `SPARSE_VECTOR_FP32` | `SPARSE_VECTOR_FP16` |
| -------------------- | -------------------- |
***
## Indexes [#indexes]
Indexes accelerate data retrieval beyond basic storage of scalar fields and vectors. In Zvec:
* **Every vector field must be indexed** using an appropriate [vector index](../vector-index/) to enable similarity search.
* **Scalar fields are optionally indexed** — but you should build [inverted indexes](../inverted-index/) on any scalar field you plan to use in filtering queries (e.g., `WHERE category = 'music'`).
You can define indexes at [collection creation](../../collections/create/) by specifying `index_param` in the schema for each field or vector.\
Alternatively, you can add indexes after collection creation by calling [`create_index()`](../../collections/schema-evolution/#create-an-index) dynamically — no data re-ingestion required.
Python
Node.js
```python title="Create a collection"
import zvec
# Define the collection schema with one scalar field and one vector field, both
# configured with indexes via "index_param".
# [!code word:index_param]
schema = zvec.CollectionSchema( # [!code highlight]
name="my_collection",
fields=[
zvec.FieldSchema(
name="price",
data_type=zvec.DataType.INT32,
index_param=zvec.InvertIndexParam(enable_range_optimization=True),
),
],
vectors=[
zvec.VectorSchema(
name="vector",
data_type=zvec.DataType.VECTOR_FP32,
dimension=256,
index_param=zvec.HnswIndexParam(metric_type=zvec.MetricType.COSINE),
),
],
)
collection = zvec.create_and_open(path="/path/to/my/collection", schema=schema) # [!code highlight]
```
```ts title="Create a collection"
import { ZVecCollectionSchema, ZVecCreateAndOpen, ZVecDataType, ZVecIndexType, ZVecMetricType } from "@zvec/zvec";
// Define the collection schema with one scalar field and one vector field, both
// configured with indexes via "indexParams".
// [!code word:indexParams]
const schema = new ZVecCollectionSchema( // [!code highlight]
{
name: "my_collection",
fields: [
{
name: "price",
dataType: ZVecDataType.INT32,
indexParams: { indexType: ZVecIndexType.INVERT, enableRangeOptimization: true }
}
],
vectors: [
{
name: "vector",
dataType: ZVecDataType.VECTOR_FP32,
dimension: 256,
indexParams: { indexType: ZVecIndexType.HNSW, metricType: ZVecMetricType.COSINE }
}
],
}
);
const collection = ZVecCreateAndOpen("/path/to/my/collection", schema); // [!code highlight]
```
# Full-Text Index
A full-text index is a data structure designed for ***efficient keyword-based search over text content***.
It breaks text fields into terms (tokens), builds an inverted mapping from terms to documents, and uses BM25 scoring to return results **ranked by relevance** — without scanning every document.
## When to Use a Full-Text Index [#when-to-use-a-full-text-index]
Use a full-text index when you need to **search text content by keywords and rank results by relevance**. It excels in scenarios such as:
* ✅ Natural language queries: users type everyday language to find content
* ✅ Exact phrase matching: `"vector database"` matches the complete phrase, not individual words
* ✅ Boolean retrieval: `+machine -neural` to require or exclude specific terms
* ✅ Multi-language support: built-in tokenizers for English-like languages and Chinese
* ✅ Text-only use cases: build a full-text search collection with no vector fields at all
How does this differ from an [inverted index](../inverted-index/)? An **inverted index** accelerates exact-value filtering on scalar fields (e.g., `status = "active"`), while a **full-text index** tokenizes text content for keyword retrieval with relevance ranking.
## How Does It Work? [#how-does-it-work]
Imagine you have a collection of articles:
| Doc ID | Content |
| ------ | ------------------------------------------------------------ |
| 1 | Training and optimizing machine learning models |
| 2 | Applications of deep learning in natural language processing |
| 3 | Combining vector databases with machine learning |
### Tokenization [#1-tokenization]
The full-text index first splits text into tokens using a configured tokenizer. With the default standard tokenizer:
| Doc ID | Tokens |
| ------ | --------------------------------------------------------------- |
| 1 | `[training, optimizing, machine, learning, models]` |
| 2 | `[applications, deep, learning, natural, language, processing]` |
| 3 | `[combining, vector, databases, machine, learning]` |
### Token Filtering [#2-token-filtering]
After tokenization, the full-text index applies token filters in the configured order. For example:
* `lowercase`: converts tokens to lowercase for case-insensitive matching.
The same tokenizer and filter configuration is used for both indexing and querying, so choose the text analysis strategy when defining the field.
### Building the Inverted Map [#3-building-the-inverted-map]
The tokenized results are inverted into a mapping from each term to its list of documents:
| Term | Doc IDs |
| --------- | ----------- |
| machine | `[1, 3]` |
| learning | `[1, 2, 3]` |
| models | `[1]` |
| deep | `[2]` |
| vector | `[3]` |
| databases | `[3]` |
| ... | ... |
### BM25 Scoring [#4-bm25-scoring]
When you query "machine learning", the index locates documents containing those terms — `[1, 2, 3]` — then scores each document using the [BM25](https://en.wikipedia.org/wiki/Okapi_BM25) algorithm.
BM25 ranks results based on three factors:
| Factor | Effect |
| ------------------------------------ | ------------------------------------------------------------------------------------------ |
| **Term Frequency (TF)** | More occurrences of the term in a document yield a higher score (with diminishing returns) |
| **Inverse Document Frequency (IDF)** | Rarer terms across the collection receive higher weight |
| **Document Length** | Shorter documents score relatively higher for the same term |
### WAND Optimization [#5-wand-optimization]
When a query contains multiple terms (e.g., "machine learning models"), the full-text index uses the **WAND (Weak AND)** algorithm to optimize retrieval:
1. Pre-compute a score upper bound for each term
2. Skip documents that cannot enter the top-k results
3. Use a Block-Max strategy that operates on blocks of 128 documents for fast skipping
This enables efficient top-k retrieval on large datasets without fully scoring every candidate document.
## Tokenizers [#tokenizers]
Tokenizers determine how text is split into terms, directly affecting retrieval quality. The same tokenizer configuration is used for both indexing and querying. See [Tokenizers](../../data-operations/query/fts/#tokenizers) for configuration details.
## Key Parameters [#key-parameters]
### Index-Time Parameters [#index-time-parameters]
| Parameter | Description | Tuning Guidance |
| ---------------- | -------------------------------------------------------- | --------------------------------------------------------------------------------------------------------------------------------------------------------------------------------------------------------------------------------------------------------------- |
| `tokenizer_name` | **Tokenizer** used to split text into searchable tokens | Use `standard` for English-like text; it implements Unicode UAX #29 word boundaries and behaves similarly to Elasticsearch's standard tokenizer. Use `whitespace` when separators are already meaningful, and `jieba` for Chinese or mixed Chinese/English text |
| `filters` | **Token filters** applied in sequence after tokenization | For English text, use `["lowercase", "stemmer"]`; for English-like text or text with diacritics, you can also add `ascii_folding` for accent-insensitive matching |
| `extra_params` | **Tokenizer- and filter-specific JSON configuration** | See the configuration sections for each tokenizer and token filter |
### Query-Time Parameters [#query-time-parameters]
| Parameter | Description | Tuning Guidance |
| -------------------------------------- | ------------------------------------------------------------------------ | ----------------------------------------------------------------------------- |
| `match_string` / `matchString` | **Natural-language query text** that is tokenized by the field tokenizer | Use for simple user-entered search text |
| `query_string` / `queryString` | **Structured query expression** with phrases and boolean operators | Use when callers need explicit required, excluded, grouped, or phrase terms |
| `default_operator` / `defaultOperator` | **Default boolean operator** for adjacent bare terms | Use `OR` for broader recall, or `AND` when every bare term should be required |
## Full-Text Index vs. Vector Index [#full-text-index-vs-vector-index]
Full-text indexes and vector indexes address **different dimensions** of retrieval:
| Aspect | Full-Text Index | Vector Index |
| ---------------- | ------------------------------------- | ------------------------------------------------ |
| Matching | Exact keyword matching | Semantic similarity |
| Input | Text keywords | Vector embeddings |
| Ranking | BM25 score | Distance / similarity |
| Typical use case | "Documents containing these keywords" | "Documents semantically similar to this content" |
In Zvec, full-text search and vector search are **mutually exclusive within one query route**: a single `Query` / `ZVecQuery` should not set both `fts` and `vector` / `id`. To combine keyword matching with semantic retrieval, use separate query routes with re-ranking, or run separate queries and merge the results in your application.
## Trade-offs [#trade-offs]
* ⚠️ **Storage overhead**: The inverted map, term frequencies, and position data require additional storage.
* ⚠️ **Write amplification**: Every write operation requires tokenization and index updates, adding write latency.
* ⚠️ **Tokenizer dependency**: Retrieval quality depends on tokenizer choice — for example, Chinese text requires the Jieba tokenizer rather than the default standard tokenizer.
# Concepts
This section introduces key terms and foundational ideas that underpin the design and usage of Zvec.
# Inverted Index
An inverted index is a data structure used to store and organize information for ***efficient value-based search and retrieval***.
It is widely used in database systems, search engines, and analytics platforms to **accelerate filtering operations and keyword matching**.
## When to Use an Inverted Index [#when-to-use-an-inverted-index]
Use an inverted index when your workload involves **frequent lookups based on specific field values**. It excels in scenarios such as:
* ✅ Exact-value filtering:
* `status = "active"`
* `category IN ("electronics", "books")`
* ✅ Range queries:
* `age > 25`
* ✅ Text pattern matching:
* Starts with: `product_name LIKE "Wireless%"`
* Ends with: `email LIKE "%@engineering.company.com"`
* ✅ Array or set membership queries:
* Contains any: `tags CONTAIN_ANY ["sport", "music"]`
* Contains all: `permissions CONTAIN_ALL ["read", "write"]`
## How Does It Work? [#how-does-it-work]
Imagine you're organizing a collection of recipes. Each recipe is a `document` with structured fields `cuisine`, `author`, and `url`.
| Doc ID | Cuisine | Author | URL |
| ------ | ------- | ----------- | --------------------------------------------- |
| 1 | Italian | Julia Chen | `https://cooking.com/italian-pasta-carbonara` |
| 2 | Thai | Liam Tran | `https://cooking.com/thai-basil-42` |
| 3 | Mexican | Elena Gomez | `https://cooking.com/mexican-pork-chicken-65` |
| 4 | Italian | Marco Rossi | `https://cooking.com/italian-pizza-37` |
| 5 | Italian | Marco Rossi | `https://cooking.com/italian-pasta-20` |
| 6 | Chinese | Julia Chen | `https://cooking.com/chinese-spicy-hot-pot` |
A regular (or "forward") view asks:
> What values does document #1 contain? → Cuisine: Italian, Author: Julia Chen
But an **inverted index flips this around**. Instead, it answers:
> Which documents contain the value Italian? → \[1, 4, 5]
To enable fast lookups, we build inverted indexes for **fields that are frequently searched** — like `cuisine` and `author`.
**Inverted Index: `cuisine`**
| Cuisine | Doc IDs |
| ------- | ----------- |
| Italian | `[1, 4, 5]` |
| Thai | `[2]` |
| Mexican | `[3]` |
| Chinese | `[6]` |
**Inverted Index: `author`**
| Author | Doc IDs |
| ----------- | -------- |
| Julia Chen | `[1, 6]` |
| Liam Tran | `[2]` |
| Elena Gomez | `[3]` |
| Marco Rossi | `[4, 5]` |
With these indexes in place, queries become extremely efficient ✨:
* "Find all Italian recipes" → look up "Italian" in the `cuisine` index → `[1, 4, 5]`
* "Show recipes by Marco Rossi" → look up "Marco Rossi" in the `author` index → `[4, 5]`
* "Find Italian recipes by Julia Chen" → intersect `[1, 4, 5]` and `[1, 6]` → `[1]`
We **do not index** `url`, because it's rarely used in queries. Indexing it would waste storage and slow down writes, with little benefit. Once we have a document ID, we can always fetch its `url` directly from the original data.
## Why "inverted"? [#why-inverted]
Because it inverts the standard mapping:
| Direction | Mapping |
| --------- | --------------------------- |
| Forward | Document ID → List of Terms |
| Inverted | Term → List of Document IDs |
This inversion is what makes keyword-based search efficient. Instead of checking every document to see if it contains your query term, you jump straight to the term and get all matching documents immediately.
## Trade-offs [#trade-offs]
While powerful, inverted indexes come with costs:
* ⚠️ **Storage overhead**: The index requires additional storage space.
* ⚠️ **Write amplification**: Every write operation — `INSERT`, `UPSERT`, and `UPDATE` — require index maintenance, which adds latency to writes and increases I/O load.
# Vector Embedding
## What is a Vector? [#what-is-a-vector]
In the context of AI and vector databases, ***a vector is a list of numbers generated by embedding models to capture the semantic essence of unstructured data*** — such as text, images, or audio.
These models transform raw input into a high-dimensional space where ***semantically similar items produce similar vectors***, enabling AI systems to compare meaning rather than relying on exact word matches.
***
## How Do You Use Vectors with a Database? [#how-do-you-use-vectors-with-a-database]
1. 🗂️ **Store**: Generate embeddings from your data — documents, product images, or user profiles — and save them in the vector database.
2. 🔍 **Search**: When a new query arrives (a question, photo, etc.), generate a **query vector** using the same embedding model, then ask the database to find the most similar vectors.
Using [efficient indexes](../vector-index/), the database quickly returns relevant results — even at large scale. This is the foundation of semantic search: **finding what ***means*** the same, not just what ***says*** the same**.
***
## How Vectors Power Real-World Applications? [#how-vectors-power-real-world-applications]
**Image search** is a great example:
* Each image is converted into a vector that captures its visual features — such as shape, color, and object type.
* Images that are **visually or semantically similar end up with nearby vectors**.
By comparing these vectors, search systems can:
* ✅ **Recognize the same person across different photos**: Even with changes in lighting, pose, or expression, images of one individual generate similar vectors, allowing the system to match identities reliably.
* ✅ **Find look-alike products in e-commerce platforms**: When a user snaps a photo of a dress, lamp, or sofa, the system compares its vector to product vectors and retrieves items with similar appearance or style.
All of this happens through fast vector similarity comparisons, powered by the vector database.
 ***
## What is an Embedding Model? [#what-is-an-embedding-model]
An embedding model is an AI model that converts raw data into vector embeddings — illustrated in the [diagram](#vector-embedding-diagram) at the top.
These models learn patterns from vast amounts of training data so that objects with similar meanings produce vectors that are close together in vector space — typically measured using distance metrics such as **cosine similarity**, **dot product**, or **Euclidean distance**.
**The choice of distance metric matters.** If an embedding model was trained for a specific metric (e.g., cosine similarity), the vector database should use the same metric during search to preserve semantic relationships and achieve optimal accuracy.
To explore and compare state-of-the-art embedding models, you can check out the [Embedding Leaderboard on Hugging Face](https://huggingface.co/spaces/mteb/leaderboard), which evaluates hundreds of models across diverse tasks and languages.
***
## Types of Vectors [#types-of-vectors]
Vector representations are primarily categorized into two types: ***dense*** and ***sparse***, each capturing data in its own way.
### Dense Vectors [#dense-vectors]
Dense vectors are fixed-length, real-valued embeddings where (nearly) every dimension carries semantic information. These vectors are often generated by deep learning models that transform raw inputs (e.g., text, images, audio) into a structured vector space reflecting their semantic similarities.
```python
# Example: 384-dimensional dense vector from a neural network model
dense_vector = [ 0.012, -0.034, 0.005, 0.041, -0.022, ..., 0.018 ] # Length = 384
```
* **✅ Semantic-Rich**: understands context and meaning (e.g., "king – man + woman ≈ queen")
* **⚠️ Opaque**: hard to interpret which features drive similarity
### Sparse Vectors [#sparse-vectors]
Sparse vectors are high-dimensional, often vocabulary-sized representations in which only a small subset of dimensions are non-zero. Each active dimension corresponds to a specific term (e.g., a word or n-gram), weighted by relevance scores such as **BM25**.
In this model, every document is converted into a vector — called a document vector — that records which terms appear in it and how important they are. Similarly, a search query is also turned into a sparse vector using the same weighting scheme.
Rather than relying on exact keyword matches, similarity between a query and a document is computed using the dot product of their vectors. This measures how well their weighted terms align: documents that contain the same important terms as the query receive higher scores — rewarding both **term overlap** and **term importance**.
```python
# Example: Sparse vector over a vocabulary of 50,000 terms, stored as {term: weight}
sparse_vector = {
"puppy": 2.31,
"dog": 1.85,
"pet": 1.12,
"animal": 0.76
}
# The remaining ~49,996 dimensions are implicitly zero.
```
For computational efficiency, sparse vectors use integer indices to map terms to their positions within a vocabulary dictionary rather than storing the term strings directly.
```python
# Vocabulary mapping, containing around 50,000 unique terms, indexed by integer IDs
vocab = {
"animal": 124,
"dog": 309,
"pet": 1822,
"puppy": 4017,
"cat": 5001,
"kitten": 7890,
# ... (many other terms fill the rest of the dictionary)
# Total size ≈ 50,000
}
# Sparse vector stored as {index: weight}
sparse_vector = {
4017: 2.31, # "puppy"
309: 1.85, # "dog"
1822: 1.12, # "pet"
124: 0.76 # "animal"
}
# The remaining ~49,996 dimensions are implicitly zero.
```
* **✅ Interpretable**: non-zero dimensions map directly to known terms (e.g., `4017` → "puppy")
* **⚠️ Lacks Semantic Understanding**: treats "car" and "automobile" as unrelated unless explicitly linked
# Delete
Zvec provides two ways to delete [documents](../../concepts/data-modeling/#documents). Choose the method that best fits your use case:
| Method | Input | When to Use |
| -------------------- | ------------------------------------------------- | ---------------------------------------------------------------------------------------------------------- |
| `delete()` | One or more document `id`s | Use when you know the exact ID(s) of the documents you want to delete |
| `delete_by_filter()` | A filter expression (e.g., `publish_year < 1900`) | Use for bulk deletion based on field values — ideal for cleaning up documents that match specific criteria |
Delete operations are **immediate** and **irreversible**.\
Always double-check your input before running a delete operation.
***
## Delete by IDs [#delete-by-ids]
Assume you've already opened a collection and have a `collection` object ready.
Python
Node.js
```python title="Open a collection"
import zvec
collection = zvec.open(path="/path/to/example/collection") # [!code highlight]
```
```ts title="Open a collection"
import { ZVecCollection, ZVecOpen } from "@zvec/zvec";
const collection: ZVecCollection = ZVecOpen("/path/to/example/collection"); // [!code highlight]
```
Use `delete()` to remove one or more documents when you know their exact IDs.
Python
Node.js
```python title="Delete documents by IDs"
# Delete a single document
result = collection.delete(ids="doc_id_1") # [!code highlight]
print(result) # {"code":0} means success
# Delete multiple documents at once
result = collection.delete(ids=["doc_id_2", "doc_id_3"]) # [!code highlight]
print(result) # [{"code":0}, {"code":0}]
```
```ts title="Delete documents by IDs"
// Delete a single document
let result = collection.deleteSync("doc_id_1"); // [!code highlight]
console.log(result); // { ok: true } means success
// Delete multiple documents at once
let results = collection.deleteSync(["doc_id_2", "doc_id_3"]); // [!code highlight]
console.log(results); // [ { ok: true }, { ok: true } ]
```
* When given a single `id`, `delete()` returns one `Status` object.
* When given a list of `id`s, it returns a list of `Status` objects in the same order.
***
## Delete by Filter Condition [#delete-by-filter-condition]
Use `delete_by_filter()` to remove all documents that match a boolean `filter` expression.
The `filter` can reference scalar fields (e.g., `publish_year`, `language`) using [comparison and logical operators](../query/filter/#supported-filter-syntax).
Python
Node.js
```python title="Delete documents by filter condition"
# Delete all books published before 1900
collection.delete_by_filter(filter="publish_year < 1900") # [!code highlight]
# Combined filter
collection.delete_by_filter( # [!code highlight]
filter='publish_year < 1900 AND (language = "English" OR language = "Chinese")'
)
```
```ts title="Delete documents by filter condition"
// Delete all books published before 1900 (sync)
collection.deleteByFilterSync("publish_year < 1900"); // [!code highlight]
// Delete all books published before 1900 (async)
await collection.deleteByFilter("publish_year < 1900"); // [!code highlight]
// Combined filter
collection.deleteByFilterSync('publish_year < 1900 AND (language = "English" OR language = "Chinese")'); // [!code highlight]
```
# Fetch
Use `fetch()` to retrieve [documents](../../concepts/data-modeling/#documents) by their `id`s.\
This is a **direct lookup** — no search, scoring, or filtering is involved.
Python
Node.js
```python title="Fetch documents"
# [!code word:fetch]
# Fetch a single document
result = collection.fetch(ids="book_1")
print(result) # { "book_1": Doc(...) }
# Fetch multiple documents
result = collection.fetch(ids=["book_1", "book_2", "book_3"])
print(result) # { "book_1": Doc(...), "book_2": Doc(...), "book_3": Doc(...) }
```
```ts title="Fetch documents"
// [!code word:fetchSync]
// Fetch a single document
let result = collection.fetchSync("book_1");
console.log(result); // { "book_1": {...} }
// Fetch multiple documents
let results = collection.fetchSync(["book_1", "book_2", "book_3"]);
console.log(results); // { "book_1": {...}, "book_2": {...}, "book_3": {...} }
```
* **Input**: A single document `id` or a list of document `id`s.
* **Output**: A mapping from each **found** `id` to its corresponding document object.
* Missing `id`s are **silently omitted** from the result (no error raised).
* The returned dictionary does not guarantee input order — access documents by `id` instead.
# Data Operations
Zvec provides a complete set of **data manipulation operations** to manage [documents](../concepts/data-modeling/#documents) in your [collection](../collections/).
| Operation | Purpose |
| ----------------------- | -------------------------------------------------------------------------------------------------------------- |
| [`Insert`](./insert/) | Add new documents (fails if the document `ID` already exists) |
| [`Upsert`](./upsert/) | Insert new documents or replace existing ones by `ID` |
| [`Update`](./update/) | Modify specific fields of existing documents by `ID` |
| [`Delete`](./delete/) | Delete documents by `ID` or using a scalar filter condition |
| [`Query`](./query/) | Perform vector similarity search or full-text search, optionally combined with scalar filtering and re-ranking |
| [`Fetch`](./fetch/) | Retrieve full documents directly by `ID` |
| [`Iterate`](./iterate/) | Stream every document one by one without loading the whole collection into memory |
All write operations (`insert`, `upsert`, `update`, `delete`) are immediately visible for querying — enabling true real-time, streaming workloads.
# Insert
Use the **`insert()`** method to add one or more new [documents](../../concepts/data-modeling/#documents) (`Doc`) to a [collection](../../collections/).
**Performance Tip**:\
New vectors are initially buffered for fast ingestion. For optimal search performance, call [`optimize()`](../../collections/optimize/) after inserting a large batch of documents.
***
## Document `Doc` [#document-doc]
Each `Doc` passed to `insert()` must:
* Have a unique `id` (not already present in the collection)
* Provide data that matches the collection's [schema](../../collections/create/schema/):
1. **Scalar fields**: provided as key–value pairs under `fields` (scalar field names as keys)
2. **Vector embeddings**: provided as key–value pairs under `vectors` (vector names as keys)
* You can omit `nullable` scalar fields if a document doesn't have a value for them
If a document with the same `id` already exists in the collection, the insertion will **fail** for that document.\
To overwrite existing documents or insert without checking, use [`upsert()`](../upsert/) instead.
***
## Insert a Single Document [#insert-a-single-document]
Assume you already have a collection with the following schema:
* A scalar field: `text` (string)
* A [dense vector embedding](../../concepts/vector-embedding/#dense-vectors): `text_embedding` (4-dimensional FP32 vector)
The 4-dimensional vector is for demonstration only — real-world embeddings are usually much larger.
You've also opened the collection and have a `collection` object ready.
Python
Node.js
```python title="Open a collection"
import zvec
collection_schema = zvec.CollectionSchema( # [!code highlight]
name="example_collection",
fields=[
zvec.FieldSchema(
name="text",
data_type=zvec.DataType.STRING,
index_param=zvec.InvertIndexParam(enable_range_optimization=False),
),
],
vectors=[
zvec.VectorSchema(
name="text_embedding",
data_type=zvec.DataType.VECTOR_FP32,
dimension=4,
index_param=zvec.HnswIndexParam(metric_type=zvec.MetricType.COSINE),
),
],
)
collection = zvec.open(path="/path/to/example/collection") # [!code highlight]
```
```ts title="Open a collection"
import { ZVecCollection, ZVecCollectionSchema, ZVecDataType, ZVecIndexType, ZVecMetricType, ZVecOpen } from "@zvec/zvec";
const collectionSchema: ZVecCollectionSchema = new ZVecCollectionSchema({ // [!code highlight]
name: "example_collection",
fields: [
{
name: "text",
dataType: ZVecDataType.STRING,
indexParams: {
indexType: ZVecIndexType.INVERT,
enableRangeOptimization: false
}
}
],
vectors: [
{
name: "text_embedding",
dataType: ZVecDataType.VECTOR_FP32,
dimension: 4,
indexParams: {
indexType: ZVecIndexType.HNSW,
metricType: ZVecMetricType.COSINE
}
}
]
});
const collection: ZVecCollection = ZVecOpen("/path/to/example/collection"); // [!code highlight]
```
Now, insert a document like this:
Python
Node.js
```python title="Insert a document"
import zvec
# Create a document
doc = zvec.Doc( # [!code highlight]
id="text_1", # ← must be unique
vectors={
"text_embedding": [0.1, 0.2, 0.3, 0.4], # ← must match the vector name
# ↑ list of floats; list length = dimension (4)
},
fields={
"text": "This is a sample text.", # ← must match the scalar field name
},
)
# Insert the document
result = collection.insert(doc) # [!code highlight]
print(result) # {"code": 0} means success
```
```ts title="Insert a document"
import { ZVecCollection, ZVecDocInput, ZVecOpen } from "@zvec/zvec";
// Create a document
let doc: ZVecDocInput = { // [!code highlight]
id: "text_1", // ← must be unique
vectors: {
"text_embedding": [0.1, 0.2, 0.3, 0.4] // ← must match the vector name
// ↑ list of floats; list length = dimension (4)
},
fields: {
"text": "This is a sample text." // ← must match the scalar field name
}
};
// Insert the document
let result = collection.insertSync(doc); // [!code highlight]
console.log(result); // { ok: true } means success
```
The `insert()` method validates the document first:
* **Incorrect usage** — such as an unknown field or wrong vector dimension — **raises an error**.
* **If validation passes**, the method proceeds with the insertion and returns a `Status` object indicating success or failure (e.g., duplicate `ID`, insufficient disk space).
Successfully inserted documents are immediately available for querying 🚀.
***
## Insert a Batch of Documents [#insert-a-batch-of-documents]
To insert multiple documents at once, pass a list of `Doc` objects to `insert()`.\
Each `Doc` is processed independently, and the method returns a list of `Status` objects — one per document.
Python
Node.js
```python title="Insert a batch of documents"
import zvec
result = collection.insert( # [!code highlight]
[
zvec.Doc(
id="text_1",
vectors={"text_embedding": [0.1, 0.2, 0.3, 0.4]},
fields={"text": "This is a sample text."},
),
zvec.Doc(
id="text_2",
vectors={"text_embedding": [0.4, 0.3, 0.2, 0.1]},
fields={"text": "This is another sample text."},
),
zvec.Doc(
id="text_3",
vectors={"text_embedding": [-0.1, -0.2, -0.3, -0.4]},
fields={"text": "One more sample text."},
),
]
)
print(result) # [{"code":0}, {"code":0}, {"code":0}]
```
```ts title="Insert a batch of documents"
let result = collection.insertSync([ // [!code highlight]
{
id: "text_1",
vectors: { "text_embedding": [0.1, 0.2, 0.3, 0.4] },
fields: { "text": "This is a sample text." },
},
{
id: "text_2",
vectors: { "text_embedding": [0.4, 0.3, 0.2, 0.1] },
fields: { "text": "This is another sample text." },
},
{
id: "text_3",
vectors: { "text_embedding": [-0.1, -0.2, -0.3, -0.4] },
fields: { "text": "One more sample text." },
}
]);
console.log(result); // [ { ok: true }, { ok: true }, { ok: true } ]
```
If any document in the batch has incorrect usage (e.g., an unknown field or wrong vector dimension), the method raises an exception and **no documents are inserted**.
If all documents are valid, the method attempts to insert every one. A failure in one (e.g., duplicate `id`) does **not** stop others from being inserted.
🔍 **Always check each `Status` in the result list.**
***
## Insert Documents with Sparse Vectors [#insert-documents-with-sparse-vectors]
Assume your collection includes a [sparse vector](../../concepts/vector-embedding/#sparse-vectors) named `sparse_embedding`.
Python
Node.js
```python title="Open a collection"
import zvec
collection_schema = zvec.CollectionSchema( # [!code highlight]
name="example_collection",
vectors=[
zvec.VectorSchema(
name="sparse_embedding",
data_type=zvec.DataType.SPARSE_VECTOR_FP32,
index_param=zvec.HnswIndexParam(metric_type=zvec.MetricType.IP),
),
],
)
collection = zvec.open(path="/path/to/example/collection") # [!code highlight]
```
```ts title="Open a collection"
import { ZVecCollection, ZVecCollectionSchema, ZVecDataType, ZVecIndexType, ZVecMetricType, ZVecOpen } from "@zvec/zvec";
const collectionSchema: ZVecCollectionSchema = new ZVecCollectionSchema({ // [!code highlight]
name: "example_collection",
vectors: [
{
name: "sparse_embedding",
dataType: ZVecDataType.SPARSE_VECTOR_FP32,
indexParams: { indexType: ZVecIndexType.HNSW, metricType: ZVecMetricType.IP }
}
]
});
const collection: ZVecCollection = ZVecOpen("/path/to/example/collection"); // [!code highlight]
```
Insert a document with a sparse vector like this:
Python
Node.js
```python title="Insert a document with a sparse vector"
import zvec
result = collection.insert( # [!code highlight]
zvec.Doc(
id="text_1",
vectors={
"sparse_embedding": {
42: 1.25, # ← dimension 42 has weight 1.25
1337: 0.8, # ← dimension 1337 has weight 0.8
2999: 0.63, # ← dimension 2999 has weight 0.63
}
},
)
)
print(result) # {"code":0}
```
```ts title="Insert a document with a sparse vector"
let result = collection.insertSync({ // [!code highlight]
id: "text_1",
vectors: {
"sparse_embedding": {
42: 1.25, // ← dimension 42 has weight 1.25
1337: 0.8, // ← dimension 1337 has weight 0.8
2999: 0.63 // ← dimension 2999 has weight 0.63
}
}
});
console.log(result); // { ok: true }
```
A sparse vector is represented as a mapping from `dimension indices` (integers) to `values` (floats).\
There is **no fixed dimension size** — only non-zero dimensions need to be included.
***
## Insert Documents with Multiple Fields and Vectors [#insert-documents-with-multiple-fields-and-vectors]
Real-world applications often require collections with multiple scalar fields and vector embeddings. In this example, assume your collection includes the following schema:
* **Scalar fields**:
1. `book_title` (string)
2. `category` (array of strings)
3. `publish_year` (32-bit integer)
* **Vector embeddings**:
1. `dense_embedding`: a 768-dimensional dense vector
2. `sparse_embedding`: a sparse vector
Python
Node.js
```python title="Open a collection"
import zvec
collection_schema = zvec.CollectionSchema( # [!code highlight]
name="example_collection",
fields=[
zvec.FieldSchema(
name="book_title",
data_type=zvec.DataType.STRING,
index_param=zvec.InvertIndexParam(enable_range_optimization=False),
),
zvec.FieldSchema(
name="category",
data_type=zvec.DataType.ARRAY_STRING,
),
zvec.FieldSchema(
name="publish_year",
data_type=zvec.DataType.INT32,
index_param=zvec.InvertIndexParam(enable_range_optimization=True),
),
],
vectors=[
zvec.VectorSchema(
name="dense_embedding",
data_type=zvec.DataType.VECTOR_FP32,
dimension=768,
index_param=zvec.HnswIndexParam(metric_type=zvec.MetricType.COSINE),
),
zvec.VectorSchema(
name="sparse_embedding",
data_type=zvec.DataType.SPARSE_VECTOR_FP32,
index_param=zvec.HnswIndexParam(metric_type=zvec.MetricType.IP),
),
],
)
collection = zvec.open(path="/path/to/example/collection") # [!code highlight]
```
```ts title="Open a collection"
import { ZVecCollection, ZVecCollectionSchema, ZVecDataType, ZVecIndexType, ZVecMetricType, ZVecOpen } from "@zvec/zvec";
const collectionSchema: ZVecCollectionSchema = new ZVecCollectionSchema({ // [!code highlight]
name: "example_collection",
fields: [
{
name: "book_title",
dataType: ZVecDataType.STRING,
indexParams: { indexType: ZVecIndexType.INVERT, enableRangeOptimization: false }
},
{
name: "category",
dataType: ZVecDataType.ARRAY_STRING
},
{
name: "publish_year",
dataType: ZVecDataType.INT32,
indexParams: { indexType: ZVecIndexType.INVERT, enableRangeOptimization: true }
}
],
vectors: [
{
name: "dense_embedding",
dataType: ZVecDataType.VECTOR_FP32,
dimension: 768,
indexParams: { indexType: ZVecIndexType.HNSW, metricType: ZVecMetricType.COSINE }
},
{
name: "sparse_embedding",
dataType: ZVecDataType.SPARSE_VECTOR_FP32,
indexParams: { indexType: ZVecIndexType.HNSW, metricType: ZVecMetricType.IP }
}
]
});
const collection: ZVecCollection = ZVecOpen("/path/to/example/collection"); // [!code highlight]
```
Insert a document with multiple fields and vectors like this:
Python
Node.js
```python title="Insert a document with multiple fields and vectors"
import zvec
# Create a document
doc = zvec.Doc( # [!code highlight]
id="book_1",
vectors={
"dense_embedding": [0.1 for _ in range(768)], # ← use real embedding in practice
"sparse_embedding": {42: 1.25, 1337: 0.8, 1999: 0.64}, # ← use real embedding in practice
},
fields={
"book_title": "Gone with the Wind", # ← string
"category": ["Romance", "Classic Literature"], # ← array of strings
"publish_year": 1936, # ← integer
},
)
# Insert the document
result = collection.insert(doc) # [!code highlight]
print(result) # {"code": 0} means success
```
```ts title="Insert a document with multiple fields and vectors"
// Create a document
let doc: ZVecDocInput = { // [!code highlight]
id: "book_1",
vectors: {
"dense_embedding": Array(768).fill(0.1), // ← use real embedding in practice
"sparse_embedding": { 42: 1.25, 1337: 0.8, 1999: 0.64 } // ← use real embedding in practice
},
fields: {
"book_title": "Gone with the Wind", // ← string
"category": ["Romance", "Classic Literature"], // ← array of strings
"publish_year": 1936 // ← integer
}
};
// Insert the document
let result = collection.insertSync(doc); // [!code highlight]
console.log(result); // { ok: true } means success
```
# Iterate
Use **`iter_docs()`** to stream **all** [documents](../../concepts/data-modeling/#documents) in a [collection](../../collections/) one by one.
Unlike [`fetch()`](../fetch/) — which retrieves documents by known `id`s — iteration performs a **full scan**. Documents are streamed in bounded windows, so the whole collection is never materialized in memory at once — making it suitable for export, backup, migration, or offline processing.
Python
Node.js
```python title="Iterate over all documents"
# [!code word:iter_docs]
with collection.iter_docs() as docs:
for doc in docs:
print(doc.id, doc.fields, doc.vectors)
```
```ts title="Iterate over all documents"
// [!code word:iterDocsSync]
for (const doc of collection.iterDocsSync()) {
console.log(doc.id, doc.fields, doc.vectors);
}
```
The iterator holds a native resource slot on the collection, so let the language close it for you: Python's `with` statement and JavaScript's `for...of` loop both release the iterator when the loop finishes, breaks early, or raises an exception. Iterators also close themselves automatically when fully exhausted.
***
## Select Fields and Vectors [#select-fields-and-vectors]
By default, every scalar field and every vector is materialized for each document. Use `output_fields` and `include_vector` to reduce the amount of data read:
* **`output_fields`** (`outputFields`): a list of scalar field names to return. If omitted, all scalar fields are returned; an empty list returns no scalar fields. Unknown or duplicate names raise an error.
* **`include_vector`** (`includeVector`): whether to materialize vector data. Vectors are included by default; disable it when you only need scalar fields — skipping vectors makes traversal faster.
Python
Node.js
```python title="Select output fields and exclude vectors"
with collection.iter_docs( # [!code highlight]
output_fields=["book_title", "publish_year"],
include_vector=False,
) as docs:
for doc in docs:
print(doc.id, doc.field("book_title"), doc.field("publish_year"))
```
```ts title="Select output fields and exclude vectors"
for (const doc of collection.iterDocsSync({ // [!code highlight]
outputFields: ["book_title", "publish_year"],
includeVector: false
})) {
console.log(doc.id, doc.fields.book_title, doc.fields.publish_year);
}
```
***
## Snapshot Semantics [#snapshot-semantics]
Both `iter_docs()` and `iterDocsSync()` iterate over an **isolated snapshot taken at call time**:
* Data written **after** the iterator is created — inserts, upserts, updates — is **not visible** to this iterator.
* Deletes made after creation do not affect the iteration; documents already deleted when the snapshot was taken are filtered out.
* On a writable collection, creating the iterator may seal the current writing segment (each call can produce a new small segment); read-only collections are scanned directly without any write.
* Iteration order is unspecified — it is **not** insertion order, and it can change after [`optimize()`](../../collections/optimize/) reorganizes segments — so never rely on it.
***
## Concurrency [#concurrency]
While any iterator is open on a collection, these operations **raise an error**:
* Schema changes — creating or dropping an index, adding, altering or dropping a column
* [`optimize()`](../../collections/optimize/), which fails at its start
* Closing or destroying the collection
Conversely, creating an iterator fails while one of those maintenance operations is already running. Writes, `flush()`, `query()` and `fetch()` remain **unaffected**.
Close every iterator before closing the collection. These restrictions are lifted as soon as all open iterators are closed.
***
## Break Early [#break-early]
Stopping before the end is safe — exiting the `with` block or the `for...of` loop releases the iterator's slot. When you drive the iterator manually instead, close it yourself:
Python
Node.js
```python title="Stop iteration early"
with collection.iter_docs() as docs:
for doc in docs:
if doc.field("publish_year") == 1936:
print("found:", doc.id)
break # the with-block closes the iterator here
```
```ts title="Stop iteration early"
for (const doc of collection.iterDocsSync()) {
if (doc.fields.publish_year === 1936) {
console.log("found:", doc.id);
break; // for...of closes the iterator here
}
}
// Driving the iterator manually? Close it yourself.
const docs = collection.iterDocsSync();
const first = docs.next();
if (!first.done) console.log("first:", first.value.id);
docs.closeSync(); // [!code highlight]
```
# Update
Use `update()` to modify **existing** [documents](../../concepts/data-modeling/#documents) (`Doc`).
Only the scalar fields and vector embeddings you **include will be updated**; all other content remains unchanged.
The method accepts either a single `Doc` object or a list of `Doc` objects.
***
## Document `Doc` [#document-doc]
Each `Doc` passed to `update()` must:
* Specify an `id` that **already exists** in the collection (the operation will fail if the document is not found)
* Include only the fields and vectors you **intend to update**, formatted according to the collection's [schema](../../collections/create/schema/):
1. **Scalar fields**: provided as key–value pairs under `fields` (scalar field names as keys)
2. **Vector embeddings**: provided as key–value pairs under `vectors` (vector names as keys)
* Omit any scalar fields or vectors you do not want to change — they will be left untouched.
***
## Update a Single Document [#update-a-single-document]
Assume you already have a collection with the following schema:
* **Scalar fields**:
1. `book_title` (string)
2. `category` (array of strings)
3. `publish_year` (32-bit integer)
* **Vector embeddings**:
1. `dense_embedding`: a 768-dimensional dense vector
2. `sparse_embedding`: a sparse vector
Python
Node.js
```python title="Open a collection"
import zvec
collection_schema = zvec.CollectionSchema( # [!code highlight]
name="example_collection",
fields=[
zvec.FieldSchema(
name="book_title",
data_type=zvec.DataType.STRING,
index_param=zvec.InvertIndexParam(enable_range_optimization=False),
),
zvec.FieldSchema(
name="category",
data_type=zvec.DataType.ARRAY_STRING,
),
zvec.FieldSchema(
name="publish_year",
data_type=zvec.DataType.INT32,
index_param=zvec.InvertIndexParam(enable_range_optimization=True),
),
],
vectors=[
zvec.VectorSchema(
name="dense_embedding",
data_type=zvec.DataType.VECTOR_FP32,
dimension=768,
index_param=zvec.HnswIndexParam(metric_type=zvec.MetricType.COSINE),
),
zvec.VectorSchema(
name="sparse_embedding",
data_type=zvec.DataType.SPARSE_VECTOR_FP32,
index_param=zvec.HnswIndexParam(metric_type=zvec.MetricType.IP),
),
],
)
collection = zvec.open(path="/path/to/example/collection") # [!code highlight]
```
```ts title="Open a collection"
import { ZVecCollection, ZVecCollectionSchema, ZVecDataType, ZVecIndexType, ZVecMetricType, ZVecOpen } from "@zvec/zvec";
const collectionSchema: ZVecCollectionSchema = new ZVecCollectionSchema({ // [!code highlight]
name: "example_collection",
fields: [
{
name: "book_title",
dataType: ZVecDataType.STRING,
indexParams: { indexType: ZVecIndexType.INVERT, enableRangeOptimization: false }
},
{
name: "category",
dataType: ZVecDataType.ARRAY_STRING
},
{
name: "publish_year",
dataType: ZVecDataType.INT32,
indexParams: { indexType: ZVecIndexType.INVERT, enableRangeOptimization: true }
}
],
vectors: [
{
name: "dense_embedding",
dataType: ZVecDataType.VECTOR_FP32,
dimension: 768,
indexParams: { indexType: ZVecIndexType.HNSW, metricType: ZVecMetricType.COSINE }
},
{
name: "sparse_embedding",
dataType: ZVecDataType.SPARSE_VECTOR_FP32,
indexParams: { indexType: ZVecIndexType.HNSW, metricType: ZVecMetricType.IP }
}
]
});
const collection: ZVecCollection = ZVecOpen("/path/to/example/collection"); // [!code highlight]
```
To update an existing document, provide its `id` and only the fields or vectors you want to change:
Python
Node.js
```python title="Update a document"
import zvec
doc = zvec.Doc( # [!code highlight]
id="book_1", # ← must already exist in the collection
vectors={
"sparse_embedding": { # ← replaces entire sparse vector
35: 0.25,
237: 0.1,
369: 0.44,
},
},
fields={
"category": [ # ← replaces current category list
"Romance",
"Classic Literature",
"American Civil War",
],
},
# Note: `book_title`, `publish_year`, and `dense_embedding` are omitted → they stay as-is
)
# Update the document
result = collection.update(doc) # [!code highlight]
print(result) # {"code": 0} means success
```
```ts title="Update a document"
let doc: ZVecDocInput = { // [!code highlight]
id: "book_1", // ← must already exist in the collection
vectors: {
"sparse_embedding": { // ← replaces entire sparse vector
35: 0.25,
237: 0.1,
369: 0.44
}
},
fields: {
"category": [ // ← replaces current category list
"Romance",
"Classic Literature",
"American Civil War"
]
}
// Note: `book_title`, `publish_year`, and `dense_embedding` are omitted → they stay as-is
};
// Update the document
let result = collection.updateSync(doc); // [!code highlight]
console.log(result); // { ok: true } means success
```
The `update()` method validates the document first:
* **Incorrect usage** — such as an unknown field or wrong vector dimension — **raises an error**.
* **If validation passes**, the method proceeds with the update and returns a `Status` object indicating success or failure (e.g., non-existing `ID`).
Successfully updated documents are immediately available for querying 🚀.
***
## Update a Batch of Documents [#update-a-batch-of-documents]
To update multiple documents at once, pass a list of `Doc` objects to `update()`.\
Each `Doc` is processed independently, and the method returns a list of `Status` objects — one per document.
Python
Node.js
```python title="Update a batch of documents"
import zvec
results = collection.update( # [!code highlight]
[
zvec.Doc(
id="book_1",
vectors={
"sparse_embedding": {35: 0.25, 237: 0.1, 369: 0.44},
},
fields={
"category": ["Romance", "Classic Literature", "American Civil War"],
},
),
zvec.Doc(
id="book_2",
fields={
"book_title": "The Great Gatsby",
},
),
zvec.Doc(
id="book_3",
fields={
"book_title": "A Tale of Two Cities",
"publish_year": 1859,
},
),
]
)
print(results) # [{"code":0}, {"code":0}, {"code":0}]
```
```ts title="Update a batch of documents"
let result = collection.updateSync([ // [!code highlight]
{
id: "book_1",
vectors: { "sparse_embedding": { 35: 0.25, 237: 0.1, 369: 0.44 } },
fields: { "category": ["Romance", "Classic Literature", "American Civil War"] }
},
{
id: "book_2",
fields: { "book_title": "The Great Gatsby" }
},
{
id: "book_3",
fields: {
"book_title": "A Tale of Two Cities",
"publish_year": 1859
}
}
]);
console.log(result); // [ { ok: true }, { ok: true }, { ok: true } ]
```
If any document in the batch has incorrect usage (e.g., an unknown field or wrong vector dimension), the method raises an exception and **no documents are updated**.
If all documents are valid, the method attempts to update every one. A failure in one (e.g., the `id` doesn't exist) does **not** stop others from being updated.
🔍 **Always check each `Status` in the result list.**
# Upsert
`upsert()` works similar to `insert()` — it adds one or more new [documents](../../concepts/data-modeling/#documents) (`Doc`) to a [collection](../../collections/).
The key difference is that if a document with the same `id` already exists, it will be **overwritten**.
* Use `upsert()` if you want to overwrite an existing document (or don't mind replacing it).
* Use `insert()` if you want to avoid accidentally overwriting a document — `insert()` will fail if a document with the same id already exists.
**Performance Tip**:\
New vectors are initially buffered for fast ingestion. For optimal search performance, call [`optimize()`](../../collections/optimize/) after upserting a large batch of documents.
***
## Document `Doc` [#document-doc]
Each `Doc` passed to `upsert()` must:
* Have an `id` (if a document with the same `id` already exists, it will be replaced)
* Provide data that matches the collection's [schema](../../collections/create/schema/#define-a-collection-schema):
1. **Scalar fields**: provided as key–value pairs under `fields` (scalar field names as keys)
2. **Vector embeddings**: provided as key–value pairs under `vectors` (vector names as keys)
* You can omit `nullable` scalar fields if a document doesn't have a value for them
***
## Upsert a Single Document [#upsert-a-single-document]
Assume you already have a collection with the following schema:
* A scalar field: `text` (string)
* A [dense vector embedding](../../concepts/vector-embedding/#dense-vectors): `text_embedding` (4-dimensional FP32 vector)
The 4-dimensional vector is for demonstration only — real-world embeddings are usually much larger.
You've also opened the collection and have a `collection` object ready.
Python
Node.js
```python title="Open a collection"
import zvec
collection_schema = zvec.CollectionSchema( # [!code highlight]
name="example_collection",
fields=[
zvec.FieldSchema(
name="text",
data_type=zvec.DataType.STRING,
index_param=zvec.InvertIndexParam(enable_range_optimization=False),
),
],
vectors=[
zvec.VectorSchema(
name="text_embedding",
data_type=zvec.DataType.VECTOR_FP32,
dimension=4,
index_param=zvec.HnswIndexParam(metric_type=zvec.MetricType.COSINE),
),
],
)
collection = zvec.open(path="/path/to/example/collection") # [!code highlight]
```
```ts title="Open a collection"
import { ZVecCollection, ZVecCollectionSchema, ZVecDataType, ZVecIndexType, ZVecMetricType, ZVecOpen } from "@zvec/zvec";
const collectionSchema: ZVecCollectionSchema = new ZVecCollectionSchema({ // [!code highlight]
name: "example_collection",
fields: [
{
name: "text",
dataType: ZVecDataType.STRING,
indexParams: {
indexType: ZVecIndexType.INVERT,
enableRangeOptimization: false
}
}
],
vectors: [
{
name: "text_embedding",
dataType: ZVecDataType.VECTOR_FP32,
dimension: 4,
indexParams: {
indexType: ZVecIndexType.HNSW,
metricType: ZVecMetricType.COSINE
}
}
]
});
const collection: ZVecCollection = ZVecOpen("/path/to/example/collection"); // [!code highlight]
```
Now, upsert a document like this:
Python
Node.js
```python title="Upsert a document"
import zvec
# Create a document
doc = zvec.Doc( # [!code highlight]
id="text_1", # ← must be unique
vectors={
"text_embedding": [0.1, 0.2, 0.3, 0.4], # ← must match the vector name
# ↑ list of floats; list length = dimension (4)
},
fields={
"text": "This is a sample text.", # ← must match the scalar field name
},
)
# Upsert the document
result = collection.upsert(doc) # [!code highlight]
print(result) # {"code": 0} means success
```
```ts title="Upsert a document"
import { ZVecCollection, ZVecDocInput, ZVecOpen } from "@zvec/zvec";
// Create a document
let doc: ZVecDocInput = { // [!code highlight]
id: "text_1", // ← must be unique
vectors: {
"text_embedding": [0.1, 0.2, 0.3, 0.4] // ← must match the vector name
// ↑ list of floats; list length = dimension (4)
},
fields: {
"text": "This is a sample text." // ← must match the scalar field name
}
};
// Upsert the document
let result = collection.upsertSync(doc); // [!code highlight]
console.log(result); // { ok: true } means success
```
The `upsert()` method validates the document first:
* **Incorrect usage** — such as an unknown field or wrong vector dimension — **raises an error**.
* **If validation passes**, the method proceeds with the upsertion and returns a `Status` object indicating success or failure (e.g., insufficient disk space).
Successfully upserted documents are immediately available for querying 🚀.
***
## Upsert a Batch of Documents [#upsert-a-batch-of-documents]
To upsert multiple documents at once, pass a list of `Doc` objects to `upsert()`.\
Each `Doc` is processed independently, and the method returns a list of `Status` objects — one per document.
Python
Node.js
```python title="Upsert a batch of documents"
import zvec
result = collection.upsert( # [!code highlight]
[
zvec.Doc(
id="text_1",
vectors={"text_embedding": [0.1, 0.2, 0.3, 0.4]},
fields={"text": "This is a sample text."},
),
zvec.Doc(
id="text_2",
vectors={"text_embedding": [0.4, 0.3, 0.2, 0.1]},
fields={"text": "This is another sample text."},
),
zvec.Doc(
id="text_3",
vectors={"text_embedding": [-0.1, -0.2, -0.3, -0.4]},
fields={"text": "One more sample text."},
),
]
)
print(result) # [{"code":0}, {"code":0}, {"code":0}]
```
```ts title="Upsert a batch of documents"
let result = collection.upsertSync([ // [!code highlight]
{
id: "text_1",
vectors: { "text_embedding": [0.1, 0.2, 0.3, 0.4] },
fields: { "text": "This is a sample text." },
},
{
id: "text_2",
vectors: { "text_embedding": [0.4, 0.3, 0.2, 0.1] },
fields: { "text": "This is another sample text." },
},
{
id: "text_3",
vectors: { "text_embedding": [-0.1, -0.2, -0.3, -0.4] },
fields: { "text": "One more sample text." },
}
]);
console.log(result); // [ { ok: true }, { ok: true }, { ok: true } ]
```
If any document in the batch has incorrect usage (e.g., an unknown field or wrong vector dimension), the method raises an exception and **no documents are upserted**.
If all documents are valid, the method attempts to upsert every one. A failure in one (e.g., insufficient disk space) does **not** stop others from being upserted.
🔍 **Always check each `Status` in the result list.**
***
## Upsert Documents with Sparse Vectors [#upsert-documents-with-sparse-vectors]
Assume your collection includes a [sparse vector](../../concepts/vector-embedding/#sparse-vectors) named `sparse_embedding`.
Python
Node.js
```python title="Open a collection"
import zvec
collection_schema = zvec.CollectionSchema( # [!code highlight]
name="example_collection",
vectors=[
zvec.VectorSchema(
name="sparse_embedding",
data_type=zvec.DataType.SPARSE_VECTOR_FP32,
index_param=zvec.HnswIndexParam(metric_type=zvec.MetricType.IP),
),
],
)
collection = zvec.open(path="/path/to/example/collection") # [!code highlight]
```
```ts title="Open a collection"
import { ZVecCollection, ZVecCollectionSchema, ZVecDataType, ZVecIndexType, ZVecMetricType, ZVecOpen } from "@zvec/zvec";
const collectionSchema: ZVecCollectionSchema = new ZVecCollectionSchema({ // [!code highlight]
name: "example_collection",
vectors: [
{
name: "sparse_embedding",
dataType: ZVecDataType.SPARSE_VECTOR_FP32,
indexParams: { indexType: ZVecIndexType.HNSW, metricType: ZVecMetricType.IP }
}
]
});
const collection: ZVecCollection = ZVecOpen("/path/to/example/collection"); // [!code highlight]
```
Upsert a document with a sparse vector like this:
Python
Node.js
```python title="Upsert a document with a sparse vector"
import zvec
result = collection.upsert( # [!code highlight]
zvec.Doc(
id="text_1",
vectors={
"sparse_embedding": {
42: 1.25, # ← dimension 42 has weight 1.25
1337: 0.8, # ← dimension 1337 has weight 0.8
2999: 0.63, # ← dimension 2999 has weight 0.63
}
},
)
)
print(result) # {"code":0}
```
```ts title="Upsert a document with a sparse vector"
let result = collection.upsertSync({ // [!code highlight]
id: "text_1",
vectors: {
"sparse_embedding": {
42: 1.25, // ← dimension 42 has weight 1.25
1337: 0.8, // ← dimension 1337 has weight 0.8
2999: 0.63 // ← dimension 2999 has weight 0.63
}
}
});
console.log(result); // { ok: true }
```
A sparse vector is represented as a mapping from `dimension indices` (integers) to `values` (floats).\
There is **no fixed dimension size** — only non-zero dimensions need to be included.
***
## Upsert Documents with Multiple Fields and Vectors [#upsert-documents-with-multiple-fields-and-vectors]
Real-world applications often require collections with multiple scalar fields and vector embeddings. In this example, assume your collection includes the following schema:
* **Scalar fields**:
1. `book_title` (string)
2. `category` (array of strings)
3. `publish_year` (32-bit integer)
* **Vector embeddings**:
1. `dense_embedding`: a 768-dimensional dense vector
2. `sparse_embedding`: a sparse vector
Python
Node.js
```python title="Open a collection"
import zvec
collection_schema = zvec.CollectionSchema( # [!code highlight]
name="example_collection",
fields=[
zvec.FieldSchema(
name="book_title",
data_type=zvec.DataType.STRING,
index_param=zvec.InvertIndexParam(enable_range_optimization=False),
),
zvec.FieldSchema(
name="category",
data_type=zvec.DataType.ARRAY_STRING,
),
zvec.FieldSchema(
name="publish_year",
data_type=zvec.DataType.INT32,
index_param=zvec.InvertIndexParam(enable_range_optimization=True),
),
],
vectors=[
zvec.VectorSchema(
name="dense_embedding",
data_type=zvec.DataType.VECTOR_FP32,
dimension=768,
index_param=zvec.HnswIndexParam(metric_type=zvec.MetricType.COSINE),
),
zvec.VectorSchema(
name="sparse_embedding",
data_type=zvec.DataType.SPARSE_VECTOR_FP32,
index_param=zvec.HnswIndexParam(metric_type=zvec.MetricType.IP),
),
],
)
collection = zvec.open(path="/path/to/example/collection") # [!code highlight]
```
```ts title="Open a collection"
import { ZVecCollection, ZVecCollectionSchema, ZVecDataType, ZVecIndexType, ZVecMetricType, ZVecOpen } from "@zvec/zvec";
const collectionSchema: ZVecCollectionSchema = new ZVecCollectionSchema({ // [!code highlight]
name: "example_collection",
fields: [
{
name: "book_title",
dataType: ZVecDataType.STRING,
indexParams: { indexType: ZVecIndexType.INVERT, enableRangeOptimization: false }
},
{
name: "category",
dataType: ZVecDataType.ARRAY_STRING
},
{
name: "publish_year",
dataType: ZVecDataType.INT32,
indexParams: { indexType: ZVecIndexType.INVERT, enableRangeOptimization: true }
}
],
vectors: [
{
name: "dense_embedding",
dataType: ZVecDataType.VECTOR_FP32,
dimension: 768,
indexParams: { indexType: ZVecIndexType.HNSW, metricType: ZVecMetricType.COSINE }
},
{
name: "sparse_embedding",
dataType: ZVecDataType.SPARSE_VECTOR_FP32,
indexParams: { indexType: ZVecIndexType.HNSW, metricType: ZVecMetricType.IP }
}
]
});
const collection: ZVecCollection = ZVecOpen("/path/to/example/collection"); // [!code highlight]
```
Upsert a document with multiple fields and vectors like this:
Python
Node.js
```python title="Upsert a document with multiple fields and vectors"
import zvec
# Create a document
doc = zvec.Doc( # [!code highlight]
id="book_1",
vectors={
"dense_embedding": [0.1 for _ in range(768)], # ← use real embedding in practice
"sparse_embedding": {42: 1.25, 1337: 0.8, 1999: 0.64}, # ← use real embedding in practice
},
fields={
"book_title": "Gone with the Wind", # ← string
"category": ["Romance", "Classic Literature"], # ← array of strings
"publish_year": 1936, # ← integer
},
)
# Upsert the document
result = collection.upsert(doc) # [!code highlight]
print(result) # {"code": 0} means success
```
```ts title="Upsert a document with multiple fields and vectors"
// Create a document
let doc: ZVecDocInput = { // [!code highlight]
id: "book_1",
vectors: {
"dense_embedding": Array(768).fill(0.1), // ← use real embedding in practice
"sparse_embedding": { 42: 1.25, 1337: 0.8, 1999: 0.64 } // ← use real embedding in practice
},
fields: {
"book_title": "Gone with the Wind", // ← string
"category": ["Romance", "Classic Literature"], // ← array of strings
"publish_year": 1936 // ← integer
}
};
// Upsert the document
let result = collection.upsertSync(doc); // [!code highlight]
console.log(result); // { ok: true } means success
```
# Create
## Create and Open a Collection [#create-and-open-a-collection]
To create a new collection in Zvec, you need to define the following:
1. **Schema** — the structural blueprint of your data, specifying scalar fields and vector embeddings.
2. **Collection options** (optional) — runtime settings that control how the collection behaves when opened (e.g., read-only mode).
Once defined, call `create_and_open()` to initialize a new collection at a specified path and return a `Collection` object ready for inserts and queries.
If a collection already exists at the specified path, `create_and_open()` will raise an error to prevent accidental overwrites.
Python
Node.js
```python title="Create and open a collection"
import zvec
# [!code word:CollectionSchema]
# [!code word:CollectionOption]
# Define a collection schema
collection_schema = zvec.CollectionSchema(
name="example_collection",
fields=[
zvec.FieldSchema(
name="string_field_example",
data_type=zvec.DataType.STRING,
nullable=True,
index_param=zvec.InvertIndexParam(enable_range_optimization=False),
),
],
vectors=[
zvec.VectorSchema(
name="dense_vector_example",
data_type=zvec.DataType.VECTOR_FP32,
dimension=768,
index_param=zvec.HnswIndexParam(metric_type=zvec.MetricType.COSINE),
),
],
)
# Create and open the collection
collection = zvec.create_and_open( # [!code highlight]
path="/path/to/my/collection",
schema=collection_schema,
option=zvec.CollectionOption(read_only=False, enable_mmap=True),
)
```
```ts title="Create and open a collection"
import { ZVecCollectionSchema, ZVecCreateAndOpen, ZVecDataType, ZVecIndexType, ZVecMetricType } from "@zvec/zvec";
// [!code word:ZVecCollectionSchema]
// Define a collection schema
const collectionSchema = new ZVecCollectionSchema({
name: "example_collection",
fields: [
{
name: "string_field_example",
dataType: ZVecDataType.STRING,
nullable: true,
indexParams: { indexType: ZVecIndexType.INVERT, enableRangeOptimization: false }
}
],
vectors: [
{
name: "dense_vector_example",
dataType: ZVecDataType.VECTOR_FP32,
dimension: 768,
indexParams: { indexType: ZVecIndexType.HNSW, metricType: ZVecMetricType.COSINE }
}
]
});
// Create and open the collection
const collection = ZVecCreateAndOpen( // [!code highlight]
"/path/to/my/collection",
collectionSchema,
{ readOnly: false, enableMMAP: true } // [!code highlight]
);
```
***
## Real-World Example: 🛒 Product Search [#real-world-example--product-search]
This schema models a **multi-modal product search system**, combining visual, textual, and structured metadata for rich retrieval:
### 🗂️ Scalar Fields: For Filtering & Display [#️-scalar-fields-for-filtering--display]
* `category` (array of strings, indexed): Enables queries like `category CONTAIN_ANY ("electronics", "headphones")` to find products that belong to either "electronics" or "headphones" (or both).
* `price` (integer, indexed with range optimization): Supports fast range queries such as `price > 100`.
* `in_stock` (boolean, indexed): Enables instant filtering by availability (e.g., "only show items in stock").
* `image_url` and `description` are stored but **not indexed**, since they're only used for display.
### 📐 Vector Embeddings: For Semantic Relevance [#-vector-embeddings-for-semantic-relevance]
* Two dense vectors capture semantic meaning:
* `image_vec`: 512-dimensional embeddings from product images (e.g., via a vision model).
* `description_vec`: 768-dimensional embeddings from product descriptions (e.g., from a language model), stored with quantization.
* One sparse vector `keywords_sparse` for keyword matching, enabling hybrid sparse-dense search.
Python
Node.js
```python title="Create a collection"
import zvec
collection_schema = zvec.CollectionSchema( # [!code highlight]
name="product_search",
fields=[ # [!code highlight]
zvec.FieldSchema(
name="image_url",
data_type=zvec.DataType.STRING, # Not used in filtering, no index created
nullable=True, # Could be null
),
zvec.FieldSchema(
name="description",
data_type=zvec.DataType.STRING, # Not used in filtering, no index created
),
zvec.FieldSchema(
name="category",
data_type=zvec.DataType.ARRAY_STRING,
# Inverted index for array membership queries
index_param=zvec.InvertIndexParam(),
),
zvec.FieldSchema(
name="price",
data_type=zvec.DataType.INT32,
# Optimization for range queries, e.g., price > 100
index_param=zvec.InvertIndexParam(enable_range_optimization=True),
),
zvec.FieldSchema(
name="in_stock",
data_type=zvec.DataType.BOOL,
# Inverted index for boolean queries
index_param=zvec.InvertIndexParam(),
),
],
vectors=[ # [!code highlight]
# Dense embedding from product images
zvec.VectorSchema(
name="image_vec",
data_type=zvec.DataType.VECTOR_FP32,
dimension=512,
# Use HNSW index for similarity search with cosine distance metric
index_param=zvec.HnswIndexParam(metric_type=zvec.MetricType.COSINE),
),
# Dense embedding from product descriptions
zvec.VectorSchema(
name="description_vec",
data_type=zvec.DataType.VECTOR_FP32,
dimension=768,
# Enable quantization for faster similarity search
index_param=zvec.HnswIndexParam(metric_type=zvec.MetricType.COSINE, quantize_type=zvec.QuantizeType.INT8),
),
# Sparse vector from product keywords
zvec.VectorSchema(
name="keywords_sparse",
data_type=zvec.DataType.SPARSE_VECTOR_FP32,
# Use HNSW index for similarity search with inner product metric
index_param=zvec.HnswIndexParam(metric_type=zvec.MetricType.IP),
),
],
)
collection = zvec.create_and_open( # [!code highlight]
path="path/to/collection",
schema=collection_schema,
option=zvec.CollectionOption(read_only=False, enable_mmap=True),
)
```
```ts title="Create a collection"
import { ZVecCollection, ZVecCollectionSchema, ZVecCreateAndOpen, ZVecDataType, ZVecIndexType, ZVecMetricType, ZVecQuantizeType } from "@zvec/zvec";
const collectionSchema = new ZVecCollectionSchema({ // [!code highlight]
name: "product_search",
fields: [ // [!code highlight]
{
name: "image_url",
dataType: ZVecDataType.STRING, // Not used in filtering, no index created
nullable: true // Could be null
},
{
name: "description",
dataType: ZVecDataType.STRING // Not used in filtering, no index created
},
{
name: "category",
dataType: ZVecDataType.ARRAY_STRING,
// Inverted index for array membership queries
indexParams: { indexType: ZVecIndexType.INVERT }
},
{
name: "price",
dataType: ZVecDataType.INT32,
// Optimization for range queries, e.g., price > 100
indexParams: { indexType: ZVecIndexType.INVERT, enableRangeOptimization: true }
},
{
name: "in_stock",
dataType: ZVecDataType.BOOL,
// Inverted index for boolean queries
indexParams: { indexType: ZVecIndexType.INVERT }
}
],
vectors: [ // [!code highlight]
{ // Dense embedding from product images
name: "image_vec",
dataType: ZVecDataType.VECTOR_FP32,
dimension: 512,
// Use HNSW index for similarity search with cosine distance metric
indexParams: { indexType: ZVecIndexType.HNSW, metricType: ZVecMetricType.COSINE }
},
{ // Dense embedding from product descriptions
name: "description_vec",
dataType: ZVecDataType.VECTOR_FP32,
dimension: 768,
// Enable quantization for faster similarity search
indexParams: { indexType: ZVecIndexType.HNSW, metricType: ZVecMetricType.COSINE, quantizeType: ZVecQuantizeType.INT8 }
},
{ // Sparse vector from product keywords
name: "keywords_sparse",
dataType: ZVecDataType.SPARSE_VECTOR_FP32,
// Use HNSW index for similarity search with inner product metric
indexParams: { indexType: ZVecIndexType.HNSW, metricType: ZVecMetricType.IP }
}
]
});
const collection: ZVecCollection = ZVecCreateAndOpen( // [!code highlight]
"path/to/collection",
collectionSchema,
{ readOnly: false, enableMMAP: true }
);
```
# Options
The `CollectionOption` lets you control runtime behavior when creating or opening a collection:
* `read_only`: Opens the collection in read-only mode. Attempts to write will raise an error.
**Note**: `read_only` must be set to `False` when calling `create_and_open()`, since creation requires writing files to disk.
* `enable_mmap`: Uses memory-mapped I/O for faster access (default to `True`). This trades slightly higher memory cache usage for improved performance.
Python
Node.js
```python title="Collection option"
import zvec
# [!code word:CollectionOption]
collection_option = zvec.CollectionOption(read_only=False, enable_mmap=True)
```
```ts title="Collection option"
import { ZVecCollectionOptions } from "@zvec/zvec";
// [!code word:ZVecCollectionOptions]
const collectionOptions: ZVecCollectionOptions = { readOnly: false, enableMMAP: true };
```
# Schema
A **collection schema** `CollectionSchema` defines the structure that every [document](../../../concepts/data-modeling/#documents) inserted into the collection must conform to.
The schema in Zvec is **dynamic**: you can add or remove scalar fields and vectors at any time without rebuilding the collection.
`CollectionSchema` has three parts:
1. `name`: An identifier for the collection.
2. `fields`: A list of scalar fields.
3. `vectors`: A list of vector fields.
***
## What is an Embedding Model? [#what-is-an-embedding-model]
An embedding model is an AI model that converts raw data into vector embeddings — illustrated in the [diagram](#vector-embedding-diagram) at the top.
These models learn patterns from vast amounts of training data so that objects with similar meanings produce vectors that are close together in vector space — typically measured using distance metrics such as **cosine similarity**, **dot product**, or **Euclidean distance**.
**The choice of distance metric matters.** If an embedding model was trained for a specific metric (e.g., cosine similarity), the vector database should use the same metric during search to preserve semantic relationships and achieve optimal accuracy.
To explore and compare state-of-the-art embedding models, you can check out the [Embedding Leaderboard on Hugging Face](https://huggingface.co/spaces/mteb/leaderboard), which evaluates hundreds of models across diverse tasks and languages.
***
## Types of Vectors [#types-of-vectors]
Vector representations are primarily categorized into two types: ***dense*** and ***sparse***, each capturing data in its own way.
### Dense Vectors [#dense-vectors]
Dense vectors are fixed-length, real-valued embeddings where (nearly) every dimension carries semantic information. These vectors are often generated by deep learning models that transform raw inputs (e.g., text, images, audio) into a structured vector space reflecting their semantic similarities.
```python
# Example: 384-dimensional dense vector from a neural network model
dense_vector = [ 0.012, -0.034, 0.005, 0.041, -0.022, ..., 0.018 ] # Length = 384
```
* **✅ Semantic-Rich**: understands context and meaning (e.g., "king – man + woman ≈ queen")
* **⚠️ Opaque**: hard to interpret which features drive similarity
### Sparse Vectors [#sparse-vectors]
Sparse vectors are high-dimensional, often vocabulary-sized representations in which only a small subset of dimensions are non-zero. Each active dimension corresponds to a specific term (e.g., a word or n-gram), weighted by relevance scores such as **BM25**.
In this model, every document is converted into a vector — called a document vector — that records which terms appear in it and how important they are. Similarly, a search query is also turned into a sparse vector using the same weighting scheme.
Rather than relying on exact keyword matches, similarity between a query and a document is computed using the dot product of their vectors. This measures how well their weighted terms align: documents that contain the same important terms as the query receive higher scores — rewarding both **term overlap** and **term importance**.
```python
# Example: Sparse vector over a vocabulary of 50,000 terms, stored as {term: weight}
sparse_vector = {
"puppy": 2.31,
"dog": 1.85,
"pet": 1.12,
"animal": 0.76
}
# The remaining ~49,996 dimensions are implicitly zero.
```
For computational efficiency, sparse vectors use integer indices to map terms to their positions within a vocabulary dictionary rather than storing the term strings directly.
```python
# Vocabulary mapping, containing around 50,000 unique terms, indexed by integer IDs
vocab = {
"animal": 124,
"dog": 309,
"pet": 1822,
"puppy": 4017,
"cat": 5001,
"kitten": 7890,
# ... (many other terms fill the rest of the dictionary)
# Total size ≈ 50,000
}
# Sparse vector stored as {index: weight}
sparse_vector = {
4017: 2.31, # "puppy"
309: 1.85, # "dog"
1822: 1.12, # "pet"
124: 0.76 # "animal"
}
# The remaining ~49,996 dimensions are implicitly zero.
```
* **✅ Interpretable**: non-zero dimensions map directly to known terms (e.g., `4017` → "puppy")
* **⚠️ Lacks Semantic Understanding**: treats "car" and "automobile" as unrelated unless explicitly linked
# Delete
Zvec provides two ways to delete [documents](../../concepts/data-modeling/#documents). Choose the method that best fits your use case:
| Method | Input | When to Use |
| -------------------- | ------------------------------------------------- | ---------------------------------------------------------------------------------------------------------- |
| `delete()` | One or more document `id`s | Use when you know the exact ID(s) of the documents you want to delete |
| `delete_by_filter()` | A filter expression (e.g., `publish_year < 1900`) | Use for bulk deletion based on field values — ideal for cleaning up documents that match specific criteria |
Delete operations are **immediate** and **irreversible**.\
Always double-check your input before running a delete operation.
***
## Delete by IDs [#delete-by-ids]
Assume you've already opened a collection and have a `collection` object ready.
Python
Node.js
```python title="Open a collection"
import zvec
collection = zvec.open(path="/path/to/example/collection") # [!code highlight]
```
```ts title="Open a collection"
import { ZVecCollection, ZVecOpen } from "@zvec/zvec";
const collection: ZVecCollection = ZVecOpen("/path/to/example/collection"); // [!code highlight]
```
Use `delete()` to remove one or more documents when you know their exact IDs.
Python
Node.js
```python title="Delete documents by IDs"
# Delete a single document
result = collection.delete(ids="doc_id_1") # [!code highlight]
print(result) # {"code":0} means success
# Delete multiple documents at once
result = collection.delete(ids=["doc_id_2", "doc_id_3"]) # [!code highlight]
print(result) # [{"code":0}, {"code":0}]
```
```ts title="Delete documents by IDs"
// Delete a single document
let result = collection.deleteSync("doc_id_1"); // [!code highlight]
console.log(result); // { ok: true } means success
// Delete multiple documents at once
let results = collection.deleteSync(["doc_id_2", "doc_id_3"]); // [!code highlight]
console.log(results); // [ { ok: true }, { ok: true } ]
```
* When given a single `id`, `delete()` returns one `Status` object.
* When given a list of `id`s, it returns a list of `Status` objects in the same order.
***
## Delete by Filter Condition [#delete-by-filter-condition]
Use `delete_by_filter()` to remove all documents that match a boolean `filter` expression.
The `filter` can reference scalar fields (e.g., `publish_year`, `language`) using [comparison and logical operators](../query/filter/#supported-filter-syntax).
Python
Node.js
```python title="Delete documents by filter condition"
# Delete all books published before 1900
collection.delete_by_filter(filter="publish_year < 1900") # [!code highlight]
# Combined filter
collection.delete_by_filter( # [!code highlight]
filter='publish_year < 1900 AND (language = "English" OR language = "Chinese")'
)
```
```ts title="Delete documents by filter condition"
// Delete all books published before 1900 (sync)
collection.deleteByFilterSync("publish_year < 1900"); // [!code highlight]
// Delete all books published before 1900 (async)
await collection.deleteByFilter("publish_year < 1900"); // [!code highlight]
// Combined filter
collection.deleteByFilterSync('publish_year < 1900 AND (language = "English" OR language = "Chinese")'); // [!code highlight]
```
# Fetch
Use `fetch()` to retrieve [documents](../../concepts/data-modeling/#documents) by their `id`s.\
This is a **direct lookup** — no search, scoring, or filtering is involved.
Python
Node.js
```python title="Fetch documents"
# [!code word:fetch]
# Fetch a single document
result = collection.fetch(ids="book_1")
print(result) # { "book_1": Doc(...) }
# Fetch multiple documents
result = collection.fetch(ids=["book_1", "book_2", "book_3"])
print(result) # { "book_1": Doc(...), "book_2": Doc(...), "book_3": Doc(...) }
```
```ts title="Fetch documents"
// [!code word:fetchSync]
// Fetch a single document
let result = collection.fetchSync("book_1");
console.log(result); // { "book_1": {...} }
// Fetch multiple documents
let results = collection.fetchSync(["book_1", "book_2", "book_3"]);
console.log(results); // { "book_1": {...}, "book_2": {...}, "book_3": {...} }
```
* **Input**: A single document `id` or a list of document `id`s.
* **Output**: A mapping from each **found** `id` to its corresponding document object.
* Missing `id`s are **silently omitted** from the result (no error raised).
* The returned dictionary does not guarantee input order — access documents by `id` instead.
# Data Operations
Zvec provides a complete set of **data manipulation operations** to manage [documents](../concepts/data-modeling/#documents) in your [collection](../collections/).
| Operation | Purpose |
| ----------------------- | -------------------------------------------------------------------------------------------------------------- |
| [`Insert`](./insert/) | Add new documents (fails if the document `ID` already exists) |
| [`Upsert`](./upsert/) | Insert new documents or replace existing ones by `ID` |
| [`Update`](./update/) | Modify specific fields of existing documents by `ID` |
| [`Delete`](./delete/) | Delete documents by `ID` or using a scalar filter condition |
| [`Query`](./query/) | Perform vector similarity search or full-text search, optionally combined with scalar filtering and re-ranking |
| [`Fetch`](./fetch/) | Retrieve full documents directly by `ID` |
| [`Iterate`](./iterate/) | Stream every document one by one without loading the whole collection into memory |
All write operations (`insert`, `upsert`, `update`, `delete`) are immediately visible for querying — enabling true real-time, streaming workloads.
# Insert
Use the **`insert()`** method to add one or more new [documents](../../concepts/data-modeling/#documents) (`Doc`) to a [collection](../../collections/).
**Performance Tip**:\
New vectors are initially buffered for fast ingestion. For optimal search performance, call [`optimize()`](../../collections/optimize/) after inserting a large batch of documents.
***
## Document `Doc` [#document-doc]
Each `Doc` passed to `insert()` must:
* Have a unique `id` (not already present in the collection)
* Provide data that matches the collection's [schema](../../collections/create/schema/):
1. **Scalar fields**: provided as key–value pairs under `fields` (scalar field names as keys)
2. **Vector embeddings**: provided as key–value pairs under `vectors` (vector names as keys)
* You can omit `nullable` scalar fields if a document doesn't have a value for them
If a document with the same `id` already exists in the collection, the insertion will **fail** for that document.\
To overwrite existing documents or insert without checking, use [`upsert()`](../upsert/) instead.
***
## Insert a Single Document [#insert-a-single-document]
Assume you already have a collection with the following schema:
* A scalar field: `text` (string)
* A [dense vector embedding](../../concepts/vector-embedding/#dense-vectors): `text_embedding` (4-dimensional FP32 vector)
The 4-dimensional vector is for demonstration only — real-world embeddings are usually much larger.
You've also opened the collection and have a `collection` object ready.
Python
Node.js
```python title="Open a collection"
import zvec
collection_schema = zvec.CollectionSchema( # [!code highlight]
name="example_collection",
fields=[
zvec.FieldSchema(
name="text",
data_type=zvec.DataType.STRING,
index_param=zvec.InvertIndexParam(enable_range_optimization=False),
),
],
vectors=[
zvec.VectorSchema(
name="text_embedding",
data_type=zvec.DataType.VECTOR_FP32,
dimension=4,
index_param=zvec.HnswIndexParam(metric_type=zvec.MetricType.COSINE),
),
],
)
collection = zvec.open(path="/path/to/example/collection") # [!code highlight]
```
```ts title="Open a collection"
import { ZVecCollection, ZVecCollectionSchema, ZVecDataType, ZVecIndexType, ZVecMetricType, ZVecOpen } from "@zvec/zvec";
const collectionSchema: ZVecCollectionSchema = new ZVecCollectionSchema({ // [!code highlight]
name: "example_collection",
fields: [
{
name: "text",
dataType: ZVecDataType.STRING,
indexParams: {
indexType: ZVecIndexType.INVERT,
enableRangeOptimization: false
}
}
],
vectors: [
{
name: "text_embedding",
dataType: ZVecDataType.VECTOR_FP32,
dimension: 4,
indexParams: {
indexType: ZVecIndexType.HNSW,
metricType: ZVecMetricType.COSINE
}
}
]
});
const collection: ZVecCollection = ZVecOpen("/path/to/example/collection"); // [!code highlight]
```
Now, insert a document like this:
Python
Node.js
```python title="Insert a document"
import zvec
# Create a document
doc = zvec.Doc( # [!code highlight]
id="text_1", # ← must be unique
vectors={
"text_embedding": [0.1, 0.2, 0.3, 0.4], # ← must match the vector name
# ↑ list of floats; list length = dimension (4)
},
fields={
"text": "This is a sample text.", # ← must match the scalar field name
},
)
# Insert the document
result = collection.insert(doc) # [!code highlight]
print(result) # {"code": 0} means success
```
```ts title="Insert a document"
import { ZVecCollection, ZVecDocInput, ZVecOpen } from "@zvec/zvec";
// Create a document
let doc: ZVecDocInput = { // [!code highlight]
id: "text_1", // ← must be unique
vectors: {
"text_embedding": [0.1, 0.2, 0.3, 0.4] // ← must match the vector name
// ↑ list of floats; list length = dimension (4)
},
fields: {
"text": "This is a sample text." // ← must match the scalar field name
}
};
// Insert the document
let result = collection.insertSync(doc); // [!code highlight]
console.log(result); // { ok: true } means success
```
The `insert()` method validates the document first:
* **Incorrect usage** — such as an unknown field or wrong vector dimension — **raises an error**.
* **If validation passes**, the method proceeds with the insertion and returns a `Status` object indicating success or failure (e.g., duplicate `ID`, insufficient disk space).
Successfully inserted documents are immediately available for querying 🚀.
***
## Insert a Batch of Documents [#insert-a-batch-of-documents]
To insert multiple documents at once, pass a list of `Doc` objects to `insert()`.\
Each `Doc` is processed independently, and the method returns a list of `Status` objects — one per document.
Python
Node.js
```python title="Insert a batch of documents"
import zvec
result = collection.insert( # [!code highlight]
[
zvec.Doc(
id="text_1",
vectors={"text_embedding": [0.1, 0.2, 0.3, 0.4]},
fields={"text": "This is a sample text."},
),
zvec.Doc(
id="text_2",
vectors={"text_embedding": [0.4, 0.3, 0.2, 0.1]},
fields={"text": "This is another sample text."},
),
zvec.Doc(
id="text_3",
vectors={"text_embedding": [-0.1, -0.2, -0.3, -0.4]},
fields={"text": "One more sample text."},
),
]
)
print(result) # [{"code":0}, {"code":0}, {"code":0}]
```
```ts title="Insert a batch of documents"
let result = collection.insertSync([ // [!code highlight]
{
id: "text_1",
vectors: { "text_embedding": [0.1, 0.2, 0.3, 0.4] },
fields: { "text": "This is a sample text." },
},
{
id: "text_2",
vectors: { "text_embedding": [0.4, 0.3, 0.2, 0.1] },
fields: { "text": "This is another sample text." },
},
{
id: "text_3",
vectors: { "text_embedding": [-0.1, -0.2, -0.3, -0.4] },
fields: { "text": "One more sample text." },
}
]);
console.log(result); // [ { ok: true }, { ok: true }, { ok: true } ]
```
If any document in the batch has incorrect usage (e.g., an unknown field or wrong vector dimension), the method raises an exception and **no documents are inserted**.
If all documents are valid, the method attempts to insert every one. A failure in one (e.g., duplicate `id`) does **not** stop others from being inserted.
🔍 **Always check each `Status` in the result list.**
***
## Insert Documents with Sparse Vectors [#insert-documents-with-sparse-vectors]
Assume your collection includes a [sparse vector](../../concepts/vector-embedding/#sparse-vectors) named `sparse_embedding`.
Python
Node.js
```python title="Open a collection"
import zvec
collection_schema = zvec.CollectionSchema( # [!code highlight]
name="example_collection",
vectors=[
zvec.VectorSchema(
name="sparse_embedding",
data_type=zvec.DataType.SPARSE_VECTOR_FP32,
index_param=zvec.HnswIndexParam(metric_type=zvec.MetricType.IP),
),
],
)
collection = zvec.open(path="/path/to/example/collection") # [!code highlight]
```
```ts title="Open a collection"
import { ZVecCollection, ZVecCollectionSchema, ZVecDataType, ZVecIndexType, ZVecMetricType, ZVecOpen } from "@zvec/zvec";
const collectionSchema: ZVecCollectionSchema = new ZVecCollectionSchema({ // [!code highlight]
name: "example_collection",
vectors: [
{
name: "sparse_embedding",
dataType: ZVecDataType.SPARSE_VECTOR_FP32,
indexParams: { indexType: ZVecIndexType.HNSW, metricType: ZVecMetricType.IP }
}
]
});
const collection: ZVecCollection = ZVecOpen("/path/to/example/collection"); // [!code highlight]
```
Insert a document with a sparse vector like this:
Python
Node.js
```python title="Insert a document with a sparse vector"
import zvec
result = collection.insert( # [!code highlight]
zvec.Doc(
id="text_1",
vectors={
"sparse_embedding": {
42: 1.25, # ← dimension 42 has weight 1.25
1337: 0.8, # ← dimension 1337 has weight 0.8
2999: 0.63, # ← dimension 2999 has weight 0.63
}
},
)
)
print(result) # {"code":0}
```
```ts title="Insert a document with a sparse vector"
let result = collection.insertSync({ // [!code highlight]
id: "text_1",
vectors: {
"sparse_embedding": {
42: 1.25, // ← dimension 42 has weight 1.25
1337: 0.8, // ← dimension 1337 has weight 0.8
2999: 0.63 // ← dimension 2999 has weight 0.63
}
}
});
console.log(result); // { ok: true }
```
A sparse vector is represented as a mapping from `dimension indices` (integers) to `values` (floats).\
There is **no fixed dimension size** — only non-zero dimensions need to be included.
***
## Insert Documents with Multiple Fields and Vectors [#insert-documents-with-multiple-fields-and-vectors]
Real-world applications often require collections with multiple scalar fields and vector embeddings. In this example, assume your collection includes the following schema:
* **Scalar fields**:
1. `book_title` (string)
2. `category` (array of strings)
3. `publish_year` (32-bit integer)
* **Vector embeddings**:
1. `dense_embedding`: a 768-dimensional dense vector
2. `sparse_embedding`: a sparse vector
Python
Node.js
```python title="Open a collection"
import zvec
collection_schema = zvec.CollectionSchema( # [!code highlight]
name="example_collection",
fields=[
zvec.FieldSchema(
name="book_title",
data_type=zvec.DataType.STRING,
index_param=zvec.InvertIndexParam(enable_range_optimization=False),
),
zvec.FieldSchema(
name="category",
data_type=zvec.DataType.ARRAY_STRING,
),
zvec.FieldSchema(
name="publish_year",
data_type=zvec.DataType.INT32,
index_param=zvec.InvertIndexParam(enable_range_optimization=True),
),
],
vectors=[
zvec.VectorSchema(
name="dense_embedding",
data_type=zvec.DataType.VECTOR_FP32,
dimension=768,
index_param=zvec.HnswIndexParam(metric_type=zvec.MetricType.COSINE),
),
zvec.VectorSchema(
name="sparse_embedding",
data_type=zvec.DataType.SPARSE_VECTOR_FP32,
index_param=zvec.HnswIndexParam(metric_type=zvec.MetricType.IP),
),
],
)
collection = zvec.open(path="/path/to/example/collection") # [!code highlight]
```
```ts title="Open a collection"
import { ZVecCollection, ZVecCollectionSchema, ZVecDataType, ZVecIndexType, ZVecMetricType, ZVecOpen } from "@zvec/zvec";
const collectionSchema: ZVecCollectionSchema = new ZVecCollectionSchema({ // [!code highlight]
name: "example_collection",
fields: [
{
name: "book_title",
dataType: ZVecDataType.STRING,
indexParams: { indexType: ZVecIndexType.INVERT, enableRangeOptimization: false }
},
{
name: "category",
dataType: ZVecDataType.ARRAY_STRING
},
{
name: "publish_year",
dataType: ZVecDataType.INT32,
indexParams: { indexType: ZVecIndexType.INVERT, enableRangeOptimization: true }
}
],
vectors: [
{
name: "dense_embedding",
dataType: ZVecDataType.VECTOR_FP32,
dimension: 768,
indexParams: { indexType: ZVecIndexType.HNSW, metricType: ZVecMetricType.COSINE }
},
{
name: "sparse_embedding",
dataType: ZVecDataType.SPARSE_VECTOR_FP32,
indexParams: { indexType: ZVecIndexType.HNSW, metricType: ZVecMetricType.IP }
}
]
});
const collection: ZVecCollection = ZVecOpen("/path/to/example/collection"); // [!code highlight]
```
Insert a document with multiple fields and vectors like this:
Python
Node.js
```python title="Insert a document with multiple fields and vectors"
import zvec
# Create a document
doc = zvec.Doc( # [!code highlight]
id="book_1",
vectors={
"dense_embedding": [0.1 for _ in range(768)], # ← use real embedding in practice
"sparse_embedding": {42: 1.25, 1337: 0.8, 1999: 0.64}, # ← use real embedding in practice
},
fields={
"book_title": "Gone with the Wind", # ← string
"category": ["Romance", "Classic Literature"], # ← array of strings
"publish_year": 1936, # ← integer
},
)
# Insert the document
result = collection.insert(doc) # [!code highlight]
print(result) # {"code": 0} means success
```
```ts title="Insert a document with multiple fields and vectors"
// Create a document
let doc: ZVecDocInput = { // [!code highlight]
id: "book_1",
vectors: {
"dense_embedding": Array(768).fill(0.1), // ← use real embedding in practice
"sparse_embedding": { 42: 1.25, 1337: 0.8, 1999: 0.64 } // ← use real embedding in practice
},
fields: {
"book_title": "Gone with the Wind", // ← string
"category": ["Romance", "Classic Literature"], // ← array of strings
"publish_year": 1936 // ← integer
}
};
// Insert the document
let result = collection.insertSync(doc); // [!code highlight]
console.log(result); // { ok: true } means success
```
# Iterate
Use **`iter_docs()`** to stream **all** [documents](../../concepts/data-modeling/#documents) in a [collection](../../collections/) one by one.
Unlike [`fetch()`](../fetch/) — which retrieves documents by known `id`s — iteration performs a **full scan**. Documents are streamed in bounded windows, so the whole collection is never materialized in memory at once — making it suitable for export, backup, migration, or offline processing.
Python
Node.js
```python title="Iterate over all documents"
# [!code word:iter_docs]
with collection.iter_docs() as docs:
for doc in docs:
print(doc.id, doc.fields, doc.vectors)
```
```ts title="Iterate over all documents"
// [!code word:iterDocsSync]
for (const doc of collection.iterDocsSync()) {
console.log(doc.id, doc.fields, doc.vectors);
}
```
The iterator holds a native resource slot on the collection, so let the language close it for you: Python's `with` statement and JavaScript's `for...of` loop both release the iterator when the loop finishes, breaks early, or raises an exception. Iterators also close themselves automatically when fully exhausted.
***
## Select Fields and Vectors [#select-fields-and-vectors]
By default, every scalar field and every vector is materialized for each document. Use `output_fields` and `include_vector` to reduce the amount of data read:
* **`output_fields`** (`outputFields`): a list of scalar field names to return. If omitted, all scalar fields are returned; an empty list returns no scalar fields. Unknown or duplicate names raise an error.
* **`include_vector`** (`includeVector`): whether to materialize vector data. Vectors are included by default; disable it when you only need scalar fields — skipping vectors makes traversal faster.
Python
Node.js
```python title="Select output fields and exclude vectors"
with collection.iter_docs( # [!code highlight]
output_fields=["book_title", "publish_year"],
include_vector=False,
) as docs:
for doc in docs:
print(doc.id, doc.field("book_title"), doc.field("publish_year"))
```
```ts title="Select output fields and exclude vectors"
for (const doc of collection.iterDocsSync({ // [!code highlight]
outputFields: ["book_title", "publish_year"],
includeVector: false
})) {
console.log(doc.id, doc.fields.book_title, doc.fields.publish_year);
}
```
***
## Snapshot Semantics [#snapshot-semantics]
Both `iter_docs()` and `iterDocsSync()` iterate over an **isolated snapshot taken at call time**:
* Data written **after** the iterator is created — inserts, upserts, updates — is **not visible** to this iterator.
* Deletes made after creation do not affect the iteration; documents already deleted when the snapshot was taken are filtered out.
* On a writable collection, creating the iterator may seal the current writing segment (each call can produce a new small segment); read-only collections are scanned directly without any write.
* Iteration order is unspecified — it is **not** insertion order, and it can change after [`optimize()`](../../collections/optimize/) reorganizes segments — so never rely on it.
***
## Concurrency [#concurrency]
While any iterator is open on a collection, these operations **raise an error**:
* Schema changes — creating or dropping an index, adding, altering or dropping a column
* [`optimize()`](../../collections/optimize/), which fails at its start
* Closing or destroying the collection
Conversely, creating an iterator fails while one of those maintenance operations is already running. Writes, `flush()`, `query()` and `fetch()` remain **unaffected**.
Close every iterator before closing the collection. These restrictions are lifted as soon as all open iterators are closed.
***
## Break Early [#break-early]
Stopping before the end is safe — exiting the `with` block or the `for...of` loop releases the iterator's slot. When you drive the iterator manually instead, close it yourself:
Python
Node.js
```python title="Stop iteration early"
with collection.iter_docs() as docs:
for doc in docs:
if doc.field("publish_year") == 1936:
print("found:", doc.id)
break # the with-block closes the iterator here
```
```ts title="Stop iteration early"
for (const doc of collection.iterDocsSync()) {
if (doc.fields.publish_year === 1936) {
console.log("found:", doc.id);
break; // for...of closes the iterator here
}
}
// Driving the iterator manually? Close it yourself.
const docs = collection.iterDocsSync();
const first = docs.next();
if (!first.done) console.log("first:", first.value.id);
docs.closeSync(); // [!code highlight]
```
# Update
Use `update()` to modify **existing** [documents](../../concepts/data-modeling/#documents) (`Doc`).
Only the scalar fields and vector embeddings you **include will be updated**; all other content remains unchanged.
The method accepts either a single `Doc` object or a list of `Doc` objects.
***
## Document `Doc` [#document-doc]
Each `Doc` passed to `update()` must:
* Specify an `id` that **already exists** in the collection (the operation will fail if the document is not found)
* Include only the fields and vectors you **intend to update**, formatted according to the collection's [schema](../../collections/create/schema/):
1. **Scalar fields**: provided as key–value pairs under `fields` (scalar field names as keys)
2. **Vector embeddings**: provided as key–value pairs under `vectors` (vector names as keys)
* Omit any scalar fields or vectors you do not want to change — they will be left untouched.
***
## Update a Single Document [#update-a-single-document]
Assume you already have a collection with the following schema:
* **Scalar fields**:
1. `book_title` (string)
2. `category` (array of strings)
3. `publish_year` (32-bit integer)
* **Vector embeddings**:
1. `dense_embedding`: a 768-dimensional dense vector
2. `sparse_embedding`: a sparse vector
Python
Node.js
```python title="Open a collection"
import zvec
collection_schema = zvec.CollectionSchema( # [!code highlight]
name="example_collection",
fields=[
zvec.FieldSchema(
name="book_title",
data_type=zvec.DataType.STRING,
index_param=zvec.InvertIndexParam(enable_range_optimization=False),
),
zvec.FieldSchema(
name="category",
data_type=zvec.DataType.ARRAY_STRING,
),
zvec.FieldSchema(
name="publish_year",
data_type=zvec.DataType.INT32,
index_param=zvec.InvertIndexParam(enable_range_optimization=True),
),
],
vectors=[
zvec.VectorSchema(
name="dense_embedding",
data_type=zvec.DataType.VECTOR_FP32,
dimension=768,
index_param=zvec.HnswIndexParam(metric_type=zvec.MetricType.COSINE),
),
zvec.VectorSchema(
name="sparse_embedding",
data_type=zvec.DataType.SPARSE_VECTOR_FP32,
index_param=zvec.HnswIndexParam(metric_type=zvec.MetricType.IP),
),
],
)
collection = zvec.open(path="/path/to/example/collection") # [!code highlight]
```
```ts title="Open a collection"
import { ZVecCollection, ZVecCollectionSchema, ZVecDataType, ZVecIndexType, ZVecMetricType, ZVecOpen } from "@zvec/zvec";
const collectionSchema: ZVecCollectionSchema = new ZVecCollectionSchema({ // [!code highlight]
name: "example_collection",
fields: [
{
name: "book_title",
dataType: ZVecDataType.STRING,
indexParams: { indexType: ZVecIndexType.INVERT, enableRangeOptimization: false }
},
{
name: "category",
dataType: ZVecDataType.ARRAY_STRING
},
{
name: "publish_year",
dataType: ZVecDataType.INT32,
indexParams: { indexType: ZVecIndexType.INVERT, enableRangeOptimization: true }
}
],
vectors: [
{
name: "dense_embedding",
dataType: ZVecDataType.VECTOR_FP32,
dimension: 768,
indexParams: { indexType: ZVecIndexType.HNSW, metricType: ZVecMetricType.COSINE }
},
{
name: "sparse_embedding",
dataType: ZVecDataType.SPARSE_VECTOR_FP32,
indexParams: { indexType: ZVecIndexType.HNSW, metricType: ZVecMetricType.IP }
}
]
});
const collection: ZVecCollection = ZVecOpen("/path/to/example/collection"); // [!code highlight]
```
To update an existing document, provide its `id` and only the fields or vectors you want to change:
Python
Node.js
```python title="Update a document"
import zvec
doc = zvec.Doc( # [!code highlight]
id="book_1", # ← must already exist in the collection
vectors={
"sparse_embedding": { # ← replaces entire sparse vector
35: 0.25,
237: 0.1,
369: 0.44,
},
},
fields={
"category": [ # ← replaces current category list
"Romance",
"Classic Literature",
"American Civil War",
],
},
# Note: `book_title`, `publish_year`, and `dense_embedding` are omitted → they stay as-is
)
# Update the document
result = collection.update(doc) # [!code highlight]
print(result) # {"code": 0} means success
```
```ts title="Update a document"
let doc: ZVecDocInput = { // [!code highlight]
id: "book_1", // ← must already exist in the collection
vectors: {
"sparse_embedding": { // ← replaces entire sparse vector
35: 0.25,
237: 0.1,
369: 0.44
}
},
fields: {
"category": [ // ← replaces current category list
"Romance",
"Classic Literature",
"American Civil War"
]
}
// Note: `book_title`, `publish_year`, and `dense_embedding` are omitted → they stay as-is
};
// Update the document
let result = collection.updateSync(doc); // [!code highlight]
console.log(result); // { ok: true } means success
```
The `update()` method validates the document first:
* **Incorrect usage** — such as an unknown field or wrong vector dimension — **raises an error**.
* **If validation passes**, the method proceeds with the update and returns a `Status` object indicating success or failure (e.g., non-existing `ID`).
Successfully updated documents are immediately available for querying 🚀.
***
## Update a Batch of Documents [#update-a-batch-of-documents]
To update multiple documents at once, pass a list of `Doc` objects to `update()`.\
Each `Doc` is processed independently, and the method returns a list of `Status` objects — one per document.
Python
Node.js
```python title="Update a batch of documents"
import zvec
results = collection.update( # [!code highlight]
[
zvec.Doc(
id="book_1",
vectors={
"sparse_embedding": {35: 0.25, 237: 0.1, 369: 0.44},
},
fields={
"category": ["Romance", "Classic Literature", "American Civil War"],
},
),
zvec.Doc(
id="book_2",
fields={
"book_title": "The Great Gatsby",
},
),
zvec.Doc(
id="book_3",
fields={
"book_title": "A Tale of Two Cities",
"publish_year": 1859,
},
),
]
)
print(results) # [{"code":0}, {"code":0}, {"code":0}]
```
```ts title="Update a batch of documents"
let result = collection.updateSync([ // [!code highlight]
{
id: "book_1",
vectors: { "sparse_embedding": { 35: 0.25, 237: 0.1, 369: 0.44 } },
fields: { "category": ["Romance", "Classic Literature", "American Civil War"] }
},
{
id: "book_2",
fields: { "book_title": "The Great Gatsby" }
},
{
id: "book_3",
fields: {
"book_title": "A Tale of Two Cities",
"publish_year": 1859
}
}
]);
console.log(result); // [ { ok: true }, { ok: true }, { ok: true } ]
```
If any document in the batch has incorrect usage (e.g., an unknown field or wrong vector dimension), the method raises an exception and **no documents are updated**.
If all documents are valid, the method attempts to update every one. A failure in one (e.g., the `id` doesn't exist) does **not** stop others from being updated.
🔍 **Always check each `Status` in the result list.**
# Upsert
`upsert()` works similar to `insert()` — it adds one or more new [documents](../../concepts/data-modeling/#documents) (`Doc`) to a [collection](../../collections/).
The key difference is that if a document with the same `id` already exists, it will be **overwritten**.
* Use `upsert()` if you want to overwrite an existing document (or don't mind replacing it).
* Use `insert()` if you want to avoid accidentally overwriting a document — `insert()` will fail if a document with the same id already exists.
**Performance Tip**:\
New vectors are initially buffered for fast ingestion. For optimal search performance, call [`optimize()`](../../collections/optimize/) after upserting a large batch of documents.
***
## Document `Doc` [#document-doc]
Each `Doc` passed to `upsert()` must:
* Have an `id` (if a document with the same `id` already exists, it will be replaced)
* Provide data that matches the collection's [schema](../../collections/create/schema/#define-a-collection-schema):
1. **Scalar fields**: provided as key–value pairs under `fields` (scalar field names as keys)
2. **Vector embeddings**: provided as key–value pairs under `vectors` (vector names as keys)
* You can omit `nullable` scalar fields if a document doesn't have a value for them
***
## Upsert a Single Document [#upsert-a-single-document]
Assume you already have a collection with the following schema:
* A scalar field: `text` (string)
* A [dense vector embedding](../../concepts/vector-embedding/#dense-vectors): `text_embedding` (4-dimensional FP32 vector)
The 4-dimensional vector is for demonstration only — real-world embeddings are usually much larger.
You've also opened the collection and have a `collection` object ready.
Python
Node.js
```python title="Open a collection"
import zvec
collection_schema = zvec.CollectionSchema( # [!code highlight]
name="example_collection",
fields=[
zvec.FieldSchema(
name="text",
data_type=zvec.DataType.STRING,
index_param=zvec.InvertIndexParam(enable_range_optimization=False),
),
],
vectors=[
zvec.VectorSchema(
name="text_embedding",
data_type=zvec.DataType.VECTOR_FP32,
dimension=4,
index_param=zvec.HnswIndexParam(metric_type=zvec.MetricType.COSINE),
),
],
)
collection = zvec.open(path="/path/to/example/collection") # [!code highlight]
```
```ts title="Open a collection"
import { ZVecCollection, ZVecCollectionSchema, ZVecDataType, ZVecIndexType, ZVecMetricType, ZVecOpen } from "@zvec/zvec";
const collectionSchema: ZVecCollectionSchema = new ZVecCollectionSchema({ // [!code highlight]
name: "example_collection",
fields: [
{
name: "text",
dataType: ZVecDataType.STRING,
indexParams: {
indexType: ZVecIndexType.INVERT,
enableRangeOptimization: false
}
}
],
vectors: [
{
name: "text_embedding",
dataType: ZVecDataType.VECTOR_FP32,
dimension: 4,
indexParams: {
indexType: ZVecIndexType.HNSW,
metricType: ZVecMetricType.COSINE
}
}
]
});
const collection: ZVecCollection = ZVecOpen("/path/to/example/collection"); // [!code highlight]
```
Now, upsert a document like this:
Python
Node.js
```python title="Upsert a document"
import zvec
# Create a document
doc = zvec.Doc( # [!code highlight]
id="text_1", # ← must be unique
vectors={
"text_embedding": [0.1, 0.2, 0.3, 0.4], # ← must match the vector name
# ↑ list of floats; list length = dimension (4)
},
fields={
"text": "This is a sample text.", # ← must match the scalar field name
},
)
# Upsert the document
result = collection.upsert(doc) # [!code highlight]
print(result) # {"code": 0} means success
```
```ts title="Upsert a document"
import { ZVecCollection, ZVecDocInput, ZVecOpen } from "@zvec/zvec";
// Create a document
let doc: ZVecDocInput = { // [!code highlight]
id: "text_1", // ← must be unique
vectors: {
"text_embedding": [0.1, 0.2, 0.3, 0.4] // ← must match the vector name
// ↑ list of floats; list length = dimension (4)
},
fields: {
"text": "This is a sample text." // ← must match the scalar field name
}
};
// Upsert the document
let result = collection.upsertSync(doc); // [!code highlight]
console.log(result); // { ok: true } means success
```
The `upsert()` method validates the document first:
* **Incorrect usage** — such as an unknown field or wrong vector dimension — **raises an error**.
* **If validation passes**, the method proceeds with the upsertion and returns a `Status` object indicating success or failure (e.g., insufficient disk space).
Successfully upserted documents are immediately available for querying 🚀.
***
## Upsert a Batch of Documents [#upsert-a-batch-of-documents]
To upsert multiple documents at once, pass a list of `Doc` objects to `upsert()`.\
Each `Doc` is processed independently, and the method returns a list of `Status` objects — one per document.
Python
Node.js
```python title="Upsert a batch of documents"
import zvec
result = collection.upsert( # [!code highlight]
[
zvec.Doc(
id="text_1",
vectors={"text_embedding": [0.1, 0.2, 0.3, 0.4]},
fields={"text": "This is a sample text."},
),
zvec.Doc(
id="text_2",
vectors={"text_embedding": [0.4, 0.3, 0.2, 0.1]},
fields={"text": "This is another sample text."},
),
zvec.Doc(
id="text_3",
vectors={"text_embedding": [-0.1, -0.2, -0.3, -0.4]},
fields={"text": "One more sample text."},
),
]
)
print(result) # [{"code":0}, {"code":0}, {"code":0}]
```
```ts title="Upsert a batch of documents"
let result = collection.upsertSync([ // [!code highlight]
{
id: "text_1",
vectors: { "text_embedding": [0.1, 0.2, 0.3, 0.4] },
fields: { "text": "This is a sample text." },
},
{
id: "text_2",
vectors: { "text_embedding": [0.4, 0.3, 0.2, 0.1] },
fields: { "text": "This is another sample text." },
},
{
id: "text_3",
vectors: { "text_embedding": [-0.1, -0.2, -0.3, -0.4] },
fields: { "text": "One more sample text." },
}
]);
console.log(result); // [ { ok: true }, { ok: true }, { ok: true } ]
```
If any document in the batch has incorrect usage (e.g., an unknown field or wrong vector dimension), the method raises an exception and **no documents are upserted**.
If all documents are valid, the method attempts to upsert every one. A failure in one (e.g., insufficient disk space) does **not** stop others from being upserted.
🔍 **Always check each `Status` in the result list.**
***
## Upsert Documents with Sparse Vectors [#upsert-documents-with-sparse-vectors]
Assume your collection includes a [sparse vector](../../concepts/vector-embedding/#sparse-vectors) named `sparse_embedding`.
Python
Node.js
```python title="Open a collection"
import zvec
collection_schema = zvec.CollectionSchema( # [!code highlight]
name="example_collection",
vectors=[
zvec.VectorSchema(
name="sparse_embedding",
data_type=zvec.DataType.SPARSE_VECTOR_FP32,
index_param=zvec.HnswIndexParam(metric_type=zvec.MetricType.IP),
),
],
)
collection = zvec.open(path="/path/to/example/collection") # [!code highlight]
```
```ts title="Open a collection"
import { ZVecCollection, ZVecCollectionSchema, ZVecDataType, ZVecIndexType, ZVecMetricType, ZVecOpen } from "@zvec/zvec";
const collectionSchema: ZVecCollectionSchema = new ZVecCollectionSchema({ // [!code highlight]
name: "example_collection",
vectors: [
{
name: "sparse_embedding",
dataType: ZVecDataType.SPARSE_VECTOR_FP32,
indexParams: { indexType: ZVecIndexType.HNSW, metricType: ZVecMetricType.IP }
}
]
});
const collection: ZVecCollection = ZVecOpen("/path/to/example/collection"); // [!code highlight]
```
Upsert a document with a sparse vector like this:
Python
Node.js
```python title="Upsert a document with a sparse vector"
import zvec
result = collection.upsert( # [!code highlight]
zvec.Doc(
id="text_1",
vectors={
"sparse_embedding": {
42: 1.25, # ← dimension 42 has weight 1.25
1337: 0.8, # ← dimension 1337 has weight 0.8
2999: 0.63, # ← dimension 2999 has weight 0.63
}
},
)
)
print(result) # {"code":0}
```
```ts title="Upsert a document with a sparse vector"
let result = collection.upsertSync({ // [!code highlight]
id: "text_1",
vectors: {
"sparse_embedding": {
42: 1.25, // ← dimension 42 has weight 1.25
1337: 0.8, // ← dimension 1337 has weight 0.8
2999: 0.63 // ← dimension 2999 has weight 0.63
}
}
});
console.log(result); // { ok: true }
```
A sparse vector is represented as a mapping from `dimension indices` (integers) to `values` (floats).\
There is **no fixed dimension size** — only non-zero dimensions need to be included.
***
## Upsert Documents with Multiple Fields and Vectors [#upsert-documents-with-multiple-fields-and-vectors]
Real-world applications often require collections with multiple scalar fields and vector embeddings. In this example, assume your collection includes the following schema:
* **Scalar fields**:
1. `book_title` (string)
2. `category` (array of strings)
3. `publish_year` (32-bit integer)
* **Vector embeddings**:
1. `dense_embedding`: a 768-dimensional dense vector
2. `sparse_embedding`: a sparse vector
Python
Node.js
```python title="Open a collection"
import zvec
collection_schema = zvec.CollectionSchema( # [!code highlight]
name="example_collection",
fields=[
zvec.FieldSchema(
name="book_title",
data_type=zvec.DataType.STRING,
index_param=zvec.InvertIndexParam(enable_range_optimization=False),
),
zvec.FieldSchema(
name="category",
data_type=zvec.DataType.ARRAY_STRING,
),
zvec.FieldSchema(
name="publish_year",
data_type=zvec.DataType.INT32,
index_param=zvec.InvertIndexParam(enable_range_optimization=True),
),
],
vectors=[
zvec.VectorSchema(
name="dense_embedding",
data_type=zvec.DataType.VECTOR_FP32,
dimension=768,
index_param=zvec.HnswIndexParam(metric_type=zvec.MetricType.COSINE),
),
zvec.VectorSchema(
name="sparse_embedding",
data_type=zvec.DataType.SPARSE_VECTOR_FP32,
index_param=zvec.HnswIndexParam(metric_type=zvec.MetricType.IP),
),
],
)
collection = zvec.open(path="/path/to/example/collection") # [!code highlight]
```
```ts title="Open a collection"
import { ZVecCollection, ZVecCollectionSchema, ZVecDataType, ZVecIndexType, ZVecMetricType, ZVecOpen } from "@zvec/zvec";
const collectionSchema: ZVecCollectionSchema = new ZVecCollectionSchema({ // [!code highlight]
name: "example_collection",
fields: [
{
name: "book_title",
dataType: ZVecDataType.STRING,
indexParams: { indexType: ZVecIndexType.INVERT, enableRangeOptimization: false }
},
{
name: "category",
dataType: ZVecDataType.ARRAY_STRING
},
{
name: "publish_year",
dataType: ZVecDataType.INT32,
indexParams: { indexType: ZVecIndexType.INVERT, enableRangeOptimization: true }
}
],
vectors: [
{
name: "dense_embedding",
dataType: ZVecDataType.VECTOR_FP32,
dimension: 768,
indexParams: { indexType: ZVecIndexType.HNSW, metricType: ZVecMetricType.COSINE }
},
{
name: "sparse_embedding",
dataType: ZVecDataType.SPARSE_VECTOR_FP32,
indexParams: { indexType: ZVecIndexType.HNSW, metricType: ZVecMetricType.IP }
}
]
});
const collection: ZVecCollection = ZVecOpen("/path/to/example/collection"); // [!code highlight]
```
Upsert a document with multiple fields and vectors like this:
Python
Node.js
```python title="Upsert a document with multiple fields and vectors"
import zvec
# Create a document
doc = zvec.Doc( # [!code highlight]
id="book_1",
vectors={
"dense_embedding": [0.1 for _ in range(768)], # ← use real embedding in practice
"sparse_embedding": {42: 1.25, 1337: 0.8, 1999: 0.64}, # ← use real embedding in practice
},
fields={
"book_title": "Gone with the Wind", # ← string
"category": ["Romance", "Classic Literature"], # ← array of strings
"publish_year": 1936, # ← integer
},
)
# Upsert the document
result = collection.upsert(doc) # [!code highlight]
print(result) # {"code": 0} means success
```
```ts title="Upsert a document with multiple fields and vectors"
// Create a document
let doc: ZVecDocInput = { // [!code highlight]
id: "book_1",
vectors: {
"dense_embedding": Array(768).fill(0.1), // ← use real embedding in practice
"sparse_embedding": { 42: 1.25, 1337: 0.8, 1999: 0.64 } // ← use real embedding in practice
},
fields: {
"book_title": "Gone with the Wind", // ← string
"category": ["Romance", "Classic Literature"], // ← array of strings
"publish_year": 1936 // ← integer
}
};
// Upsert the document
let result = collection.upsertSync(doc); // [!code highlight]
console.log(result); // { ok: true } means success
```
# Create
## Create and Open a Collection [#create-and-open-a-collection]
To create a new collection in Zvec, you need to define the following:
1. **Schema** — the structural blueprint of your data, specifying scalar fields and vector embeddings.
2. **Collection options** (optional) — runtime settings that control how the collection behaves when opened (e.g., read-only mode).
Once defined, call `create_and_open()` to initialize a new collection at a specified path and return a `Collection` object ready for inserts and queries.
If a collection already exists at the specified path, `create_and_open()` will raise an error to prevent accidental overwrites.
Python
Node.js
```python title="Create and open a collection"
import zvec
# [!code word:CollectionSchema]
# [!code word:CollectionOption]
# Define a collection schema
collection_schema = zvec.CollectionSchema(
name="example_collection",
fields=[
zvec.FieldSchema(
name="string_field_example",
data_type=zvec.DataType.STRING,
nullable=True,
index_param=zvec.InvertIndexParam(enable_range_optimization=False),
),
],
vectors=[
zvec.VectorSchema(
name="dense_vector_example",
data_type=zvec.DataType.VECTOR_FP32,
dimension=768,
index_param=zvec.HnswIndexParam(metric_type=zvec.MetricType.COSINE),
),
],
)
# Create and open the collection
collection = zvec.create_and_open( # [!code highlight]
path="/path/to/my/collection",
schema=collection_schema,
option=zvec.CollectionOption(read_only=False, enable_mmap=True),
)
```
```ts title="Create and open a collection"
import { ZVecCollectionSchema, ZVecCreateAndOpen, ZVecDataType, ZVecIndexType, ZVecMetricType } from "@zvec/zvec";
// [!code word:ZVecCollectionSchema]
// Define a collection schema
const collectionSchema = new ZVecCollectionSchema({
name: "example_collection",
fields: [
{
name: "string_field_example",
dataType: ZVecDataType.STRING,
nullable: true,
indexParams: { indexType: ZVecIndexType.INVERT, enableRangeOptimization: false }
}
],
vectors: [
{
name: "dense_vector_example",
dataType: ZVecDataType.VECTOR_FP32,
dimension: 768,
indexParams: { indexType: ZVecIndexType.HNSW, metricType: ZVecMetricType.COSINE }
}
]
});
// Create and open the collection
const collection = ZVecCreateAndOpen( // [!code highlight]
"/path/to/my/collection",
collectionSchema,
{ readOnly: false, enableMMAP: true } // [!code highlight]
);
```
***
## Real-World Example: 🛒 Product Search [#real-world-example--product-search]
This schema models a **multi-modal product search system**, combining visual, textual, and structured metadata for rich retrieval:
### 🗂️ Scalar Fields: For Filtering & Display [#️-scalar-fields-for-filtering--display]
* `category` (array of strings, indexed): Enables queries like `category CONTAIN_ANY ("electronics", "headphones")` to find products that belong to either "electronics" or "headphones" (or both).
* `price` (integer, indexed with range optimization): Supports fast range queries such as `price > 100`.
* `in_stock` (boolean, indexed): Enables instant filtering by availability (e.g., "only show items in stock").
* `image_url` and `description` are stored but **not indexed**, since they're only used for display.
### 📐 Vector Embeddings: For Semantic Relevance [#-vector-embeddings-for-semantic-relevance]
* Two dense vectors capture semantic meaning:
* `image_vec`: 512-dimensional embeddings from product images (e.g., via a vision model).
* `description_vec`: 768-dimensional embeddings from product descriptions (e.g., from a language model), stored with quantization.
* One sparse vector `keywords_sparse` for keyword matching, enabling hybrid sparse-dense search.
Python
Node.js
```python title="Create a collection"
import zvec
collection_schema = zvec.CollectionSchema( # [!code highlight]
name="product_search",
fields=[ # [!code highlight]
zvec.FieldSchema(
name="image_url",
data_type=zvec.DataType.STRING, # Not used in filtering, no index created
nullable=True, # Could be null
),
zvec.FieldSchema(
name="description",
data_type=zvec.DataType.STRING, # Not used in filtering, no index created
),
zvec.FieldSchema(
name="category",
data_type=zvec.DataType.ARRAY_STRING,
# Inverted index for array membership queries
index_param=zvec.InvertIndexParam(),
),
zvec.FieldSchema(
name="price",
data_type=zvec.DataType.INT32,
# Optimization for range queries, e.g., price > 100
index_param=zvec.InvertIndexParam(enable_range_optimization=True),
),
zvec.FieldSchema(
name="in_stock",
data_type=zvec.DataType.BOOL,
# Inverted index for boolean queries
index_param=zvec.InvertIndexParam(),
),
],
vectors=[ # [!code highlight]
# Dense embedding from product images
zvec.VectorSchema(
name="image_vec",
data_type=zvec.DataType.VECTOR_FP32,
dimension=512,
# Use HNSW index for similarity search with cosine distance metric
index_param=zvec.HnswIndexParam(metric_type=zvec.MetricType.COSINE),
),
# Dense embedding from product descriptions
zvec.VectorSchema(
name="description_vec",
data_type=zvec.DataType.VECTOR_FP32,
dimension=768,
# Enable quantization for faster similarity search
index_param=zvec.HnswIndexParam(metric_type=zvec.MetricType.COSINE, quantize_type=zvec.QuantizeType.INT8),
),
# Sparse vector from product keywords
zvec.VectorSchema(
name="keywords_sparse",
data_type=zvec.DataType.SPARSE_VECTOR_FP32,
# Use HNSW index for similarity search with inner product metric
index_param=zvec.HnswIndexParam(metric_type=zvec.MetricType.IP),
),
],
)
collection = zvec.create_and_open( # [!code highlight]
path="path/to/collection",
schema=collection_schema,
option=zvec.CollectionOption(read_only=False, enable_mmap=True),
)
```
```ts title="Create a collection"
import { ZVecCollection, ZVecCollectionSchema, ZVecCreateAndOpen, ZVecDataType, ZVecIndexType, ZVecMetricType, ZVecQuantizeType } from "@zvec/zvec";
const collectionSchema = new ZVecCollectionSchema({ // [!code highlight]
name: "product_search",
fields: [ // [!code highlight]
{
name: "image_url",
dataType: ZVecDataType.STRING, // Not used in filtering, no index created
nullable: true // Could be null
},
{
name: "description",
dataType: ZVecDataType.STRING // Not used in filtering, no index created
},
{
name: "category",
dataType: ZVecDataType.ARRAY_STRING,
// Inverted index for array membership queries
indexParams: { indexType: ZVecIndexType.INVERT }
},
{
name: "price",
dataType: ZVecDataType.INT32,
// Optimization for range queries, e.g., price > 100
indexParams: { indexType: ZVecIndexType.INVERT, enableRangeOptimization: true }
},
{
name: "in_stock",
dataType: ZVecDataType.BOOL,
// Inverted index for boolean queries
indexParams: { indexType: ZVecIndexType.INVERT }
}
],
vectors: [ // [!code highlight]
{ // Dense embedding from product images
name: "image_vec",
dataType: ZVecDataType.VECTOR_FP32,
dimension: 512,
// Use HNSW index for similarity search with cosine distance metric
indexParams: { indexType: ZVecIndexType.HNSW, metricType: ZVecMetricType.COSINE }
},
{ // Dense embedding from product descriptions
name: "description_vec",
dataType: ZVecDataType.VECTOR_FP32,
dimension: 768,
// Enable quantization for faster similarity search
indexParams: { indexType: ZVecIndexType.HNSW, metricType: ZVecMetricType.COSINE, quantizeType: ZVecQuantizeType.INT8 }
},
{ // Sparse vector from product keywords
name: "keywords_sparse",
dataType: ZVecDataType.SPARSE_VECTOR_FP32,
// Use HNSW index for similarity search with inner product metric
indexParams: { indexType: ZVecIndexType.HNSW, metricType: ZVecMetricType.IP }
}
]
});
const collection: ZVecCollection = ZVecCreateAndOpen( // [!code highlight]
"path/to/collection",
collectionSchema,
{ readOnly: false, enableMMAP: true }
);
```
# Options
The `CollectionOption` lets you control runtime behavior when creating or opening a collection:
* `read_only`: Opens the collection in read-only mode. Attempts to write will raise an error.
**Note**: `read_only` must be set to `False` when calling `create_and_open()`, since creation requires writing files to disk.
* `enable_mmap`: Uses memory-mapped I/O for faster access (default to `True`). This trades slightly higher memory cache usage for improved performance.
Python
Node.js
```python title="Collection option"
import zvec
# [!code word:CollectionOption]
collection_option = zvec.CollectionOption(read_only=False, enable_mmap=True)
```
```ts title="Collection option"
import { ZVecCollectionOptions } from "@zvec/zvec";
// [!code word:ZVecCollectionOptions]
const collectionOptions: ZVecCollectionOptions = { readOnly: false, enableMMAP: true };
```
# Schema
A **collection schema** `CollectionSchema` defines the structure that every [document](../../../concepts/data-modeling/#documents) inserted into the collection must conform to.
The schema in Zvec is **dynamic**: you can add or remove scalar fields and vectors at any time without rebuilding the collection.
`CollectionSchema` has three parts:
1. `name`: An identifier for the collection.
2. `fields`: A list of scalar fields.
3. `vectors`: A list of vector fields.
## Collection Name [#collection-name-step]
A human-readable identifier for your collection. This name is used internally for reference and logging.
## Scalar Fields [#scalar-fields-step]
Scalar fields store non-vector (i.e., structured) data — such as strings, numbers, booleans, or arrays.
Each field is defined using `FieldSchema` with the following properties:
1. `name`: A unique string identifier for the field within the collection.
2. [`data_type`](../../../concepts/data-modeling/#scalar-types): The type of data stored — e.g., `STRING`, `INT64`, or array types like `ARRAY_STRING`.
3. `nullable` (optional): Whether the field is allowed to **have no value** (defaults to `False`).
4. `index_param` (optional): Enables fast filtering via `InvertIndexParam` ([inverted index](../../../concepts/inverted-index/)) or full-text search via `FtsIndexParam` ([full-text index](../../../concepts/fts-index/)).
Add an index to fields you plan to filter on. Unindexed fields save storage and write overhead.
For **inverted indexes** (`InvertIndexParam`), you can optionally activate performance-enhancing (but storage-costly) features:
* `enable_range_optimization=True` → faster range queries (e.g., `price > 100`)
* `enable_extended_wildcard=True` → complex string pattern matching (e.g., `name LIKE 'abc%def'`)
For **full-text indexes** (`FtsIndexParam`), configure the tokenizer and token filters instead. See [full-text search](../../../data-operations/query/fts/#defining-an-fts-field) for details.
Python
Node.js
```python title="Define a scalar field with inverted index"
import zvec
# [!code word:InvertIndexParam]
field_schema = zvec.FieldSchema( # [!code highlight]
name="string_field_example",
data_type=zvec.DataType.STRING,
nullable=True,
# Enables fast filtering; range queries are supported but unoptimized
index_param=zvec.InvertIndexParam(enable_range_optimization=False),
)
```
```ts title="Define a scalar field with inverted index"
import { ZVecDataType, ZVecFieldSchema, ZVecIndexType } from "@zvec/zvec";
const fieldSchema: ZVecFieldSchema = { // [!code highlight]
name: "string_field_example",
dataType: ZVecDataType.STRING,
nullable: true,
// [!code word:INVERT]
// Enables fast filtering; range queries are supported but unoptimized
indexParams: { indexType: ZVecIndexType.INVERT, enableRangeOptimization: false }
};
```
Python
Node.js
```python title="Define a field with full-text index"
import zvec
# [!code word:FtsIndexParam]
fts_field = zvec.FieldSchema( # [!code highlight]
name="content",
data_type=zvec.DataType.STRING,
nullable=False,
index_param=zvec.FtsIndexParam( # [!code highlight]
tokenizer_name="standard",
),
)
```
```ts title="Define a field with full-text index"
import { ZVecDataType, ZVecFieldSchema, ZVecIndexType } from "@zvec/zvec";
const ftsField: ZVecFieldSchema = { // [!code highlight]
name: "content",
dataType: ZVecDataType.STRING,
nullable: false,
// [!code word:FTS]
indexParams: {
indexType: ZVecIndexType.FTS,
tokenizerName: "standard"
}
};
```
## Vectors (Embeddings) [#vectors-embeddings-step]
A vector is defined using `VectorSchema` with the following properties:
1. `name`: A unique string identifier for the vector within the collection.
2. [`data_type`](../../../concepts/data-modeling/#vector-types): The numeric format of the vector.
* [Dense vectors](../../../concepts/vector-embedding/#dense-vectors): `VECTOR_FP32`, `VECTOR_FP16`, etc.
* [Sparse vectors](../../../concepts/vector-embedding/#sparse-vectors): `SPARSE_VECTOR_FP32`, `SPARSE_VECTOR_FP16`.
3. `dimension`: Required for dense vectors — the number of dimensions.
4. `index_param`: Configures the vector index type and similarity metric.
### Choosing Vector Index Type [#choosing-vector-index-type]
The `index_param` allows you to configure the appropriate indexing strategy:
* `metric_type`: `COSINE`, `L2`, or `IP` (inner product) — *Ensure your metric matches how your embeddings were trained!*
* [`quantize_type`](../../../concepts/vector-index/quantization/) (optional): Compress vectors to reduce index size and speed up search (with slight [recall](../../../concepts/vector-index/#recall-measuring-approximation-quality) trade-off).
* [`quantizer_param`](../../../concepts/vector-index/quantization/) (optional): Additional quantizer parameters, e.g. `enable_rotate` (reduces quantization recall loss via random rotation).
Use `FlatIndexParam()` for Flat index configuration.
Python
Node.js
```python title="Define a vector embedding"
import zvec
vector_schema = zvec.VectorSchema( # [!code highlight]
name="dense_vector_example",
data_type=zvec.DataType.VECTOR_FP32,
dimension=768,
# [!code word:FlatIndexParam]
index_param=zvec.FlatIndexParam(metric_type=zvec.MetricType.COSINE),
)
```
```ts title="Define a vector embedding"
import { ZVecDataType, ZVecIndexType, ZVecMetricType, ZVecVectorSchema } from "@zvec/zvec";
const vectorSchema: ZVecVectorSchema = { // [!code highlight]
name: "dense_vector_example",
dataType: ZVecDataType.VECTOR_FP32,
dimension: 768,
// [!code word:FLAT]
indexParams: { indexType: ZVecIndexType.FLAT, metricType: ZVecMetricType.COSINE }
};
```
Use [`HnswIndexParam()`](../../../concepts/vector-index/hnsw-index/#index-time-parameters) for HNSW index configuration.
Python
Node.js
```python title="Define a vector embedding"
import zvec
vector_schema = zvec.VectorSchema( # [!code highlight]
name="dense_vector_example",
data_type=zvec.DataType.VECTOR_FP32,
dimension=768,
# [!code word:HnswIndexParam]
index_param=zvec.HnswIndexParam(
metric_type=zvec.MetricType.COSINE,
ef_construction=700,
quantize_type=zvec.QuantizeType.INT8,
quantizer_param=zvec.QuantizerParam(enable_rotate=True),
),
)
```
```ts title="Define a vector embedding"
import {
ZVecDataType,
ZVecIndexType,
ZVecMetricType,
ZVecQuantizeType,
ZVecVectorSchema,
} from "@zvec/zvec";
const vectorSchema: ZVecVectorSchema = { // [!code highlight]
name: "dense_vector_example",
dataType: ZVecDataType.VECTOR_FP32,
dimension: 768,
// [!code word:HNSW]
indexParams: {
indexType: ZVecIndexType.HNSW,
metricType: ZVecMetricType.COSINE,
efConstruction: 700,
quantizeType: ZVecQuantizeType.INT8,
quantizerParams: { enableRotate: true },
},
};
```
Use [`HnswRabitqIndexParam()`](../../../concepts/vector-index/hnsw-rabitq-index/#index-time-parameters) for HNSW-RaBitQ index configuration. This index combines HNSW graph navigation with RaBitQ quantization for lower memory usage.
HNSW-RaBitQ is available only on **Linux x86\_64** with AVX2 or AVX512 support. Zvec automatically selects the best runtime.
Python
Node.js
```python title="Define a vector embedding"
import zvec
vector_schema = zvec.VectorSchema( # [!code highlight]
name="dense_vector_example",
data_type=zvec.DataType.VECTOR_FP32,
dimension=768,
# [!code word:HnswRabitqIndexParam]
index_param=zvec.HnswRabitqIndexParam(
metric_type=zvec.MetricType.COSINE,
total_bits=7,
num_clusters=64,
),
)
```
```ts title="Define a vector embedding"
import { ZVecDataType, ZVecIndexType, ZVecMetricType, ZVecVectorSchema } from "@zvec/zvec";
const vectorSchema: ZVecVectorSchema = { // [!code highlight]
name: "dense_vector_example",
dataType: ZVecDataType.VECTOR_FP32,
dimension: 768,
// [!code word:HNSW_RABITQ]
indexParams: {
indexType: ZVecIndexType.HNSW_RABITQ,
metricType: ZVecMetricType.COSINE,
totalBits: 7,
numClusters: 64
}
};
```
Use [`IVFIndexParam()`](../../../concepts/vector-index/ivf-index/#index-time-parameters) for IVF index configuration.
Python
Node.js
```python title="Define a vector embedding"
import zvec
vector_schema = zvec.VectorSchema( # [!code highlight]
name="dense_vector_example",
data_type=zvec.DataType.VECTOR_FP32,
dimension=768,
# [!code word:IVFIndexParam]
index_param=zvec.IVFIndexParam(metric_type=zvec.MetricType.COSINE, n_list=1000),
)
```
```ts title="Define a vector embedding"
import { ZVecDataType, ZVecIndexType, ZVecMetricType, ZVecVectorSchema } from "@zvec/zvec";
const vectorSchema: ZVecVectorSchema = { // [!code highlight]
name: "dense_vector_example",
dataType: ZVecDataType.VECTOR_FP32,
dimension: 768,
// [!code word:IVF]
indexParams: { indexType: ZVecIndexType.IVF, metricType: ZVecMetricType.COSINE, nList: 1000 }
};
```
Use [`IvfRabitqIndexParam()`](../../../concepts/vector-index/ivf-rabitq-index/#index-time-parameters) to configure an IVF-RaBitQ index. IVF narrows the scan scope, while RaBitQ compresses vectors within each inverted list.
IVF-RaBitQ is available only on **Linux x86\_64** with AVX2 or AVX512 support. Zvec automatically selects the best runtime.
Python
Node.js
```python title="Define a vector embedding"
import zvec
vector_schema = zvec.VectorSchema( # [!code highlight]
name="dense_vector_example",
data_type=zvec.DataType.VECTOR_FP32,
dimension=768,
# [!code word:IvfRabitqIndexParam]
index_param=zvec.IvfRabitqIndexParam(
metric_type=zvec.MetricType.COSINE,
nlist=1024,
total_bits=7,
sample_count=0,
),
)
```
```ts title="Define a vector embedding"
import { ZVecDataType, ZVecIndexType, ZVecMetricType, ZVecVectorSchema } from "@zvec/zvec";
const vectorSchema: ZVecVectorSchema = { // [!code highlight]
name: "dense_vector_example",
dataType: ZVecDataType.VECTOR_FP32,
dimension: 768,
// [!code word:IVF_RABITQ]
indexParams: {
indexType: ZVecIndexType.IVF_RABITQ,
metricType: ZVecMetricType.COSINE,
nList: 1024,
totalBits: 7,
sampleCount: 0,
},
};
```
Use [`DiskAnnIndexParam()`](../../../concepts/vector-index/diskann-index/#index-time-parameters) for DiskANN index configuration.
Python
Node.js
```python title="Define a vector embedding"
import zvec
vector_schema = zvec.VectorSchema( # [!code highlight]
name="dense_vector_example",
data_type=zvec.DataType.VECTOR_FP32,
dimension=768,
# [!code word:DiskAnnIndexParam]
index_param=zvec.DiskAnnIndexParam(
metric_type=zvec.MetricType.COSINE,
max_degree=64,
list_size=100,
pq_chunk_num=96,
),
)
```
```ts title="Define a vector embedding"
import { ZVecDataType, ZVecIndexType, ZVecMetricType, ZVecVectorSchema } from "@zvec/zvec";
const vectorSchema: ZVecVectorSchema = { // [!code highlight]
name: "dense_vector_example",
dataType: ZVecDataType.VECTOR_FP32,
dimension: 768,
// [!code word:DISKANN]
indexParams: {
indexType: ZVecIndexType.DISKANN,
metricType: ZVecMetricType.COSINE,
maxDegree: 64,
listSize: 100,
pqChunkNum: 96
}
};
```
## Full Schema Example [#full-schema-example]
Python
Node.js
```python title="Define a collection schema"
import zvec
collection_schema = zvec.CollectionSchema( # [!code highlight]
name="example_collection",
fields=[ # [!code highlight]
zvec.FieldSchema(
name="string_field_example",
data_type=zvec.DataType.STRING,
nullable=True,
index_param=zvec.InvertIndexParam(enable_range_optimization=False),
),
],
vectors=[ # [!code highlight]
zvec.VectorSchema(
name="dense_vector_example",
data_type=zvec.DataType.VECTOR_FP32,
dimension=768,
index_param=zvec.HnswIndexParam(metric_type=zvec.MetricType.COSINE),
),
],
)
```
```ts title="Define a collection schema"
import { ZVecCollectionSchema, ZVecDataType, ZVecIndexType, ZVecMetricType } from "@zvec/zvec";
const collectionSchema: ZVecCollectionSchema = new ZVecCollectionSchema({ // [!code highlight]
name: "example_collection",
fields: [ // [!code highlight]
{
name: "string_field_example",
dataType: ZVecDataType.STRING,
nullable: true,
indexParams: { indexType: ZVecIndexType.INVERT, enableRangeOptimization: false }
}
],
vectors: [ // [!code highlight]
{
name: "dense_vector_example",
dataType: ZVecDataType.VECTOR_FP32,
dimension: 768,
indexParams: { indexType: ZVecIndexType.HNSW, metricType: ZVecMetricType.COSINE }
}
]
});
```
# DiskANN Index
A disk-based graph index designed for **billion-scale** vector search — keeping compressed vectors in memory and full-precision vectors on disk, enabling high-recall approximate nearest neighbor search with a **dramatically smaller memory footprint**.
DiskANN was introduced by Subramanya et al. in the NeurIPS 2019 paper [DiskANN: Fast Accurate Billion-point Nearest Neighbor Search on a Single Node](https://proceedings.neurips.cc/paper_files/paper/2019/hash/09853c7fb1d3f8ee67a61b6bf4a7f8e6-Abstract.html).
**Platform Support**: DiskANN is currently supported on **Linux only**.
**`libaio` is optional.** When it is available, DiskANN uses Linux asynchronous I/O for better performance. Without `libaio`, DiskANN continues to work using a fallback I/O path, but queries may be slower.
The trade-off: because every query path involves disk I/O, DiskANN delivers **lower QPS than pure in-memory indexes** (such as [HNSW](../hnsw-index/)). It is best suited for throughput- and latency-tolerant workloads that must handle very large datasets under tight memory budgets.
## How It Works [#how-it-works]
DiskANN builds a [Vamana graph](https://proceedings.neurips.cc/paper_files/paper/2019/file/09853c7fb1d3f8ee67a61b6bf4a7f8e6-Paper.pdf) over the full dataset and stores it on disk along with the original vectors. At search time, only compressed PQ (Product Quantization) codes live in memory, while the graph and full-precision vectors are read from disk on demand.
* **Vamana graph for navigation** 🪜
* A single-layer graph where each node is connected to up to `max_degree` neighbors.
* The graph is built using a greedy search-and-prune strategy with an **alpha parameter** that encourages long-range edges, providing fast convergence to the query's neighborhood.
* A **medoid** (the point closest to the dataset's centroid) serves as the fixed entry point for every search.
* **Product Quantization (PQ) for distance estimation** 🔍
* The vector space is split into `pq_chunk_num` sub-spaces, and each sub-vector is quantized into a 256-centroid codebook (8-bit PQ codes).
* At query time, a **PQ distance lookup table** is precomputed for the query, allowing approximate distances to all candidates to be computed via fast table lookups instead of full-precision arithmetic.
* **Cached beam search** 🔎
* Search starts from the medoid and explores the graph using a **beam search** strategy — multiple frontier nodes are expanded concurrently via batched disk I/O.
* Frequently accessed nodes near the entry point are cached in memory (**BFS-level caching**), reducing disk reads for hot regions of the graph.
* For each visited node, approximate distances are computed using PQ codes, and the full-precision vector is read from disk to compute the exact distance for the top-k result candidates.
## When to Use a DiskANN Index? [#when-to-use-a-diskann-index]
* ✅ Billion-scale datasets that **cannot fit entirely in memory**
* ✅ Cost-sensitive deployments where minimizing RAM is critical
* ✅ Batch workloads and offline analytics that can tolerate slightly higher latency per query compared to in-memory indexes
**Best Practice**: Use DiskANN when your dataset far exceeds available RAM. It provides strong recall with memory consumption proportional only to PQ codes, not full vectors. For datasets that fit in memory, prefer [HNSW](../hnsw-index/) or [HNSW-RaBitQ](../hnsw-rabitq-index/) for lower latency.
## Advantages [#advantages]
1. ✨ **Extremely low memory footprint** — Only PQ-compressed codes (1 byte per chunk per vector) reside in memory, making billion-scale search feasible on commodity hardware
2. ✨ **High recall** — The Vamana graph preserves connectivity and diversity through its alpha-based pruning, and exact distances are recomputed for final candidates
3. ✨ **Scalable graph construction** — Built with a simple greedy insert-and-prune algorithm that can be parallelized across threads
## Trade-offs [#trade-offs]
1. ⚠️ **Higher query latency** — Each search requires disk I/O for graph traversal, making it slower than pure in-memory indexes like HNSW
2. ⚠️ **Build-time PQ training** — Requires a KMeans-based PQ training step before index construction, adding to the total build time
3. ⚠️ **Not suited for real-time workloads** — Disk access latency means DiskANN is better for latency-tolerant use cases or scenarios with relatively low QPS requirements
## Key Parameters [#key-parameters]
**Tuning Tip**:
Start with defaults. Adjust `list_size` at query time first for recall/latency trade-offs. Only increase `max_degree` if you need better recall — but expect higher disk usage and longer build times. Reduce `pq_chunk_num` if you need to cut memory further and can tolerate lower recall.
### Index-Time Parameters [#index-time-parameters]
| Parameter | Description | Tuning Guidance |
| -------------- | -------------------------------------------------------------------------------------------------------------------------- | ------------------------------------------------------------------------------------------------------------------------------------------------ |
| `metric_type` | **Similarity metric** used to compare vectors | Choose based on how your embeddings were trained |
| `max_degree` | **Max neighbors per node** — The maximum number of edges per node in the Vamana graph | • Higher `max_degree` →
✨ better recall and graph connectivity
⚠️ more disk usage and longer build time |
| `list_size` | **Build-time candidate list size** — Number of candidates considered during graph construction when inserting a new vector | • Higher `list_size` →
✨ better graph quality and higher recall
⚠️ longer index build time |
| `pq_chunk_num` | **Number of PQ sub-spaces** — Controls how the vector dimensions are partitioned for Product Quantization | • More chunks →
✨ finer-grained distance approximation and better recall
⚠️ more memory for PQ codes (1 byte per chunk per vector) |
### Query-Time Parameters [#query-time-parameters]
| Parameter | Description | Tuning Guidance |
| ----------- | --------------------------------------------------------------------------------------------------------------------- | ---------------------------------------------------------------------------------------------- |
| `list_size` | **Query-time candidate list size** — Determines how many candidates are maintained during beam search graph traversal | • Higher `list_size` →
✨ higher recall
⚠️ more disk I/O and higher query latency |
# Flat Index
## How It Works [#how-it-works]
Performs an exact (brute-force) similarity search by comparing the query vector against every vector in the dataset.
## When to Use a Flat Index [#when-to-use-a-flat-index]
* ✅ Small datasets
* ✅ Prototyping and experimentation
* ✅ Evaluation baselines
* ✅ Scenarios where 100% recall is non-negotiable
**Best Practice**: Start with Flat Index during development and testing — it's your reliability anchor. Once you validate your approach, consider approximate indexes (like [HNSW](../hnsw-index/)) for production-scale performance. Use the Flat index when working with tiny datasets (e.g., under 300k vectors) where correctness outweighs speed.
## Advantages [#advantages]
1. ✨ **Perfect Recall Guarantee** — Finds true nearest neighbors
2. ✨ **Zero Configuration** — Simple setup with no tuning required
3. ✨ **Instant Indexing** — Build time is virtually immediate
## Limitations [#limitations]
⚠️ Search latency grows linearly with dataset size — making it impractical for large-scale workloads.
# HNSW Index
## How It Works [#how-it-works]
[HNSW](https://arxiv.org/abs/1603.09320) builds a **multi-layer graph structure** where each node represents a vector and edges connect nodes based on similarity.
* Layers form a hierarchy 🪜
* **Upper layers** are sparse with fewer nodes, acting as "highways" for fast long-range navigation.
* **Lower layers** are dense with more nodes, providing fine-grained local neighborhood connectivity.
* How search works (coarse → fine) 🔍
1. Start from an **entry point** at the top layer.
2. At the current layer, you greedily walk to neighbors that are closer to the query vector, until you can't get any closer.
3. Then you **drop down one layer** at that position and repeat the same greedy search.
4. On the **lowest layer**, this process is done more carefully (with a candidate list) to refine the result.
* **Why this is fast and accurate** ⚡ 🎯
* **Fast**: Upper layers let you jump quickly to the right region without visiting most points.
* **Accurate**: The dense bottom layer lets you explore the local neighborhood thoroughly, so recall stays high.
## When to Use an HNSW Index? [#when-to-use-an-hnsw-index]
* ✅ Real-time, low-latency applications (e.g., conversational AI and live recommendations)
* ✅ Production systems requiring consistent high recall with minimal latency
**Best Practice**: HNSW is our **recommended default** for most production use cases. It strikes an excellent balance between speed, accuracy, and robustness.
## Advantages [#advantages]
1. ✨ **Near-logarithmic query time** — Typically **O(log n)** for large datasets
2. ✨ **Consistently high recall** across diverse data distributions
3. ✨ **Faster indexing** than many alternatives (e.g., [IVF-based](../ivf-index/) methods)
## Trade-offs [#trade-offs]
1. ⚠️ **Higher memory footprint** — Graph links require additional storage (scales with [`m`](#index-time-parameters))
2. ⚠️ **Indexing complexity of O(n log n)** — Slower build time than [Flat index](../flat-index/) (but often faster than [IVF](../ivf-index/))
## Key Parameters [#key-parameters]
**Tuning Tip**: Start with defaults, then adjust `ef` first for recall/latency trade-offs. Only if needed, increase `ef_construction` or `m` for better accuracy — but expect slower indexing and higher memory use.
### Index-Time Parameters [#index-time-parameters]
| Parameter | Description | Tuning Guidance |
| ----------------- | -------------------------------------------------------------------------------------------------------------------------------------------------- | ---------------------------------------------------------------------------------------------------------------------------------------------- |
| `metric_type` | **Similarity metric** used to compare vectors | Choose based on how your embeddings were trained |
| `m` | **Max neighbors per node** — The maximum number of bidirectional links created for each node during graph construction | • Higher `m` →
✨ better recall and graph connectivity
⚠️ more memory usage and higher latency for both indexing and search |
| `ef_construction` | **Index-time candidate pool size** — Determines how many neighboring candidates the algorithm considers when inserting a new vector into the graph | • Higher `ef_construction` →
✨ better graph quality and higher recall
⚠️ longer index build time (*does not affect query speed*) |
| `quantize_type` | **Vector quantization method** to apply
Defaults to no quantization | See [Quantization](../quantization/) for more details |
### Query-Time Parameters [#query-time-parameters]
| Parameter | Description | Tuning Guidance |
| ------------------ | --------------------------------------------------------------------------------------------------------------------------------------------------------------------------- | -------------------------------------------------------------------------------------------------------------------------------------------------------------------------------------------------------------------------------------------------- |
| `ef` | **Query-time candidate pool size** — Determines how many potential neighbors are explored at each step during graph traversal at query time | • Higher `ef` →
✨ higher recall
⚠️ higher query latency
💡 If you're missing results at `ef=300`, try bumping it up to `500` or even higher to cast a wider net. |
| `radius` | **Distance (similarity) threshold** for range-based filtering — only documents satisfying the threshold are returned | Example:
• With inner product `MetricType.IP`, set `radius=0.6` to keep only results with score > 0.6
✅ Use when: You want to filter out low-quality matches
🚫 Skip when: You want all top-k results, regardless of quality |
| `is_linear` | Forces a **brute-force linear search** instead of using the index | 🐌 Very slow for large datasets!
✅ Only use for: Debugging, tiny collections, or verifying index accuracy |
| `is_using_refiner` | **Enables exact score refinement** (recomputes exact similarity scores) for top candidates — helpful for **quantized** vectors to recover accuracy and boost recall quality | ✅ Recommended: When you need higher accuracy for quantized vectors
⚠️ Adds latency due to exact re-scoring |
# HNSW-RaBitQ Index
An advanced graph-based index that combines the [HNSW](../hnsw-index/) graph structure with [RaBitQ](https://arxiv.org/abs/2405.12497) quantization algorithm — delivering **dramatically lower memory usage** while maintaining state-of-the-art search quality.
**Platform requirement**: HNSW-RaBitQ currently supports **Linux x86\_64** only. The CPU must support **AVX2 or AVX512**. Zvec automatically selects the best runtime.
## How It Works [#how-it-works]
HNSW-RaBitQ combines two techniques to achieve high recall with minimal memory:
* **HNSW graph for navigation** 🪜
* Same multi-layer graph structure as the standard [HNSW index](../hnsw-index/) — sparse upper layers for fast long-range jumps, dense lower layers for fine-grained local search.
* **RaBitQ for distance estimation** 🔍
* RaBitQ processes the data by applying a **random rotation** to the vectors before converting them into **binary codes** (1s and 0s). This approach allows the system to estimate distances using efficient bitwise operations, significantly **reducing both memory usage and the computational cost** compared to processing full-precision numbers.
## When to Use HNSW-RaBitQ? [#when-to-use-hnsw-rabitq]
* ✅ Production systems needing fast search and high recall with controlled memory budgets
* ✅ Massive high-dimensional datasets — billion-scale vectors with 1536+ dimensions that would consume terabytes of RAM in FP32 format
* ✅ Workloads on **Linux x86\_64** servers with AVX2 or AVX512 support
**Best Practice**: Use HNSW-RaBitQ when you want HNSW-quality search without the memory overhead.
The `total_bits` parameter controls the accuracy–memory trade-off. According to the [paper](https://arxiv.org/abs/2405.12497), on specific datasets, **7 bits** achieves \~99% recall, **5 bits** \~95%, and **4 bits** \~90%. Going as low as **1 bit** maximizes compression at the cost of lower recall.
## Advantages [#advantages]
1. ✨ **Dramatically lower memory** — Quantized vectors are up to 32x smaller than FP32, reducing active index size
2. ✨ **Fast Distance Estimation** — RaBitQ supports to estimate the similarity metrics with high efficiency based on bitwise operations
3. ✨ **Promising Recall Without Re-ranking** — Graph construction uses original vectors, preserving graph quality and RaBitQ provides an asymptotically optimal error bound for reliable ordering and reranking.
## Trade-offs [#trade-offs]
1. ⚠️ **Platform constraints** — Supports Linux x86\_64 only and requires AVX2 or AVX512
2. ⚠️ **Training overhead** — Requires a KMeans training step before index construction, adding to build time
3. ⚠️ **Dimension constraints** — Only supports vectors between 64 and 4095 dimensions
## Key Parameters [#key-parameters]
**Tuning Tip**:
Start with the defaults (`total_bits=7`, `num_clusters=16`). Adjust `ef` first for recall/latency trade-offs at query time. Only reduce `total_bits` if you need to cut memory further and can tolerate slightly lower recall.
### Index-Time Parameters [#index-time-parameters]
| Parameter | Description | Tuning Guidance |
| ----------------- | -------------------------------------------------------------------------------------------------------------------------------------------------- | ---------------------------------------------------------------------------------------------------------------------------------------------- |
| `metric_type` | Similarity metric used to compare vectors | Choose based on how your embeddings were trained |
| `m` | **Max neighbors per node** — The maximum number of bidirectional links created for each node during graph construction | • Higher `m` →
✨ better recall and graph connectivity
⚠️ more memory usage and higher latency for both indexing and search |
| `ef_construction` | **Index-time candidate pool size** — Determines how many neighboring candidates the algorithm considers when inserting a new vector into the graph | • Higher `ef_construction` →
✨ better graph quality and higher recall
⚠️ longer index build time (*does not affect query speed*) |
| `total_bits` | **RaBitQ quantization bits per dimension** — Controls the precision of the binary encoding | Controls the accuracy–memory trade-off.
Lower values save more memory but reduce accuracy |
| `num_clusters` | **Number of KMeans clusters** — Used during the RaBitQ training phase to partition the vector space | • More clusters can capture finer distribution patterns
• Higher values increase recall slightly |
| `sample_count` | **Training sample count** — Number of vectors sampled for KMeans training (`0` = use all vectors) | Default is `0`. Set a smaller value (e.g. 5,000,000) to speed up training and reduce memory usage on very large datasets |
### Query-Time Parameters [#query-time-parameters]
| Parameter | Description | Tuning Guidance |
| ------------------ | ------------------------------------------------------------------------------------------------------------------------------------------- | ------------------------------------------------------------------------------------------------------------------------------------------------------------------------------------------------------------------------------------------------- |
| `ef` | **Query-time candidate pool size** — Determines how many potential neighbors are explored at each step during graph traversal at query time | • Higher `ef` →
✨ higher recall
⚠️ higher query latency |
| `radius` | **Distance (similarity) threshold** for range-based filtering — only documents satisfying the threshold are returned | Example:
• With inner product `MetricType.IP`, set `radius=0.6` to keep only results with score > 0.6
✅ Use when: You want to filter out low-quality matches
🚫 Skip when: You want all top-k results, regardless of quality |
| `is_linear` | Forces a **brute-force linear search** instead of using the index | 🐌 Very slow for large datasets!
✅ Only use for: Debugging, tiny collections, or verifying index accuracy |
| `is_using_refiner` | **Enables exact score refinement** — recomputes exact FP32 distances for top candidates after quantized search | ✅ Turn on: When you need maximum precision
⚠️ Adds latency due to full-precision re-scoring |
# Vector Index
A vector index is a specialized data structure that accelerates similarity search over large collections of vector embeddings.
Without an index, finding the most similar items to a query requires comparing it against **every single vector** in the database — a process known as **brute-force** or **flat search**.
Brute-force search is:
* ✅ **Accurate**: Returns the exact most similar results — no approximation.
* ⚠️ **Painfully slow at scale**: With millions or billions of vectors, queries can take seconds or minutes, making them impractical for real-time applications.
***
## Approximate vs. Exact Search [#approximate-vs-exact-search]
Most vector indexes use ***Approximate Nearest Neighbor (ANN)*** algorithms.
Instead of finding the exact closest matches, ANN finds *very close approximations* — often indistinguishable in quality for practical purposes — while delivering massive gains in speed and efficiency.
For real-world uses, such as semantic search or recommendations, this small accuracy trade-off delivers huge gains in speed and scalability. In short: ***good enough to be correct, but lightning fast*** ✨.
### Recall: Measuring Approximation Quality [#recall-measuring-approximation-quality]
**Recall** is the standard metric for evaluating how well an ANN algorithm preserves result quality.
It quantifies the fraction of **true nearest neighbors** — identified by an exact (brute-force) search — that appear in the top‑k results returned by the approximate method:
$$
\textcolor{#2563eb}{
\text{Recall@}k = \frac{\text{Number of true nearest neighbors in top-}k}{k}
}
$$
Example:
* If you request the top 10 results and 9 of them match the true top 10 from a brute-force search, your `recall@10` is 90%.
* High recall (e.g., ≥ 96%) typically means the approximation is practically indistinguishable from exact search for most applications.
By leveraging different index types (e.g., HNSW) and tuning parameters (e.g., `ef_search`) you can strike a balance between ***recall, query speed, and resource usage*** — so you can optimize for your specific accuracy and performance requirements.
***
## Vector Index Types [#vector-index-types]
Zvec supports the following vector index types, each suited to different use cases, dataset sizes, and performance requirements:
1. [Flat (Brute-Force) index](./flat-index/)
2. [HNSW (Hierarchical Navigable Small World)](./hnsw-index/)
3. [HNSW-RaBitQ (HNSW with RaBitQ Quantization)](./hnsw-rabitq-index/)
4. [DiskANN (Disk-based Approximate Nearest Neighbor)](./diskann-index/)
5. [IVF (Inverted File Index)](./ivf-index/)
6. [IVF-RaBitQ (IVF with RaBitQ Quantization)](./ivf-rabitq-index/)
Choose an index type based on your scale, latency requirements, and accuracy tolerance. Always use the same distance metric that your embedding model was trained for.
# IVF Index
## How It Works [#how-it-works]
IVF operates by **partitioning the entire vector space into clusters**. The number of clusters is controlled by the parameter [`n_list`](#key-parameters) (short for "number of lists").
### Indexing Phase ⚙️ [#indexing-phase-️]
1. **Clustering**: The algorithm first applies a clustering algorithm, creating `n_list` clusters. Each cluster is represented by its centroid — a central point that best represents all vectors assigned to that cluster.
2. **Assignment**: Each vector in the dataset is assigned to the **cluster whose centroid is closest** to it. The vector is then stored in an inverted list (also called a "bucket") associated with that centroid. The index essentially becomes a mapping from centroids to their associated vectors.
### Query Phase 🔍 [#query-phase-]
1. **Centroid Selection**: When a query vector arrives, the system first computes distances between the query and all `n_list` centroids to identify the `n_probe` nearest centroids (`n_probe` is a parameter that controls how many centroids to consider).
2. **Local Search**: Instead of scanning the entire dataset of `N` vectors, the search is **restricted to only the vectors stored in the `n_probe` selected buckets**. A brute-force (or refined) search is then performed within those buckets to find the nearest neighbors.
## When to Use an IVF Index [#when-to-use-an-ivf-index]
* ✅ Your vector dataset exhibits natural clustering or locality structure
* ✅ You're working with very large datasets and memory efficiency is critical
* ✅ You need to tune parameters to achieve optimal performance
**Best Practice**:
* IVF works best on datasets with inherent clustering structure.
* For even greater memory efficiency and scalability, combine it with Product Quantization (PQ).
* The performance of IVF is highly sensitive to parameters like `n_list`. As such, IVF is best suited for practitioners who can systematically experiment with, validate, and optimize these settings for their specific data distribution and latency-recall requirements.
## Advantages [#advantages]
1. ✨ **Compatibility** — Often used as a base layer in composite indexes (e.g., IVF-PQ) for further optimization
2. ✨ **Scalability** — Query time scales approximately as **O(N / `n_list` × `n_probe`)**, making it highly efficient for large `N` when `n_list` is large and `n_probe` is small
3. ✨ **Memory Efficiency** — Stores vectors in compact inverted lists with minimal overhead from centroids and list pointers, typically uses significantly less memory than graph-based methods like [HNSW](../hnsw-index/)
## Trade-offs [#trade-offs]
1. ⚠️ **Indexing Overhead** — Building the index requires clustering, which can be computationally intensive and slower to build than indexes like [HNSW](../hnsw-index/)
2. ⚠️ **Parameter Sensitivity** — Accuracy and latency are highly dependent on the choice of `n_list` and `n_probe`
## Key Parameters [#key-parameters]
### Index-Time Parameters [#index-time-parameters]
| Parameter | Description | Tuning Guidance |
| --------------- | ----------------------------------------------------------------------------------------------------------------- | ------------------------------------------------------------------------------------------------------------------------------------------------------------------------------------------------------------------------------------------------------------------------------------------------------------------- |
| `metric_type` | **Similarity metric** used to compare vectors | Choose based on how your embeddings were trained |
| `n_list` | **Number of clusters** (inverted lists) — the vector space is partitioned into this many clusters during indexing | • Start with `n_list` ≈ $\sqrt{N}$, where `N` is the number of vectors
• Larger `n_list` → ✨ finer partitioning, smaller buckets, faster search — but ⚠️ higher indexing cost and more centroids to manage
• Smaller `n_list` → ✨ faster index construction — but ⚠️ larger buckets and slower search |
| `n_iters` | **Centroid refinement iterations** — number of passes to optimize cluster centroids during indexing | • Higher `n_iters` →
✨ better clustering quality
⚠️ longer index build time |
| `quantize_type` | **Vector quantization method** to apply
Defaults to no quantization | See [Quantization](../quantization/) for more details |
### Query-Time Parameters [#query-time-parameters]
| Parameter | Description | Tuning Guidance |
| ----------- | -------------------------------------------------------------------------------------------------------------------- | -------------------------------------------------------------------------------------------------------------------------------------------------------------------------------------------------------------------------------------------------- |
| `n_probe` | **Number of clusters to search at query time** — the system retrieves candidates only from these nearest clusters. | • Higher `n_probe` →
✨ higher recall
⚠️ slower queries |
| `radius` | **Distance (similarity) threshold** for range-based filtering — only documents satisfying the threshold are returned | Example:
• With inner product `MetricType.IP`, set `radius=0.6` to keep only results with score > 0.6
✅ Use when: You want to filter out low-quality matches
🚫 Skip when: You want all top-k results, regardless of quality |
| `is_linear` | Forces a **brute-force linear search** instead of using the index | 🐌 Very slow for large datasets!
✅ Only use for: Debugging, tiny collections, or verifying index accuracy |
# IVF-RaBitQ Index
IVF-RaBitQ combines the cluster partitioning of [IVF](../ivf-index/) with [RaBitQ](https://arxiv.org/abs/2405.12497) quantization. IVF first narrows the candidate search space, while RaBitQ estimates candidate distances from compact binary codes, reducing both query computation and index memory usage.
**Platform requirement**: IVF-RaBitQ currently supports **Linux x86\_64** only. The CPU must support **AVX2 or AVX512**. Zvec automatically selects the best runtime.
## How It Works [#how-it-works]
### Index Construction ⚙️ [#index-construction-️]
1. **Train IVF centroids**: The system generates `nlist` cluster centroids from the training data. `sample_count` can limit the number of training samples so very large datasets do not require every vector during training.
2. **Assign inverted lists**: Each vector is assigned to its nearest centroid and stored in the corresponding inverted list.
3. **Encode with RaBitQ**: The system applies a random rotation and quantizes each vector relative to its assigned centroid. Each dimension uses at least one binary bit. When `total_bits` is greater than `1`, the extra bits improve distance-estimation accuracy.
4. **Arrange codes in batches**: Quantized codes in the same inverted list are stored in batches for parallel computation during queries.
### Query 🔍 [#query-]
1. **Select inverted lists**: The system compares the query vector with all centroids and selects only the nearest `nprobe` inverted lists.
2. **Preprocess the query**: The query vector undergoes the same rotation used during index construction, and the system creates the query state required for batch distance estimation.
3. **Estimate distances in batches**: The system first uses the 1-bit codes to estimate candidate distances and error lower bounds, pruning candidates that cannot enter the Top-K. It then uses the extra quantization bits to improve estimates for the remaining candidates.
4. **Optionally refine exact scores**: When `is_using_refiner` is enabled, the system expands the candidate set and recomputes scores using the original FP32 vectors.
## When to Use IVF-RaBitQ [#when-to-use-ivf-rabitq]
* ✅ The dataset is large and you need to reduce both the candidate scan scope and vector memory usage
* ✅ The data has cluster structure that IVF can use to narrow the search space
* ✅ You can accept offline clustering and tune `nlist` and `nprobe` for the desired recall and latency
* ✅ The workload runs on Linux x86\_64 with AVX2 or AVX512 support
**Best practice**: Start with the default `total_bits=7` and primarily tune `nprobe` to balance recall and latency. Reduce `total_bits` only when index memory remains too high and some loss of accuracy is acceptable.
With the same RaBitQ encoding, IVF-RaBitQ generally has less structural memory overhead than HNSW-RaBitQ, but it is more sensitive to clustering quality and query parameters. If low latency and high recall are the priority and graph memory is acceptable, consider [HNSW-RaBitQ](../hnsw-rabitq-index/). If memory efficiency at large scale is the priority, evaluate IVF-RaBitQ first.
## Advantages [#advantages]
1. ✨ **Reduces query work in two stages** — IVF scans only selected inverted lists, while RaBitQ uses compact codes and bitwise operations to accelerate distance estimation within each list
2. ✨ **High memory efficiency** — With `total_bits=1`, the quantized vector payload alone can theoretically be about 1/32 the size of FP32; the actual index also contains centroids, document IDs, alignment, and other metadata
3. ✨ **Error-bound pruning** — Low-cost estimates and lower bounds prune candidates first, and only candidates that may enter the Top-K receive more detailed computation
## Trade-offs [#trade-offs]
1. ⚠️ **Platform constraints** — Supports Linux x86\_64 only and requires AVX2 or AVX512
2. ⚠️ **Higher construction cost** — Requires centroid training, random rotation, and quantized-code generation
3. ⚠️ **Parameter sensitivity** — `nlist` and `nprobe` must be evaluated against the dataset size, distribution, recall target, and latency budget
4. ⚠️ **Data constraints** — Supports FP32 dense vectors with 64–4095 dimensions and the `L2`, `IP`, and `COSINE` metrics
## Key Parameters [#key-parameters]
### Index-Time Parameters [#index-time-parameters]
| Parameter | Default | Description | Tuning Guidance |
| -------------- | --------------- | ---------------------------------------------------------------------------------------------------- | ----------------------------------------------------------------------------------------------------------------------------------------------------------------------------------------------------------------------------------------------------------------------------------------------------------------- |
| `metric_type` | `MetricType.IP` | Similarity metric used to compare vectors; supports `L2`, `IP`, and `COSINE` | Choose the metric that matches how the embedding model was trained |
| `nlist` | `1024` | **Number of clusters (inverted lists)** — The number of partitions created during index construction | Start by evaluating `nlist` ≈ $\sqrt{N}$, where `N` is the number of vectors. Higher values create smaller, more granular lists but increase training, centroid-comparison, and metadata costs. `nlist` must be greater than `0`, and the training set must contain enough samples to form the requested clusters |
| `total_bits` | `7` | **Total RaBitQ bits per dimension** — Accepts values from `1` to `9` | Higher values generally improve distance-estimation accuracy and recall but consume more memory. `1` uses only the base binary code |
| `sample_count` | `0` | **Training sample count** — `0` uses all vectors to train the cluster centroids | For very large datasets, set a positive value below the total vector count to reduce training time and peak memory. The value cannot be negative |
Node.js uses camelCase parameter names: `metricType`, `nList`, `totalBits`, and `sampleCount`.
### Query-Time Parameters [#query-time-parameters]
| Parameter | Default | Description | Tuning Guidance |
| ------------------ | ------- | -------------------------------------------------------------------------------------------------------------------------------- | ------------------------------------------------------------------------------------------------------------------------------------------------------------------------------------- |
| `nprobe` | `10` | **Number of inverted lists searched at query time** — The system scans the lists whose centroids are nearest to the query vector | Higher values generally improve recall but increase latency. Values above the actual number of lists are clamped to the number of available lists. The value must be greater than `0` |
| `radius` | `0.0` | **Distance (similarity) threshold** used for range filtering | Returns only documents that satisfy the threshold. Avoid an overly strict threshold when a complete Top-K result set is required |
| `is_linear` | `False` | Forces brute-force linear search instead of using the IVF-RaBitQ index | Use only for debugging, small collections, or validating index results. It is expensive on large datasets |
| `is_using_refiner` | `False` | Recomputes exact scores for quantized-search candidates using the original FP32 vectors | Enable when higher accuracy is required. Candidate reads and exact distance computation increase latency |
| `scale_factor` | `10.0` | Candidate expansion factor used when the Refiner is enabled | Higher values provide more candidates for refinement and may improve recall, but increase latency. Applies only when `is_using_refiner=True` |
In Node.js, `nprobe` and `radius` keep the same names. The remaining parameters are `isLinear`, `isUsingRefiner`, and `scaleFactor`.
# Quantization
Quantization is a compression technique that ***transforms vectors from their original (specifically FP32) format into a more compact representation***, reducing the size of vector indexes used for search.
This transformation approximates vectors using fewer bits per dimension — enabling:
* ✨ Lower **memory footprint** — especially when the index is memory-resident,
* ✨ Faster I/O and lower query latency — due to reduced data movement and efficient integer/fp16 arithmetic,
* ✨ Better scalability on resource-constrained hardware.
**Important**:
* Quantization is a ***lossy and irreversible*** compression method. It improves runtime efficiency **at the cost of potentially reduced recall accuracy**. Always validate its effect on your retrieval quality.
* Quantization only provides benefits when applied to vectors in a **FP32** format.
## Storage Behavior [#storage-behavior]
To ensure data integrity and flexibility, **Zvec stores both the original vectors and their quantized versions**. This means:
* The **overall on-disk storage usage may increase** (due to storing two copies).
* However, **only the quantized vectors are loaded into memory for indexing and search**, significantly reducing the active index size.
* Users can always **retrieve the original, unaltered vectors** when needed.
## Enabling Quantization [#enabling-quantization]
You can enable quantization at the time of vector index creation by selecting your preferred quantization type — e.g., `FP16`, `INT8`, or `INT4` — **using the `quantize_type` parameter in your `VectorSchema`**.
Once set, Zvec automatically generates and manages the quantized representation alongside your original vectors.
***
## Quantization Types [#quantization-types]
### FP16 (Half-Precision Floating Point) [#fp16-half-precision-floating-point]
Uses 16-bit floating-point numbers to reduce memory footprint and accelerate computation while maintaining high numerical precision. Ideal for applications requiring near-FP32 accuracy with improved efficiency. Requires conversion from FP32 source.
### INT8 (8-Bit Integer Quantization) [#int8-8-bit-integer-quantization]
Represents vectors using 8-bit integers, significantly reducing storage and memory bandwidth requirements. Offers a good trade-off between speed, size, and retrieval accuracy for many similarity search tasks. Requires conversion from FP32 source.
### INT4 (4-Bit Integer Quantization) [#int4-4-bit-integer-quantization]
Ultra-compact representation using only 4 bits per dimension. Maximizes storage density and inference speed, suitable for latency-sensitive or resource-constrained environments where noticeable accuracy loss is acceptable. Requires conversion from FP32 source.
## Enabling Rotation [#enabling-rotation]
When using `INT8` or `INT4` quantization, you can **set `enable_rotate=True` via the `quantizer_param` parameter in your `VectorSchema`** to enable rotation. This applies a random orthogonal rotation to vectors before quantization, making the distribution across dimensions more uniform, which reduces information loss during quantization and improves the recall of the quantized index.
# Conditional Filtering
Conditional filtering lets you retrieve documents that match specific criteria based on their scalar fields — similar to a `WHERE` clause in SQL.
***
## Performance Considerations [#performance-considerations]
* **Indexed scalar fields**: Can be efficiently searched.
* **Unindexed scalar fields**: Can still be searched, but with significantly lower performance.
For optimal performance, ensure **frequently filtered fields are indexed**.\
For more details, please see the [Inverted Index](../../../concepts/inverted-index/).
***
## Prerequisites [#prerequisites]
This guide assumes you have opened a collection containing scalar fields.
This example collection contains the following scalar fields:
1. `publish_year`: Integer field, indexed with range optimization enabled
2. `category`: String array field, indexed — supports fast membership checks
3. `summary`: String field, stored but **not indexed** (`index_param` is `None`)
4. `in_stock`: Boolean field, indexed for quick `true/false` queries
Python
Node.js
```python title="Open a collection"
import zvec
collection_schema = zvec.CollectionSchema( # [!code highlight]
name="example_collection",
fields=[
zvec.FieldSchema(
name="publish_year",
data_type=zvec.DataType.INT32,
index_param=zvec.InvertIndexParam(enable_range_optimization=True),
),
zvec.FieldSchema(
name="category",
data_type=zvec.DataType.ARRAY_STRING,
index_param=zvec.InvertIndexParam(),
),
zvec.FieldSchema(
name="summary",
data_type=zvec.DataType.STRING,
),
zvec.FieldSchema(
name="in_stock",
data_type=zvec.DataType.BOOL,
index_param=zvec.InvertIndexParam(),
),
],
vectors=[
zvec.VectorSchema(
name="dense_embedding",
data_type=zvec.DataType.VECTOR_FP32,
dimension=768,
index_param=zvec.HnswIndexParam(metric_type=zvec.MetricType.COSINE),
),
],
)
collection = zvec.open(path="/path/to/collection") # [!code highlight]
```
```ts title="Open a collection"
import { ZVecCollection, ZVecCollectionSchema, ZVecDataType, ZVecIndexType, ZVecMetricType, ZVecOpen } from "@zvec/zvec";
const collectionSchema: ZVecCollectionSchema = new ZVecCollectionSchema({ // [!code highlight]
name: "example_collection",
fields: [
{
name: "publish_year",
dataType: ZVecDataType.INT32,
indexParams: { indexType: ZVecIndexType.INVERT, enableRangeOptimization: true }
},
{
name: "category",
dataType: ZVecDataType.ARRAY_STRING,
indexParams: { indexType: ZVecIndexType.INVERT }
},
{
name: "summary",
dataType: ZVecDataType.STRING
},
{
name: "in_stock",
dataType: ZVecDataType.BOOL,
indexParams: { indexType: ZVecIndexType.INVERT }
}
],
vectors: [
{
name: "dense_embedding",
dataType: ZVecDataType.VECTOR_FP32,
dimension: 768,
indexParams: { indexType: ZVecIndexType.HNSW, metricType: ZVecMetricType.COSINE }
}
]
});
const collection: ZVecCollection = ZVecOpen("/path/to/collection"); // [!code highlight]
```
***
## Performing Conditional Filtering [#performing-conditional-filtering]
Apply conditional filtering by passing a `filter` expression to the `query()` method.
The expression uses **SQL-like syntax** to define search conditions.
The `topk` parameter specifies the maximum number of matching documents to return.
If more documents satisfy the filter than the specified `topk`, only the first `topk` results are returned.\
Results are returned in no guaranteed order (typically in internal storage order).
Python
Node.js
```python title="Conditional filtering"
# [!code word:filter]
import zvec
# 1. Retrieve up to 10 documents published in the year 2000
results = collection.query(filter="publish_year = 2000", topk=10)
# 2. Retrieve up to 50 documents published before 1999
results = collection.query(filter="publish_year < 1999", topk=50)
# 3. Retrieve all in-stock items (assuming the collection has ≤100 documents)
results = collection.query(filter="in_stock = true", topk=100)
# 4. Romance or mystery books (up to 20 matches)
results = collection.query(filter="category CONTAIN_ANY('romance', 'mystery')", topk=20)
# 5. Books that belong to both science and philosophy categories
results = collection.query(filter="category CONTAIN_ALL('science', 'philosophy')", topk=10)
# 6. Recent (2015 or later), in-stock romance books
results = collection.query(
filter="publish_year >= 2015 AND in_stock = true AND category CONTAIN_ANY('romance')",
topk=30,
output_fields=["summary"], # Return only the 'summary' field
)
```
```ts title="Conditional filtering"
// [!code word:filter]
// 1. Retrieve up to 10 documents published in the year 2000
let results = collection.querySync({ filter: "publish_year = 2000", topk: 10 });
// 2. Retrieve up to 50 documents published before 1999
results = collection.querySync({ filter: "publish_year < 1999", topk: 50 });
// 3. Retrieve all in-stock items (assuming the collection has ≤100 documents)
results = collection.querySync({ filter: "in_stock = true", topk: 100 });
// 4. Romance or mystery books (up to 20 matches)
results = collection.querySync({ filter: "category CONTAIN_ANY('romance', 'mystery')", topk: 20 });
// 5. Books that belong to both science and philosophy categories
results = collection.querySync({ filter: "category CONTAIN_ALL('science', 'philosophy')", topk: 10 });
// 6. Recent (2015 or later), in-stock romance books
results = collection.querySync({
filter: "publish_year >= 2015 AND in_stock = true AND category CONTAIN_ANY('romance')",
topk: 30,
outputFields: ["summary"], // Return only the 'summary' field
});
```
The `query()` method with a `filter` returns a list of matching `Doc` objects.
Each `Doc` object includes:
1. `id`: The document identifier.
2. `vectors`: A map from vector field names to their corresponding embedding values.\
This is **only populated** if `include_vector=True` is passed in the query.
3. `fields`: A map from scalar field names to their stored values.\
By default, **all scalar fields** are returned; this can be restricted using the `output_fields` parameter.
***
## Supported Filter Syntax [#supported-filter-syntax]
### Comparison Operators [#comparison-operators]
| Operator | Description | Supported Data Types | Example Expression |
| ------------- | ------------------------------ | ----------------------------------- | ------------------------------------------------ |
| `<` | Less than | Integers, Floats, Strings | `publish_year < 2000` |
| `<=` | Less than or equal to | Integers, Floats, Strings | • `price <= 29.99`
• `author_name <= 'M'` |
| `=` | Equal to | Integers, Floats, Strings, Booleans | • `in_stock = true`
• `name = 'Michael'` |
| `!=` | Not equal to | Integers, Floats, Strings, Booleans | • `rating != 5`
• `status != 'active'` |
| `>=` | Greater than or equal to | Integers, Floats, Strings | `score >= 85.5` |
| `>` | Greater than | Integers, Floats, Strings | `age > 12` |
| `is null` | Checks if a field has no value | All data types | `email is null` |
| `is not null` | Checks if a field has a value | All data types | `email is not null` |
* **String comparisons** use lexicographic ordering: `'apple' < 'banana'` evaluates to `true`
* **String literals** must be enclosed in single (`'`) or double (`"`) quotes: `'hello world'`
* **Boolean comparisons** use the keywords `true` and `false` (case-insensitive)
* **Range queries**: When `enable_range_optimization` is set to `true`, range queries run efficiently. If it's `false`, they still work — but may be significantly slower.
### Membership Operators [#membership-operators]
| Operator | Description | Supported Data Types | Example Expression | Explanation |
| -------------- | --------------------------------------------------- | ------------------------- | --------------------------------------------------------------------------- | -------------------------------------------------------------------------------------------------------------------------------------------------------------------------------------------------------------------------------------- |
| `in` | Is one of | Integers, Floats, Strings | • `error_code in (400, 403, 404)`
• `user_name in ('admin', 'root')` | Evaluates to `true` if the field value **matches any** of the listed values.
• `error_code` is `400`, `403`, or `404` → `true`
• `user_name` is `'admin'` or '`root'` → `true` |
| `not in` | Is not one of | Integers, Floats, Strings | `status not in ('deleted', 'archived')` | Evaluates to `true` if the field value **does not match any** of the listed values.
• `status` is anything other than `'deleted'` or `'archived'` → `true` |
| `contain_all` | Array includes **all** listed values | Array Types | `tags contain_all ('urgent', 'bug')` | Evaluates to `true` only if the array contains **every** value in the list.
• `tags = ['bug', 'urgent', 'ui']` → `true`
• `tags = ['bug', 'ui']` → `false` (missing 'urgent') |
| `contain_any` | Array includes **at least one** of the listed value | Array Types | `permissions contain_any ('execute', 'write')` | Evaluates to `true` if the array contains **at least one** of the listed values.
• `permissions = ['admin', 'execute']` → `true`
• `permissions = ['read', 'forbidden']` → `false` (neither 'execute' nor 'write') |
| `array_length` | Array length | Array Types | `array_length(tags) > 2` | Evaluates to `true` if the array's length satisfies the condition.
• `tags = ['bug']` → `false` (length is 1)
• `tags = ['bug', 'urgent', 'fix']` → `true` (length is 3) |
* **Parentheses `()` are required** around the list of values.
* **String literals** must be enclosed in single (`'`) or double (`"`) quotes: `'hello world'`
### String Operators [#string-operators]
| Operator | Description | Supported Data Types | Example Expression | Explanation |
| -------- | ---------------------------- | -------------------- | ---------------------------------------------------------------- | -------------------------------------------------------------------------------------------------------------------------------------------------------------------------------- |
| `like` | Pattern match with wildcards | Strings | • `product_name like 'Smart%'`
• `file_name like '%.log'` | • `'Smart%'`: matches values starting with 'Smart' (e.g., 'SmartPhone', 'SmartWatch')
• `'%.log'`: matches values ending with '.log' (e.g., 'app.log', 'debug\_2025.log') |
**Performance Considerations**:\
For optimal `LIKE` query performance, fields should be [indexed](../../../concepts/inverted-index/).
* **Unindexed fields** still support filtering, but queries may be **significantly slower**.
* For **efficient infix/suffix patterns** (`'abc%def'`, `'%abc'`), configure an inverted index with `enable_extended_wildcard = true` option.
* Patterns with **multiple wildcards** (e.g., `'%abc%def%'`) are inherently expensive and should be used sparingly.
### Logical Operators [#logical-operators]
| Operator | Description | Example Expression | Explanation |
| -------- | ----------- | ---------------------------------------- | ------------------------------------------------------------ |
| `and` | Logical AND | `status = 'active' and score > 90` | Evaluates to `true` only if **all** conditions are `true`. |
| `or` | Logical OR | `role = 'admin' or permission = 'write'` | Evaluates to `true` if **at least one** condition is `true`. |
**Tip**: Use parentheses `()` to group expressions and control evaluation order, e.g., `expr1 and (expr2 or expr3)`.
# Full-Text Search
Full-text search finds documents by matching text content, ranked by [BM25](https://en.wikipedia.org/wiki/Okapi_BM25) relevance scoring. It supports natural language queries, exact phrase matching, and boolean operators.
***
## Prerequisites [#prerequisites]
This guide assumes you have opened a collection and have a `collection` object ready.
This example collection has an FTS-indexed `content` field and a scalar `category` field. No vector fields are required — Zvec supports FTS-only collections.
Python
Node.js
```python title="Create an FTS collection"
import zvec
# [!code word:FtsIndexParam]
# [!code word:content]
collection_schema = zvec.CollectionSchema( # [!code highlight]
name="article_collection",
fields=[
zvec.FieldSchema(
name="category",
data_type=zvec.DataType.STRING,
nullable=False,
),
zvec.FieldSchema(
name="content",
data_type=zvec.DataType.STRING,
nullable=False,
index_param=zvec.FtsIndexParam( # [!code highlight]
tokenizer_name="standard",
filters=["lowercase"],
),
),
],
)
collection = zvec.create_and_open(
path="/path/to/collection",
schema=collection_schema,
)
```
```python title="Insert sample documents"
collection.insert([
zvec.Doc(id="doc_0", fields={"category": "tech", "content": "Introduction to vector databases and embeddings"}),
zvec.Doc(id="doc_1", fields={"category": "tech", "content": "Machine learning models for natural language processing"}),
zvec.Doc(id="doc_2", fields={"category": "science", "content": "Deep learning and neural network architectures"}),
zvec.Doc(id="doc_3", fields={"category": "tech", "content": "Vector search with exact phrase matching"}),
zvec.Doc(id="doc_4", fields={"category": "science", "content": "Introduction to machine learning fundamentals"}),
])
```
```ts title="Create an FTS collection"
import { ZVecCollectionSchema, ZVecCreateAndOpen, ZVecDataType, ZVecIndexType } from "@zvec/zvec";
// [!code word:FTS]
// [!code word:content]
const collectionSchema = new ZVecCollectionSchema({ // [!code highlight]
name: "article_collection",
fields: [
{
name: "category",
dataType: ZVecDataType.STRING,
nullable: false
},
{
name: "content",
dataType: ZVecDataType.STRING,
nullable: false,
indexParams: {
indexType: ZVecIndexType.FTS, // [!code highlight]
tokenizerName: "standard",
filters: ["lowercase"]
}
}
]
});
const collection = ZVecCreateAndOpen("/path/to/collection", collectionSchema);
```
```ts title="Insert sample documents"
collection.insertSync([
{ id: "doc_0", fields: { category: "tech", content: "Introduction to vector databases and embeddings" } },
{ id: "doc_1", fields: { category: "tech", content: "Machine learning models for natural language processing" } },
{ id: "doc_2", fields: { category: "science", content: "Deep learning and neural network architectures" } },
{ id: "doc_3", fields: { category: "tech", content: "Vector search with exact phrase matching" } },
{ id: "doc_4", fields: { category: "science", content: "Introduction to machine learning fundamentals" } }
]);
```
***
## Defining an FTS Field [#defining-an-fts-field]
To enable full-text search on a field, add a `FieldSchema` with an `FtsIndexParam` as its `index_param`. The field must be of type `STRING`.
Python
Node.js
```python title="Define an FTS field"
import zvec
# [!code word:FtsIndexParam]
fts_field = zvec.FieldSchema( # [!code highlight]
name="content",
data_type=zvec.DataType.STRING,
nullable=False,
index_param=zvec.FtsIndexParam(
tokenizer_name="standard", # Tokenizer to use
filters=["lowercase"], # Token filters applied after tokenization
),
)
```
```ts title="Define an FTS field"
import { ZVecDataType, ZVecFieldSchema, ZVecIndexType } from "@zvec/zvec";
const ftsField: ZVecFieldSchema = { // [!code highlight]
name: "content",
dataType: ZVecDataType.STRING,
nullable: false,
indexParams: {
indexType: ZVecIndexType.FTS,
tokenizerName: "standard", // Tokenizer to use
filters: ["lowercase"] // Token filters applied after tokenization
}
};
```
### `FtsIndexParam` Parameters [#ftsindexparam-parameters]
| Parameter | Type | Default | Description |
| ---------------- | ----------- | --------------- | --------------------------------------------------------------------------------------------------------------------------------- |
| `tokenizer_name` | `str` | `"standard"` | The tokenizer used to split text into tokens. Options: `"standard"`, `"whitespace"`, `"jieba"`. See [Tokenizers](#tokenizers). |
| `filters` | `list[str]` | `["lowercase"]` | Token filters applied in sequence after tokenization. See [Token Filters](#token-filters). |
| `extra_params` | `str` | `""` | JSON string for tokenizer- and filter-specific configuration. See the configuration sections for each tokenizer and token filter. |
Zvec supports **FTS-only collections** — you can create a collection with text fields and no vector fields at all.
***
## Performing Full-Text Search [#performing-full-text-search]
Zvec provides two query modes for full-text search, both using the `Fts` object within a `Query`:
1. **Match String** — natural language input, automatically tokenized
2. **Query String** — advanced expression syntax with boolean operators
### Match String [#match-string]
Use `match_string` for natural language queries. The input is plain text — no special syntax or escaping is needed. It is tokenized using the same tokenizer configured on the field, and tokens are combined using the default operator (`OR` by default).
Python
Node.js
```python title="Match string query"
from zvec.model.param.query import Fts, Query
# [!code word:match_string]
result = collection.query( # [!code highlight]
queries=Query(
field_name="content",
fts=Fts(match_string="machine learning"), # [!code highlight]
),
topk=5,
)
print(result)
```
```ts title="Match string query"
// [!code word:matchString]
let result = collection.querySync({ // [!code highlight]
fieldName: "content",
fts: { matchString: "machine learning" }, // [!code highlight]
topk: 5
});
console.log(result);
```
With the default `OR` operator, this returns documents containing **either** "machine" **or** "learning" (or both), ranked by BM25 relevance.
### Query String [#query-string]
Use `query_string` for advanced queries with explicit boolean operators, required/excluded terms, and exact phrase matching.
Python
Node.js
```python title="Query string with operators"
from zvec.model.param.query import Fts, Query
# [!code word:query_string]
result = collection.query( # [!code highlight]
queries=Query(
field_name="content",
fts=Fts(query_string='+learning -neural "vector search"'), # [!code highlight]
),
topk=5,
)
print(result)
```
```ts title="Query string with operators"
// [!code word:queryString]
let result = collection.querySync({ // [!code highlight]
fieldName: "content",
fts: { queryString: '+learning -neural "vector search"' }, // [!code highlight]
topk: 5
});
console.log(result);
```
This query requires "learning", excludes "neural", and matches the exact phrase "vector search".
`query_string` and `match_string` are **mutually exclusive** — you must provide exactly one of them in each `Fts` object.
***
## Query Syntax Reference [#query-syntax-reference]
The following operators are supported in `query_string` expressions:
| Syntax | Meaning | Example |
| ---------- | ------------------------------------------------ | ---------------------------------- |
| `term` | Match a single term | `vector` |
| `"phrase"` | Match an exact phrase (word order and adjacency) | `"machine learning"` |
| `+term` | Term **must** appear in the document | `+vector` |
| `-term` | Term **must not** appear in the document | `-slow` |
| `a AND b` | Both terms must match | `vector AND search` |
| `a OR b` | Either term can match | `vector OR embedding` |
| `a NOT b` | Match `a` but exclude documents matching `b` | `learning NOT deep` |
| `(expr)` | Group sub-expressions | `(vector OR embedding) AND search` |
| `+(expr)` | Group must match | `+(vector OR embedding)` |
| `-(expr)` | Group must not match | `-(slow AND outdated)` |
**Operator precedence**: `AND` / `NOT` bind tighter than `OR`. Adjacent terms without an explicit operator are combined using the `default_operator` setting (default: `OR`).
For complex queries mixing multiple operators, **use `()` to make grouping explicit** and avoid unexpected results.
Leading negation is not supported — both `NOT term` and standalone `-term` require at least one positive term. Use `a NOT b` or combine `-term` with positive terms (e.g., `a -b`).
***
## Query Parameters [#query-parameters]
| Parameter | Description |
| --------------- | ----------------------------------------------------------------------------------------------------------------- |
| `topk` | The number of top-scoring documents to return. |
| `filter` | An optional SQL-like boolean expression to restrict results. See [conditional filtering](../filter/) for details. |
| `output_fields` | An optional list of scalar field names to include in results. If omitted, all scalar fields are returned. |
### Default Operator [#default-operator]
By default, adjacent bare terms in both `match_string` and `query_string` are combined with `OR`. To change this to `AND`, pass a `FtsQueryParam` via the `param` field:
Python
Node.js
```python title="Using AND as the default operator"
import zvec
from zvec.model.param.query import Fts, Query
result = collection.query(
queries=Query(
field_name="content",
fts=Fts(match_string="machine learning"),
param=zvec.FtsQueryParam(default_operator="AND"), # [!code highlight]
),
topk=5,
)
```
```ts title="Using AND as the default operator"
import { ZVecIndexType } from "@zvec/zvec";
let result = collection.querySync({
fieldName: "content",
fts: { matchString: "machine learning" },
params: {
indexType: ZVecIndexType.FTS,
defaultOperator: "AND" // [!code highlight]
},
topk: 5
});
```
With `default_operator="AND"`, this returns only documents containing **both** "machine" **and** "learning".
Explicit operators (`AND`, `OR`, `+`, `-`) in a `query_string` are not affected by `default_operator` — it only controls how adjacent bare terms are combined.
***
## Combining FTS with Scalar Filters [#combining-fts-with-scalar-filters]
You can combine full-text search with [scalar filters](../filter/) to narrow results:
Python
Node.js
```python title="FTS with scalar filter"
from zvec.model.param.query import Fts, Query
result = collection.query(
queries=Query(
field_name="content",
fts=Fts(match_string="machine learning"),
),
filter="category = 'tech'", # [!code highlight]
topk=5,
)
```
```ts title="FTS with scalar filter"
let result = collection.querySync({
fieldName: "content",
fts: { matchString: "machine learning" },
filter: "category = 'tech'", // [!code highlight]
topk: 5
});
```
FTS and vector search are **mutually exclusive within one query route**. A single `Query` / `ZVecQuery` should not set both `fts` and `vector` / `id`; use separate query routes with re-ranking, or run separate queries and merge results in your application.
***
## Tokenizers [#tokenizers]
Zvec provides three built-in tokenizers. The tokenizer is configured per-field via `FtsIndexParam`.
| Tokenizer | Name | Description |
| ---------- | -------------- | ---------------------------------------------------------------------------------------------------------------------------------------------------------------- |
| Standard | `"standard"` | Implements Unicode UAX #29 word boundaries and behaves similarly to Elasticsearch's standard tokenizer. Best for most English-like languages. **(Default)** |
| Whitespace | `"whitespace"` | Splits text on whitespace only (spaces, tabs, newlines). Preserves punctuation within tokens. |
| Jieba | `"jieba"` | Chinese word segmentation using [cppjieba](https://github.com/yanyiwu/cppjieba). Supports mixed Chinese/English text. |
### Standard Tokenizer [#standard-tokenizer]
The default tokenizer. It implements Unicode UAX #29 word boundaries and behaves similarly to Elasticsearch's standard tokenizer. For CJK ideographs, `standard` emits single-character tokens; use `jieba` when you need Chinese word-level search.
Python
Node.js
```python title="Standard tokenizer"
zvec.FtsIndexParam(tokenizer_name="standard", filters=["lowercase"])
```
```ts title="Standard tokenizer"
{
indexType: ZVecIndexType.FTS,
tokenizerName: "standard",
filters: ["lowercase"]
}
```
**Configuration** (via `extra_params` JSON):
| Key | Type | Default | Description |
| ------------------ | ----- | ------- | ----------------------------------------------------------------- |
| `max_token_length` | `int` | `255` | Maximum token length. Tokens exceeding this length are discarded. |
### Whitespace Tokenizer [#whitespace-tokenizer]
Splits text only on whitespace characters. Useful when punctuation should be preserved in tokens.
Python
Node.js
```python title="Whitespace tokenizer"
zvec.FtsIndexParam(tokenizer_name="whitespace", filters=["lowercase"])
```
```ts title="Whitespace tokenizer"
{
indexType: ZVecIndexType.FTS,
tokenizerName: "whitespace",
filters: ["lowercase"]
}
```
### Jieba Tokenizer [#jieba-tokenizer]
Chinese word segmentation tokenizer. Also handles mixed Chinese/English text.
The Python SDK **bundles a default Jieba dictionary** — the Jieba tokenizer works out of the box with no extra configuration. You only need to set `jieba_dict_dir` if you want to use a custom dictionary.
Python
Node.js
```python title="Jieba tokenizer"
zvec.FtsIndexParam(
tokenizer_name="jieba",
filters=["lowercase"],
extra_params='{"jieba_dict_dir": "/path/to/jieba/dict"}',
)
```
```ts title="Jieba tokenizer"
{
indexType: ZVecIndexType.FTS,
tokenizerName: "jieba",
filters: ["lowercase"],
extraParams: '{"jieba_dict_dir": "/path/to/jieba/dict"}'
}
```
**Configuration** (via `extra_params` JSON):
| Key | Type | Default | Description |
| ---------------- | ----- | ---------- | ------------------------------------------------------------------------------------------------------------------------------------------------------------------------------------------------------------------------- |
| `jieba_dict_dir` | `str` | — | Directory containing `jieba.dict.utf8` and `hmm_model.utf8`. Can also be set via `ZVEC_JIEBA_DICT_DIR` environment variable. |
| `user_dict_path` | `str` | — | Path to a custom user dictionary file. |
| `cut_mode` | `str` | `"search"` | Segmentation mode: `"search"` (fine-grained, recommended for search), `"mix"`, `"full"`, or `"hmm"`. See [cppjieba documentation](https://github.com/yanyiwu/cppjieba?tab=readme-ov-file#usage) for details on each mode. |
**`jieba_dict_dir` resolution order** (first non-empty value wins):
1. Per-field `extra_params` in `FtsIndexParam`
2. `ZVEC_JIEBA_DICT_DIR` environment variable
3. Global default set via `zvec.init(jieba_dict_dir=...)` or `zvec.set_default_jieba_dict_dir()`
4. Built-in dictionary bundled with the Python SDK (set automatically on `import zvec`)
## Token Filters [#token-filters]
Token filters are applied in sequence after tokenization. The same filter configuration is used for both indexing and querying.
| Filter | Description |
| ----------------- | ------------------------------------------------ |
| `"lowercase"` | Converts tokens to Unicode lowercase. |
| `"ascii_folding"` | Folds Unicode characters into ASCII equivalents. |
| `"stemmer"` | Normalizes word forms using a Snowball stemmer. |
For English text, use `lowercase` and `stemmer` so case and word forms do not affect matching. For English-like text or text with diacritics, you can also add `ascii_folding` for accent-insensitive matching.
### Lowercase Filter [#lowercase-filter]
`"lowercase"` converts tokens to Unicode lowercase.
### ASCII Folding Filter [#ascii-folding-filter]
`"ascii_folding"` folds Unicode characters into ASCII equivalents.
### Stemmer Filter [#stemmer-filter]
`"stemmer"` normalizes word forms using a Snowball stemmer. The default language is `"english"`.
Python
Node.js
```python title="English token filter combination"
zvec.FtsIndexParam(
tokenizer_name="standard",
filters=["lowercase", "stemmer"],
extra_params='{"stemmer_lang": "english"}',
)
```
```ts title="English token filter combination"
{
indexType: ZVecIndexType.FTS,
tokenizerName: "standard",
filters: ["lowercase", "stemmer"],
extraParams: '{"stemmer_lang": "english"}'
}
```
**Stemmer configuration** (via `extra_params` JSON):
| Key | Type | Default | Description |
| -------------- | ----- | ----------- | ------------------------------------------------------------------------------------------------------------------------------------- |
| `stemmer_lang` | `str` | `"english"` | Snowball language or algorithm name. For example, set it to `"porter"` for behavior close to Elasticsearch's default English stemmer. |
***
## Constraints [#constraints]
* FTS and vector search are **mutually exclusive within one query route** — a single `Query` / `ZVecQuery` should not set both `fts` and `vector` / `id`.
* `query_string` and `match_string` are **mutually exclusive** in a single `Fts` object.
* FTS fields do **not** support [alter column](../../../collections/schema-evolution/).
* Leading negation (`NOT term` or standalone `-term`) is not supported — at least one positive term is required.
# Grouped Search
Grouped search organizes vector search results by scalar field values and returns the most relevant groups, along with the most relevant documents in each group.
For example, grouping product search results by `category` prevents one category from dominating the results while preserving the most relevant products in each category.
***
## How It Works [#how-it-works]
When performing grouped search, Zvec:
1. Groups results during vector search by the value of the specified grouping field.
2. Ranks groups by the most relevant document in each group and returns up to the specified number of groups.
3. Keeps up to the specified number of documents in each group, ordered by relevance.
Documents whose grouping field is `null` are excluded from the results.
***
## Prerequisites [#prerequisites]
This guide assumes that you have opened a collection and that:
* The query field is a vector field with an index that supports grouped search.
* The grouping field is a non-array scalar field, such as an integer, float, string, or boolean field.
This example collection contains a dense vector field named `dense_embedding` and scalar fields used for grouping and filtering.
Python
Node.js
```python title="Open a collection"
import zvec
collection_schema = zvec.CollectionSchema(
name="product_collection",
vectors=[
zvec.VectorSchema(
name="dense_embedding",
data_type=zvec.DataType.VECTOR_FP32,
dimension=768,
index_param=zvec.HnswIndexParam(
metric_type=zvec.MetricType.COSINE,
),
),
],
fields=[
zvec.FieldSchema(name="title", data_type=zvec.DataType.STRING),
zvec.FieldSchema(name="category", data_type=zvec.DataType.STRING),
zvec.FieldSchema(
name="publish_year",
data_type=zvec.DataType.INT32,
index_param=zvec.InvertIndexParam(
enable_range_optimization=True,
),
),
],
)
collection = zvec.open(path="/path/to/collection")
```
```ts title="Open a collection"
import {
ZVecCollection,
ZVecCollectionSchema,
ZVecDataType,
ZVecIndexType,
ZVecMetricType,
ZVecOpen,
} from "@zvec/zvec";
const collectionSchema = new ZVecCollectionSchema({
name: "product_collection",
vectors: [
{
name: "dense_embedding",
dataType: ZVecDataType.VECTOR_FP32,
dimension: 768,
indexParams: {
indexType: ZVecIndexType.HNSW,
metricType: ZVecMetricType.COSINE,
},
},
],
fields: [
{ name: "title", dataType: ZVecDataType.STRING },
{ name: "category", dataType: ZVecDataType.STRING },
{
name: "publish_year",
dataType: ZVecDataType.INT32,
indexParams: {
indexType: ZVecIndexType.INVERT,
enableRangeOptimization: true,
},
},
],
});
const collection: ZVecCollection = ZVecOpen("/path/to/collection");
```
***
## Performing Grouped Search [#performing-grouped-search]
Specify a single query vector, a grouping field name, the number of groups to return, and the number of documents per group:
Python
Node.js
```python title="Group vector search results by category"
import zvec
results = collection.group_by_query( # [!code highlight]
query=zvec.Query(
field_name="dense_embedding",
vector=[0.1] * 768, # Replace with a real embedding in practice
param=zvec.HnswQueryParam(ef=200),
),
group_by_field_name="category", # [!code highlight]
group_count=3, # Return up to 3 categories
topk_per_group=2, # Return up to 2 documents per category
filter="publish_year >= 2020",
output_fields=["title", "category", "publish_year"],
)
for group in results:
print(f"Category: {group.group_by_value}")
for doc in group.docs:
print(doc.id, doc.field("title"), doc.score)
```
```ts title="Group vector search results by category"
import { ZVecIndexType } from "@zvec/zvec";
const results = collection.groupByQuerySync({ // [!code highlight]
fieldName: "dense_embedding",
vector: Array(768).fill(0.1), // Replace with a real embedding in practice
params: { indexType: ZVecIndexType.HNSW, ef: 200 },
groupByFieldName: "category", // [!code highlight]
groupCount: 3, // Return up to 3 categories
topkPerGroup: 2, // Return up to 2 documents per category
filter: "publish_year >= 2020",
outputFields: ["title", "category", "publish_year"],
});
for (const group of results) {
console.log(`Category: ${group.groupByValue}`);
for (const doc of group.docs) {
console.log(doc.id, doc.fields?.title, doc.score);
}
}
```
If fewer matching groups or documents are available, the actual result counts will be lower than `group_count` or `topk_per_group`. An empty collection or a search with no matches returns an empty list.
### Using the Vector from an Existing Document [#using-the-vector-from-an-existing-document]
Instead of providing an embedding directly, you can use `id` to reuse the vector from an existing document in the collection:
Python
```python title="Use the vector from an existing document"
results = collection.group_by_query(
query=zvec.Query(
field_name="dense_embedding",
id="product_123",
),
group_by_field_name="category",
group_count=3,
topk_per_group=2,
)
```
The document specified by `id` must exist and contain the vector identified by `field_name`.
The Node.js API requires an explicit query `vector`.
***
## Parameters [#parameters]
| Parameter | Type | Default | Description |
| --------------------- | ------------------- | -------- | ----------------------------------------------------------------------------------------------------------------------------------------------------------------------------------------------------- |
| `query` | `Query` | Required | A single vector search specification. Provide an embedding through `vector`, or use `id` to reuse the vector from an existing document. You can pass index-specific query parameters through `param`. |
| `group_by_field_name` | `str` | Required | The name of the non-array scalar field used for grouping. It cannot be empty. |
| `group_count` | `int` | `2` | The maximum number of groups to return. Must be a positive integer. |
| `topk_per_group` | `int` | `3` | The maximum number of documents to return per group. Must be a positive integer. |
| `filter` | `str \| None` | `None` | A [filter expression](../filter/) applied before the search. |
| `include_vector` | `bool` | `False` | Whether to include vector fields in the returned documents. |
| `output_fields` | `list[str] \| None` | `None` | Scalar fields to return. `None` returns all scalar fields; an empty list returns no scalar fields. |
| Parameter | Type | Default | Description |
| ------------------ | ----------------- | -------- | ------------------------------------------------------------------------------------------------------------- |
| `fieldName` | `string` | Required | The name of the vector field to search. |
| `vector` | `ZVecVector` | Required | The query vector. |
| `groupByFieldName` | `string` | Required | The name of the non-array scalar field used for grouping. It cannot be empty. |
| `groupCount` | `number` | `2` | The maximum number of groups to return. Must be a positive integer. |
| `topkPerGroup` | `number` | `3` | The maximum number of documents to return per group. Must be a positive integer. |
| `filter` | `string` | Unset | A [filter expression](../filter/) applied before the search. |
| `includeVector` | `boolean` | `false` | Whether to include vector fields in the returned documents. |
| `outputFields` | `string[]` | Unset | Scalar fields to return. When unset, all scalar fields are returned; an empty array returns no scalar fields. |
| `params` | `ZVecQueryParams` | Unset | Query-time parameters for the selected vector index. |
***
## Results [#results]
`group_by_query()` returns a `list[GroupResult]`. Each `GroupResult` contains:
| Attribute | Type | Description |
| ---------------- | ----------- | ---------------------------------------------------------------------------------------------------------------------------------------- |
| `group_by_value` | `str` | The string representation of the grouping field value. This attribute is a string even when the original field is an integer or boolean. |
| `docs` | `list[Doc]` | The documents in the group, ordered by vector relevance. |
`groupByQuerySync()` / `groupByQuery()` returns `ZVecGroupResult[]`. Each `ZVecGroupResult` contains:
| Attribute | Type | Description |
| -------------- | ----------- | ---------------------------------------------------------------------------------------------------------------------------------------- |
| `groupByValue` | `string` | The string representation of the grouping field value. This attribute is a string even when the original field is an integer or boolean. |
| `docs` | `ZVecDoc[]` | The documents in the group, ordered by vector relevance. |
Groups are ordered by the relevance of the first document in each group. The direction of distance or similarity scores depends on the metric used by the vector field. For example, higher inner product scores usually indicate greater relevance, while lower L2 and cosine distance scores usually indicate greater relevance.
The grouping field value is returned independently of the output fields. You can use it to identify a group even when the grouping field is not included in the output fields.
***
## Limitations and Considerations [#limitations-and-considerations]
* Grouped search supports only single-vector search. It does not support full-text search or multi-vector search.
* The grouping field cannot be a vector or array field.
* Grouped search currently does not support IVF, DiskANN, or Vamana vector indexes.
* Grouped search cannot be used with vector refinement (refiner).
* Grouped search is best-effort. Depending on the data distribution and search conditions, the actual number of groups and documents per group may be lower than the specified values. When there are not enough candidates, Zvec prioritizes the number of groups.
* Increasing the number of groups or documents per group requires collecting and sorting more candidates and typically increases query latency.
# Vector + Filter
You can combine **vector search** with **scalar filters** to restrict results to a subset of documents — just like adding a `WHERE` clause to a similarity search.
***
## Prerequisites [#prerequisites]
This guide assumes you:
* Have already opened a `collection` instance.
* Are familiar with [vector querying](../single-vector/) and [conditional filtering](../filter/).
This example collection contains one dense vector field `dense_embedding` and one scalar field `publish_year`.
Python
Node.js
```python title="Open a collection"
import zvec
# [!code word:dense_embedding]
# [!code word:publish_year]
collection_schema = zvec.CollectionSchema( # [!code highlight]
name="example_collection",
vectors=[
zvec.VectorSchema(
name="dense_embedding",
data_type=zvec.DataType.VECTOR_FP32,
dimension=768,
index_param=zvec.HnswIndexParam(metric_type=zvec.MetricType.COSINE),
),
],
fields=[
zvec.FieldSchema(
name="publish_year",
data_type=zvec.DataType.INT32,
index_param=zvec.InvertIndexParam(enable_range_optimization=True),
),
],
)
collection = zvec.open(path="/path/to/collection") # [!code highlight]
```
```ts title="Open a collection"
import { ZVecCollection, ZVecCollectionSchema, ZVecDataType, ZVecIndexType, ZVecMetricType, ZVecOpen } from "@zvec/zvec";
// [!code word:dense_embedding]
// [!code word:publish_year]
const collectionSchema: ZVecCollectionSchema = new ZVecCollectionSchema({ // [!code highlight]
name: "example_collection",
vectors: [
{
name: "dense_embedding",
dataType: ZVecDataType.VECTOR_FP32,
dimension: 768,
indexParams: { indexType: ZVecIndexType.HNSW, metricType: ZVecMetricType.COSINE }
}
],
fields: [
{
name: "publish_year",
dataType: ZVecDataType.INT32,
indexParams: { indexType: ZVecIndexType.INVERT, enableRangeOptimization: true }
}
]
});
const collection: ZVecCollection = ZVecOpen("/path/to/collection"); // [!code highlight]
```
***
## Performing Filtered Vector Search [#performing-filtered-vector-search]
To combine vector similarity search with filters, pass both a [query specification](../#query) and a `filter` expression to the `query()` method.
Python
Node.js
```python title="Filtered vector similarity search"
import zvec
result = collection.query(
queries=zvec.Query( # [!code highlight]
field_name="dense_embedding",
vector=[0.1] * 768, # Replace with real embedding
),
filter="publish_year > 1936", # Only consider books published after 1936 [!code highlight]
topk=10,
)
print(result)
```
```ts title="Filtered vector similarity search"
let result = collection.querySync({ // [!code highlight]
fieldName: "dense_embedding",
vector: Array(768).fill(0.1), // Replace with real embedding
filter: "publish_year > 1936", // Only consider books published after 1936 [!code highlight]
topk: 10
});
console.log(result);
```
This returns the top-10 most similar documents that satisfy `publish_year > 1936`, sorted by similarity score.
# Query
The `query()` method supports **vector similarity search**, **full-text search** (BM25 ranking), **conditional filtering** (like a SQL `WHERE` clause), or **combinations of these**.
It returns a list of `Doc` objects, each containing the matched [document](../../concepts/data-modeling/#documents) and its relevance score.
***
## `Query` [#query]
In Zvec, a `Query` is a query specification that describes the field and query source used for a search. Query APIs accept one or more `Query` specifications depending on whether you are performing a single- or multi-query search.
A single `Query` can target either vector search or full-text search, but not both at the same time.
Each `Query` specifies:
1. `field_name`: The name of the vector or full-text field to search
2. **Query source**:
* For vector search, provide an explicit `vector` or a document `id` (to reuse the stored embedding of an existing document)
* For full-text search, provide an `fts` clause
3. `param` (optional): Index-specific query parameters (e.g., `ef` for [HNSW](../../concepts/vector-index/hnsw-index/#query-time-parameters) or `default_operator` for [full-text search](./fts/#default-operator))
```python title="Query"
import zvec
from zvec.model.param.query import Fts, Query
vector_query = Query( # [!code highlight]
field_name="dense_embedding",
vector=[0.1] * 768, # Use real embedding in practice
)
by_id_query = Query( # [!code highlight]
field_name="dense_embedding",
id="doc123", # Use the 'dense_embedding' from the document with ID "doc123"
)
fts_query = Query( # [!code highlight]
field_name="content",
fts=Fts(match_string="machine learning"),
)
```
Each `ZVecQuery` specifies:
1. `fieldName`: The name of the vector or full-text field to search
2. **Query source**:
* For vector search, provide `vector`
* For full-text search, provide `fts`
3. `params` (optional): Index-specific query parameters (e.g., `ef` for [HNSW](../../concepts/vector-index/hnsw-index/#query-time-parameters) or `defaultOperator` for [full-text search](./fts/#default-operator))
```ts title="ZVecQuery"
import { ZVecQuery } from "@zvec/zvec";
let vector_query: ZVecQuery = { // [!code highlight]
fieldName: "dense_embedding",
vector: Array(768).fill(0.1) // Use real embedding in practice
};
// [!code word:fts]
let fts_query: ZVecQuery = { // [!code highlight]
fieldName: "content",
fts: { matchString: "machine learning" }
};
```
***
## Query Types [#query-types]
***
## Quick Start Examples [#quick-start-examples]
### Single-Vector Search [#single-vector-search]
Python
Node.js
```python
import zvec
result = collection.query( # [!code highlight]
queries=zvec.Query(
field_name="dense_embedding",
vector=[0.1] * 768, # Use real embedding in practice
),
topk=10,
)
```
```ts
let result = collection.querySync({ // [!code highlight]
fieldName: "dense_embedding",
vector: Array(768).fill(0.1), // Use real embedding in practice
topk: 10,
});
```
### Multi-Vector Search [#multi-vector-search]
Python
Node.js
```python
import zvec
result = collection.query( # [!code highlight]
topk=3,
queries=[
zvec.Query(field_name="dense_embedding", vector=[0.1] * 768),
zvec.Query(field_name="sparse_embedding", vector={1: 0.1, 37: 0.43}),
],
reranker=zvec.WeightedReRanker( # [!code highlight]
weights=[1.2, 1.0],
),
)
print(result)
```
```ts
let result = collection.multiQuerySync({ // [!code highlight]
topk: 3,
queries: [
{ fieldName: "dense_embedding", vector: Array(768).fill(0.1), numCandidates: 5 },
{ fieldName: "sparse_embedding", vector: { 1: 0.1, 37: 0.43 }, numCandidates: 5 },
],
rerank: { type: "weighted", weights: [1.2, 1.0] }, // [!code highlight]
});
```
### Conditional Filtering [#conditional-filtering]
Python
Node.js
```python
# [!code word:filter]
result = collection.query(filter="publish_year < 1999", topk=50)
```
```ts
// [!code word:filter]
let result = collection.querySync({ filter: "publish_year < 1999", topk: 50 });
```
### Hybrid Search [#hybrid-search]
Python
Node.js
```python
import zvec
result = collection.query( # [!code highlight]
queries=zvec.Query(
field_name="dense_embedding",
vector=[0.1] * 768, # Use real embedding in practice
),
# [!code word:filter]
filter="publish_year < 1999",
topk=10,
)
```
```ts
let result = collection.querySync({ // [!code highlight]
fieldName: "dense_embedding",
vector: Array(768).fill(0.1), // Use real embedding in practice
// [!code word:filter]
filter: "publish_year < 1999",
topk: 10
});
```
### Full-Text Search [#full-text-search]
Python
Node.js
```python
from zvec.model.param.query import Fts, Query
# [!code word:fts]
result = collection.query( # [!code highlight]
queries=Query(
field_name="content",
fts=Fts(match_string="machine learning"),
),
topk=10,
)
```
```ts
// [!code word:fts]
let result = collection.querySync({ // [!code highlight]
fieldName: "content",
fts: { matchString: "machine learning" },
topk: 10
});
```
### Grouped Search [#grouped-search]
Python
Node.js
```python
import zvec
groups = collection.group_by_query( # [!code highlight]
query=zvec.Query(
field_name="dense_embedding",
vector=[0.1] * 768, # Replace with a real embedding in practice
),
group_by_field_name="publish_year", # Group by publication year
group_count=3, # Return up to 3 groups
topk_per_group=2, # Return up to 2 documents per group
)
for group in groups:
print(group.group_by_value, group.docs)
```
```ts
const groups = collection.groupByQuerySync({ // [!code highlight]
fieldName: "dense_embedding",
vector: Array(768).fill(0.1), // Replace with a real embedding in practice
groupByFieldName: "publish_year", // Group by publication year
groupCount: 3, // Return up to 3 groups
topkPerGroup: 2, // Return up to 2 documents per group
});
for (const group of groups) {
console.log(group.groupByValue, group.docs);
}
```
# Multiple Vectors
Zvec supports **multi-vector queries**, allowing you to combine different embeddings in a single search.
When querying multiple vector embeddings, Zvec retrieves candidates from each vector space independently and then fuses them into one relevance-ordered list. Because scores from different vector spaces might not be directly comparable, you must choose a suitable **re-ranking strategy**.
***
## Prerequisites [#prerequisites]
This guide assumes:
* You have opened a `collection` with multiple vector fields
* You're familiar with the basic vector querying concepts. If not, please review the [single-vector search](../single-vector/) guide
This example collection contains two vector fields:
1. **`dense_embedding`** — A 768-dimensional dense vector using inner product metric
2. **`sparse_embedding`** — A sparse vector using inner product metric
It also includes two scalar fields (`publish_year` and `category`).
```python title="Create and open a collection"
import zvec
# [!code word:dense_embedding]
# [!code word:sparse_embedding]
collection_schema = zvec.CollectionSchema( # [!code highlight]
name="example_collection",
vectors=[
zvec.VectorSchema(
name="dense_embedding",
data_type=zvec.DataType.VECTOR_FP32,
dimension=768,
index_param=zvec.HnswIndexParam(metric_type=zvec.MetricType.IP),
),
zvec.VectorSchema(
name="sparse_embedding",
data_type=zvec.DataType.SPARSE_VECTOR_FP32,
index_param=zvec.HnswIndexParam(metric_type=zvec.MetricType.IP),
),
],
fields=[
zvec.FieldSchema(name="publish_year", data_type=zvec.DataType.INT64),
zvec.FieldSchema(name="category", data_type=zvec.DataType.ARRAY_STRING),
],
)
collection = zvec.create_and_open( # [!code highlight]
path="/path/to/collection",
schema=collection_schema,
)
```
***
## Performing Multi-Vector Search [#performing-multi-vector-search]
In Python, pass a list of [query specifications](../#query) to `query()` and provide a fusion strategy through `reranker`. In Node.js, pass the sub-queries to `multiQuerySync()` or `multiQuery()` and configure `rerank`.
This example queries both `dense_embedding` and `sparse_embedding` and uses `WeightedReRanker` to combine their results. Weights are positional and must follow the same order as `queries`.
Python
Node.js
```python
import zvec
result = collection.query( # [!code highlight]
topk=3, # Number of final documents returned after re-ranking
queries=[ # List of query specifications — one for each embedding space to search
zvec.Query(field_name="dense_embedding", vector=[0.1] * 768), # [!code highlight]
zvec.Query(field_name="sparse_embedding", vector={1: 0.1, 37: 0.43}), # [!code highlight]
],
reranker=zvec.WeightedReRanker( # [!code highlight]
weights=[1.2, 1.0], # dense_embedding, then sparse_embedding
),
)
print(result)
```
```ts
let result = collection.multiQuerySync({ // [!code highlight]
topk: 3, // Number of final documents returned after re-ranking
queries: [
{
fieldName: "dense_embedding",
vector: Array(768).fill(0.1),
numCandidates: 5, // Candidates retrieved for this sub-query
},
{
fieldName: "sparse_embedding",
vector: { 1: 0.1, 37: 0.43 },
numCandidates: 5,
},
],
rerank: { // [!code highlight]
type: "weighted",
weights: [1.2, 1.0], // dense_embedding, then sparse_embedding
},
});
console.log(result);
```
`topk` always controls the number of **final documents** returned after fusion.
* Python does not currently expose a separate candidate-count option for each sub-query in `Collection.query()`.
* Node.js supports `numCandidates` on each sub-query. If omitted, its default is `max(topk, 10)`.
* `topn` is used only when calling a re-ranker's standalone `rerank()` method; it is not a constructor argument.
### Re-ranking Strategies [#re-ranking-strategies]
Zvec provides different re-ranking strategies to combine scores from multiple vector fields.
| Re-ranker | `WeightedReRanker` | `RrfReRanker` (Reciprocal Rank Fusion) |
| ---------- | ------------------------------------------------------------------------------------------------------------------------ | --------------------------------------------------------------------------------------------------------------------------------------------------------------------------------------- |
| Approach | Combines normalized similarity scores using **custom weights** | Fuses results based only on **ranking positions** — no scores needed
With a zero-based rank *r* (the first result is 0), the RRF score is: $\text{RRF}(r) = \frac{1}{k + r + 1}$ |
| Best for | • Scores are reasonably comparable across vector fields
• You know the relative importance of each embedding type | • Scores come from different metrics or scales
• You prefer a simple, robust, tuning-free method |
| Parameters | `weights`: An ordered list aligned with `queries`. Score normalization uses each queried field's schema. | `rank_constant` (*k*): Controls how quickly rank influence decreases. Higher values reduce the dominance of top-ranked results. |
# Single Vector
Single-vector search finds documents most similar to a single query embedding. This is the most common search pattern in vector databases.
***
## Prerequisites [#prerequisites]
This guide assumes you have opened a collection and have a `collection` object ready.
This example collection contains two vector fields:
1. **`dense_embedding`** — A 768-dimensional dense vector using cosine metric
2. **`sparse_embedding`** — A sparse vector using inner product metric
It also includes two scalar fields (`publish_year` and `category`).
Python
Node.js
```python title="Open a collection"
import zvec
# [!code word:dense_embedding]
# [!code word:sparse_embedding]
collection_schema = zvec.CollectionSchema( # [!code highlight]
name="example_collection",
vectors=[
zvec.VectorSchema(
name="dense_embedding",
data_type=zvec.DataType.VECTOR_FP32,
dimension=768,
index_param=zvec.HnswIndexParam(metric_type=zvec.MetricType.COSINE),
),
zvec.VectorSchema(
name="sparse_embedding",
data_type=zvec.DataType.SPARSE_VECTOR_FP32,
index_param=zvec.HnswIndexParam(metric_type=zvec.MetricType.IP),
),
],
fields=[
zvec.FieldSchema(name="publish_year", data_type=zvec.DataType.INT64),
zvec.FieldSchema(name="category", data_type=zvec.DataType.ARRAY_STRING),
],
)
collection = zvec.open(path="/path/to/collection") # [!code highlight]
```
```ts title="Open a collection"
import { ZVecCollection, ZVecCollectionSchema, ZVecDataType, ZVecIndexType, ZVecMetricType, ZVecOpen } from "@zvec/zvec";
// [!code word:dense_embedding]
// [!code word:sparse_embedding]
const collectionSchema: ZVecCollectionSchema = new ZVecCollectionSchema({ // [!code highlight]
name: "example_collection",
vectors: [
{
name: "dense_embedding",
dataType: ZVecDataType.VECTOR_FP32,
dimension: 768,
indexParams: { indexType: ZVecIndexType.HNSW, metricType: ZVecMetricType.COSINE }
},
{
name: "sparse_embedding",
dataType: ZVecDataType.SPARSE_VECTOR_FP32,
indexParams: { indexType: ZVecIndexType.HNSW, metricType: ZVecMetricType.IP }
}
],
fields: [
{
name: "publish_year",
dataType: ZVecDataType.INT64
},
{
name: "category",
dataType: ZVecDataType.ARRAY_STRING
}
]
});
const collection: ZVecCollection = ZVecOpen("/path/to/collection"); // [!code highlight]
```
***
## Performing Single-Vector Search [#performing-single-vector-search]
To perform a single-vector similarity search, use the `query()` method and provide a single [query specification](../#query).
Python
Node.js
```python title="Query with a single vector"
import zvec
result = collection.query( # [!code highlight]
queries=zvec.Query(
field_name="dense_embedding",
# Dense embeddings are lists of floats
vector=[0.1] * 768, # Replace with a real embedding in practice
),
topk=3,
include_vector=False, # Do not return the vector embedding
)
print(result)
```
```ts title="Query with a single vector"
// Sync
let result = collection.querySync({ // [!code highlight]
fieldName: "dense_embedding",
// Dense embeddings are arrays of floats
vector: Array(768).fill(0.1), // Replace with a real embedding in practice
topk: 3,
includeVector: false // Do not return the vector embedding
});
console.log(result);
// Async
let resultAsync = await collection.query({ // [!code highlight]
fieldName: "dense_embedding",
// Dense embeddings are arrays of floats
vector: Array(768).fill(0.1), // Replace with a real embedding in practice
topk: 3,
includeVector: false // Do not return the vector embedding
});
console.log(resultAsync);
```
Python
Node.js
```python title="Query with a single vector"
import zvec
result = collection.query( # [!code highlight]
queries=zvec.Query(
field_name="sparse_embedding",
# Sparse embeddings are dicts: {dimension_index: weight}
vector={ # Replace with a real embedding in practice
42: 1.25,
1337: 0.8,
1999: 0.64,
},
),
topk=3,
)
print(result)
```
```ts title="Query with a single vector"
// Sync
let result = collection.querySync({ // [!code highlight]
fieldName: "sparse_embedding",
// Sparse embeddings are objects: {dimension_index: weight}
vector: { // Replace with a real embedding in practice
42: 1.25,
1337: 0.8,
1999: 0.64,
},
topk: 3
});
console.log(result);
// Async
let resultAsync = await collection.query({ // [!code highlight]
fieldName: "sparse_embedding",
// Sparse embeddings are objects: {dimension_index: weight}
vector: { // Replace with a real embedding in practice
42: 1.25,
1337: 0.8,
1999: 0.64,
},
topk: 3
});
console.log(resultAsync);
```
Python
```python title="Query with a single vector"
import zvec
result = collection.query( # [!code highlight]
queries=zvec.Query(
field_name="dense_embedding",
id="book_1", # Uses the 'dense_embedding' of the document with this ID
),
topk=100,
include_vector=True, # Returns the vector embedding
output_fields=["publish_year"], # Returns the 'publish_year' field
)
print(result)
```
All queries return a `list[Doc]` containing the **top-k** most similar documents, sorted by relevance score.
Each `Doc` object includes:
1. `id`: The document identifier.
2. `score`: The similarity score.
3. `vectors`: A map from vector field names to their corresponding embedding values.\
This is **only populated** if `include_vector=True` is passed in the query.
4. `fields`: A map from scalar field names to their stored values.\
By default, **all scalar fields** are returned; this can be restricted using the `output_fields` parameter.
This example shows results from a query on the `dense_embedding` field with the following settings:
1. `topk=3:` returns the 3 most similar documents
2. `include_vector=False` (default): vector embeddings are not returned, so `vectors` is empty
3. All scalar fields are returned
4. Cosine distance is used to compute similarity scores — lower scores indicate greater similarity
$$
\textcolor{#2563eb}{
d_{\text{cosine}} = 1 - \frac{\mathbf{a} \cdot \mathbf{b}}{\|\mathbf{a}\| \|\mathbf{b}\|}
}
$$
Python
Node.js
```json
[{
"id": "book_16", // [!code highlight]
"score": 0.12152397632598877,
"fields": {
"publish_year": 1866,
"category": [
"technology",
"romance"
]
},
"vectors": null
}, {
"id": "book_69", // [!code highlight]
"score": 0.12367439270019531,
"fields": {
"publish_year": 1919,
"category": [
"art",
"fiction"
]
},
"vectors": null
}, {
"id": "book_24", // [!code highlight]
"score": 0.12455785274505615,
"fields": {
"publish_year": 1874,
"category": [
"romance",
"politics"
]
},
"vectors": null
}]
```
```json
[
{
id: 'book_16', // [!code highlight]
score: 0.12152397632598877,
vectors: {},
fields: { publish_year: 1866, category: [Array] }
},
{
id: 'book_69', // [!code highlight]
score: 0.12367439270019531,
vectors: {},
fields: { publish_year: 1919, category: [Array] }
},
{
id: 'book_24', // [!code highlight]
score: 0.12455785274505615,
vectors: {},
fields: { publish_year: 1874, category: [Array] }
}
]
```
## Parameters [#parameters]
When performing a vector search, the `query()` method accepts two kinds of parameters:
1. **common parameters**, which apply universally regardless of the underlying index type
2. **index-specific parameters**, which allow fine-tuning of search behavior based on the vector index in use
### Common Parameters [#common-parameters]
| Parameter | Description |
| ---------------- | --------------------------------------------------------------------------------------------------------------- |
| `topk` | The number of most similar documents to return. |
| `include_vector` | If `True`, the returned `Doc` objects include the full vector embeddings (disabled by default for performance). |
| `output_fields` | An optional list of scalar field names to include in results. If omitted, all scalar fields are returned. |
| `filter` | An optional SQL-like boolean expression to restrict results. See [filtered search](../filter/) for details. |
The `reranker` parameter is part of the `query()` interface but **only applies to [multi-vector search](../multi-vector/)**.\
Do not provide it in single-vector queries.
### Index-Specific Parameters [#index-specific-parameters]
You can fine-tune search behavior by passing index-specific query parameters through the `param` option in the `Query` object.
The exact type and structure of these `param` depend on the vector index used for the target vector embedding. If omitted, default values are used.
Each index type exposes its own set of tunable options at query time. For full details:
Mismatched parameter classes will cause an error. For instance, using `IVFQueryParam` with an HNSW-indexed vector (or vice versa) is not allowed.
If `dense_embedding` uses an [HNSW](../../../concepts/vector-index/hnsw-index/) index, you can adjust the `ef` parameter like this:
Python
Node.js
```python title="Query with index-specific parameters"
import zvec
result = collection.query( # [!code highlight]
queries=zvec.Query(
field_name="dense_embedding",
vector=[0.1] * 768,
param=zvec.HnswQueryParam(ef=600), # Set ef to a larger value for better recall [!code highlight]
),
topk=10,
)
print(result)
```
```ts title="Query with index-specific parameters"
let result = collection.querySync({ // [!code highlight]
fieldName: "dense_embedding",
vector: Array(768).fill(0.1),
params: { indexType: ZVecIndexType.HNSW, ef: 600 }, // Set ef to a larger value for better recall [!code highlight]
topk: 10
});
console.log(result);
```
If `dense_embedding` uses an [HNSW-RaBitQ](../../../concepts/vector-index/hnsw-rabitq-index/) index, you can adjust the `ef` parameter like this:
Python
Node.js
```python title="Query with index-specific parameters"
import zvec
result = collection.query( # [!code highlight]
queries=zvec.Query(
field_name="dense_embedding",
vector=[0.1] * 768,
param=zvec.HnswRabitqQueryParam(ef=600), # Set ef to a larger value for better recall [!code highlight]
),
topk=10,
)
print(result)
```
```ts title="Query with index-specific parameters"
let result = collection.querySync({ // [!code highlight]
fieldName: "dense_embedding",
vector: Array(768).fill(0.1),
params: { indexType: ZVecIndexType.HNSW_RABITQ, ef: 600 }, // Set ef to a larger value for better recall [!code highlight]
topk: 10
});
console.log(result);
```
If `dense_embedding` uses an [IVF](../../../concepts/vector-index/ivf-index/) index, you can adjust the `n_probe` parameter like this:
Python
Node.js
```python title="Query with index-specific parameters"
import zvec
result = collection.query( # [!code highlight]
queries=zvec.Query(
field_name="dense_embedding",
vector=[0.1] * 768,
param=zvec.IVFQueryParam(nprobe=100), # [!code highlight]
),
topk=10,
)
print(result)
```
```ts title="Query with index-specific parameters"
let result = collection.querySync({ // [!code highlight]
fieldName: "dense_embedding",
vector: Array(768).fill(0.1),
params: { indexType: ZVecIndexType.IVF, nprobe: 100 }, // [!code highlight]
topk: 10
});
console.log(result);
```
If `dense_embedding` uses an [IVF-RaBitQ](../../../concepts/vector-index/ivf-rabitq-index/) index, use `nprobe` to control the number of inverted lists scanned:
Python
Node.js
```python title="Query with index-specific parameters"
import zvec
result = collection.query( # [!code highlight]
queries=zvec.Query(
field_name="dense_embedding",
vector=[0.1] * 768,
param=zvec.IvfRabitqQueryParam(
nprobe=100, # Scanning more lists generally improves recall [!code highlight]
is_using_refiner=True,
scale_factor=10.0,
),
),
topk=10,
)
print(result)
```
```ts title="Query with index-specific parameters"
const result = collection.querySync({ // [!code highlight]
fieldName: "dense_embedding",
vector: Array(768).fill(0.1),
params: {
indexType: ZVecIndexType.IVF_RABITQ,
nprobe: 100, // Scanning more lists generally improves recall [!code highlight]
isUsingRefiner: true,
scaleFactor: 10.0,
},
topk: 10,
});
console.log(result);
```
If `dense_embedding` uses a [DiskANN](../../../concepts/vector-index/diskann-index/) index, you can adjust the `list_size` parameter like this:
Python
Node.js
```python title="Query with index-specific parameters"
import zvec
result = collection.query( # [!code highlight]
queries=zvec.Query(
field_name="dense_embedding",
vector=[0.1] * 768,
param=zvec.DiskAnnQueryParam(list_size=200), # Larger list_size = higher recall, more disk I/O [!code highlight]
),
topk=10,
)
print(result)
```
```ts title="Query with index-specific parameters"
let result = collection.querySync({ // [!code highlight]
fieldName: "dense_embedding",
vector: Array(768).fill(0.1),
params: { indexType: ZVecIndexType.DISKANN, listSize: 200 }, // Larger listSize = higher recall, more disk I/O [!code highlight]
topk: 10
});
console.log(result);
```
# 总览
# AI 友好
本网站文档支持直接被 AI 助手读取。配合 [**Qoder**](https://qoder.com/) 等工具,AI 助手可以基于文档帮你编写 Zvec 代码。
## 快速开始:复制 Prompt [#快速开始复制-prompt]
把下面的 Prompt 发给你的 AI 助手。它会拿到完整的文档索引,之后可以自主访问需要的页面 (每个页面都有对应的 Markdown 版本)。
```plain
读取 https://zvec.org/llms.txt 来获取 Zvec 的完整文档索引。
根据我给你的任务,按需获取相关的 Markdown 页面作为参考。
```
接下来你只需要正常提问或下达任务,AI 就会自动查阅相关文档,帮你解答或生成代码。
***
## 复制页面按钮 [#复制页面按钮]
一般来说,让 AI 通过上面的 Prompt 自己去查阅文档是最方便的。
当然,如果你正好在看某个页面,也可以直接点**复制页面**按钮,把内容粘贴给 AI。
***
## 可用端点 [#可用端点]
所有文档页面均提供纯 Markdown 格式,AI 助手可以直接读取:
| URL | 说明 |
| ---------------------------------------- | ----------------- |
| [`/llms.txt`](https://zvec.org/llms.txt) | 完整的文档页面索引 |
| `/mdx/{lang}/docs/{path}.md` | 单个页面的 Markdown 内容 |
将 `{lang}` 替换为语言代码,`{path}` 替换为页面路径。例如:
* `https://zvec.org/mdx/zh/docs/db/quickstart.md`
* `https://zvec.org/mdx/zh/docs/db/collections/create/schema.md`
* `https://zvec.org/mdx/zh/docs/db/data-operations/insert.md`
# 基准测试
**Zvec** 专为速度、规模和效率而设计 — 并已在阿里巴巴集团严苛的生产负载中经过了实战检验。
下文将展示 Zvec 在不同工作负载和配置下的基准测试结果。
所有测试均在受控环境中进行,采用标准化数据集和业界公认的方法,以确保公平性、透明度和可复现性。
## 性能评测 [#性能评测]
我们使用 [**VectorDBBench**](https://github.com/zilliztech/VectorDBBench) 对 Zvec 进行评估。VectorDBBench 是一个开源的向量数据库基准测试框架。
我们的评估主要基于以下两个标准数据集:
* **Cohere 1M**:100万条 768 维向量
* **Cohere 10M**:1000万条 768 维向量
对于每个数据集,我们测量以下关键性能指标:
* **每秒查询数(QPS)**:持续负载下的吞吐量。
* **召回率**:最近邻检索的准确度,反映搜索质量。
* **索引构建时间**:完整数据集的导入和构建索引所需的时间,反映数据导入效率。
### Cohere 10M 基准测试结果 [#cohere-10m-基准测试结果]
 ### Cohere 1M 基准测试结果 [#cohere-1m-基准测试结果]


 ## 复现基准测试结果 [#复现基准测试结果]
请按照以下步骤复现我们的基准测试结果。
## 复现基准测试结果 [#复现基准测试结果]
请按照以下步骤复现我们的基准测试结果。
### 准备环境 [#准备环境-step]
1. **启动 ECS 实例**
我们推荐使用 **Ubuntu 24.04** 作为操作系统。如果使用其他操作系统,有可能需要调整复现步骤中的命令。
* 参考[此指南](https://help.aliyun.com/zh/ecs/user-guide/create-a-subscription-instance-on-the-quick-launch-tab),创建一个 **g9i.4xlarge** 实例(16 vCPU,64 GiB 内存)。
2. **安装系统依赖**
* 如尚未安装 git,请先安装
```bash
apt-get update
apt install git
```
* 安装 Python3.11 或更高版本
```bash
apt-get update
apt install python3-full python3-venv python3-dev
cd /opt
python3 -m venv venv
source venv/bin/activate
```
3. **安装 [VectorDBBench](https://github.com/zilliztech/VectorDBBench)**
```bash
# Clone VectorDBBench
git clone https://github.com/zilliztech/VectorDBBench.git
cd VectorDBBench
# Install deps
pip install -U pip
pip install -e .
# 如遇下载缓慢或连接问题,可尝试使用阿里云 PyPI 镜像
# pip install -U pip -i https://mirrors.aliyun.com/pypi/simple
# pip install -e . -i https://mirrors.aliyun.com/pypi/simple
```
4. **安装 Zvec**
```bash
pip install zvec==v0.1.1
```
### 运行基准测试 [#运行基准测试-step]
#### Cohere 10M [#cohere-10m]
1. **构建索引**
```bash
vectordbbench zvec --path Performance768D10M --db-label 16c64g-v0.1 --case-type Performance768D10M --num-concurrency 12,14,16,18,20 --quantize-type int8 --m 50 --ef-search 118 --is-using-refiner
```
2. **运行测试**
```bash
vectordbbench zvec --path Performance768D10M --db-label 16c64g-v0.1 --case-type Performance768D10M --num-concurrency 12,14,16,18,20 --quantize-type int8 --m 50 --ef-search 118 --is-using-refiner --skip-drop-old --skip-load
```
#### Cohere 1M [#cohere-1m]
1. **构建索引**
```bash
vectordbbench zvec --path Performance768D1M --db-label 16c64g-v0.1 --case-type Performance768D1M --num-concurrency 12,14,16,18,20 --quantize-type int8 --m 15 --ef-search 180
```
2. **运行测试**
```bash
vectordbbench zvec --path Performance768D1M --db-label 16c64g-v0.1 --case-type Performance768D1M --num-concurrency 12,14,16,18,20 --quantize-type int8 --m 15 --ef-search 180 --skip-drop-old --skip-load
```
# 全局配置
在执行任何数据库操作之前,你可以选择使用 `init()` 函数来配置全局设置。
* 如果不进行配置,Zvec 会自动应用合理的默认值 — 通常会根据系统的可用内存、CPU 和运行环境进行优化调整。
* 当你需要自定义设置时请使用 `init()`,例如:
* 调整日志的详细程度或输出格式
* 控制并发数 (比如查询线程数)
如需调用 `init()`,请只在程序启动时调用一次 (在创建或打开任何 collection 之前)。`init()` 不支持运行时动态修改配置。
## 配置示例 [#配置示例]
Python
Node.js
```python title="全局配置"
import zvec
# [!code word:init]
zvec.init(
log_type=zvec.LogType.CONSOLE,
log_level=zvec.LogLevel.WARN,
query_threads=4,
)
```
```ts title="全局配置"
import { ZVecInitialize, ZVecLogLevel, ZVecLogType } from "@zvec/zvec";
// [!code word:ZVecInitialize]
ZVecInitialize({
logType: ZVecLogType.CONSOLE,
logLevel: ZVecLogLevel.WARN,
queryThreads: 4
});
```
* 将日志输出到**控制台**,级别为 `WARN` 及更高。
* 将查询线程数限制为最多 4 个。
关于配置选项和高级调优参数的完整列表,请参阅 API Reference。
# Embedding
本页介绍 **Zvec 的 Embedding 函数系统**,用于将文本转换为向量表示。它提供多种**开箱即用的实现**,并支持**自定义扩展**以集成你自己的模型。
**当前支持:**Zvec 目前仅支持**文本模态** Embedding。未来版本可能会添加对其他模态(图片、音频等)的支持。
\*\*中国大陆用户提示:\*\*为了更稳定地从 Hugging Face 下载模型,请在运行 Python 前配置镜像端点:
```bash
export HF_ENDPOINT=https://hf-mirror.com
```
\*\*依赖项:\*\*要运行本文档中的示例,请先安装以下包:
```bash
pip install openai dashscope dashtext sentence-transformers
```
## 概述 [#概述]
Zvec 的 Embedding 系统提供了开箱即用的 **Embedding 函数**,将文本转换为向量表示以进行相似度搜索。
### Embedding 函数类型 [#embedding-函数类型]
| 类型 | 实现 | 描述 |
| ------------- | ----------------------------- | --------------------------------------------------------------- |
| **本地稠密** | `DefaultLocalDenseEmbedding` | 使用 Sentence Transformers 和 `all-MiniLM-L6-v2` 模型(384 维,\~80MB) |
| **本地稀疏** | `DefaultLocalSparseEmbedding` | 使用 SPLADE `naver/splade-cocondenser-ensembledistil` 模型(\~100MB) |
| **BM25** | `BM25EmbeddingFunction` | 使用 DashText SDK 的 BM25 算法(本地计算,无需 API 密钥) |
| **Qwen 稠密** | `QwenDenseEmbedding` | 使用 Qwen Dashscope API |
| **Qwen 稀疏** | `QwenSparseEmbedding` | 使用 Qwen Dashscope API |
| **OpenAI 稠密** | `OpenAIDenseEmbedding` | 使用 OpenAI API |
| **Jina 稠密** | `JinaDenseEmbedding` | 使用 Jina Embeddings API,支持任务特定和 Matryoshka 维度 |
## 稠密 Embedding [#稠密-embedding]
稠密 Embedding 将语义信息编码在固定长度的连续向量中。
### DefaultLocalDenseEmbedding - 本地稠密 Embedding [#1-defaultlocaldenseembedding---本地稠密-embedding]
使用 Sentence Transformers 库和 `all-MiniLM-L6-v2` 模型生成 384 维稠密向量。
**模型详情:**
* 模型:`all-MiniLM-L6-v2`(HuggingFace)或 `iic/nlp_gte_sentence-embedding_chinese-small`(ModelScope,适用于中文)
* 维度:384
* 大小:\~80MB
```python
from zvec.extension import DefaultLocalDenseEmbedding
# 基础用法(国际用户)
embedding_func = DefaultLocalDenseEmbedding()
vector = embedding_func.embed("Hello, world!")
print(f"Dimensions: {len(vector)}") # 384
# 中国用户:推荐使用 ModelScope
embedding_func = DefaultLocalDenseEmbedding(model_source="modelscope")
vector = embedding_func.embed("你好,世界!")
# 批量处理
texts = ["Text 1", "Text 2", "Text 3"]
vectors = [embedding_func.embed(text) for text in texts]
# 语义相似度计算
import numpy as np
v1 = embedding_func.embed("The cat sits on the mat")
v2 = embedding_func.embed("A cat is resting on the mat")
similarity = np.dot(v1, v2) # 归一化向量,点积 = 余弦相似度
print(f"Similarity: {similarity:.4f}")
```
### QwenDenseEmbedding - Dashscope API 稠密 Embedding [#2-qwendenseembedding---dashscope-api-稠密-embedding]
使用 Qwen 的 Dashscope Embedding API。
**注意:**需要 Dashscope API 密钥,且**维度必须显式指定**。
```python
from zvec.extension import QwenDenseEmbedding
# 需要 API 密钥
embedding_func = QwenDenseEmbedding(
api_key="your-dashscope-api-key",
model="text-embedding-v4", # 可选,默认使用最新模型
dimension=256, # 必填:Embedding 维度
)
vector = embedding_func.embed("Vector database")
print(f"Dimensions: {embedding_func.dimension}") # 256
```
### OpenAIDenseEmbedding - OpenAI API 稠密 Embedding [#3-openaidenseembedding---openai-api-稠密-embedding]
使用 OpenAI 的 Embedding API。
```python
from zvec.extension import OpenAIDenseEmbedding
embedding_func = OpenAIDenseEmbedding(
api_key="your-openai-api-key",
model="text-embedding-4", # 可选,默认使用最新模型
dimension=256, # 必填:Embedding 维度
)
vector = embedding_func.embed("Vector database")
```
### JinaDenseEmbedding - Jina Embeddings API 稠密 Embedding [#4-jinadenseembedding---jina-embeddings-api-稠密-embedding]
使用 [Jina Embeddings](https://jina.ai) API 生成稠密向量。Jina v5 模型家族支持任务特定的 Embedding 和 [Matryoshka 表示学习](https://arxiv.org/abs/2205.13147),允许在不重新训练的情况下灵活降维。
**可用模型:**
| 模型 | 参数量 | 最大长度 | 维度 | MTEB English v2 | MMTEB |
| ------------------------------- | ---- | ----- | ---- | --------------- | ----- |
| `jina-embeddings-v5-text-small` | 677M | 32768 | 1024 | 71.7 | 67.7 |
| `jina-embeddings-v5-text-nano` | 239M | 8192 | 768 | 71.0 | 65.5 |
截至 2026 年 2 月,`v5-text-small` 在 [MTEB](https://huggingface.co/spaces/mteb/leaderboard) 上排名 1B 参数以下最佳多语言 Embedding 模型。`v5-text-nano` 匹配或超过所有其他 500M 以下的模型,包括 KaLM-mini-v2.5(494M)和 Gemma-300M(308M),同时使用更少的参数。
两个模型都支持 Matryoshka 维度(32、64、128、256、512、768、1024),并在 Apache 2.0 许可证下开源,可通过 GGUF 和 MLX 格式本地部署。
\*\*注意:\*\*需要 Jina API 密钥。在 [jina.ai](https://jina.ai) 获取(有免费额度)。
```python
from zvec.extension import JinaDenseEmbedding
# 基础用法(默认:v5-text-small,1024 维)
embedding_func = JinaDenseEmbedding(api_key="your-jina-api-key")
vector = embedding_func.embed("Vector database")
print(f"Dimensions: {len(vector)}") # 1024
# 用于检索:对查询和文档使用不同的任务类型
query_emb = JinaDenseEmbedding(
api_key="your-jina-api-key",
task="retrieval.query",
)
doc_emb = JinaDenseEmbedding(
api_key="your-jina-api-key",
task="retrieval.passage",
)
query_vector = query_emb.embed("What is machine learning?")
doc_vector = doc_emb.embed("Machine learning is a subset of artificial intelligence...")
# 语义相似度
import numpy as np
similarity = np.dot(query_vector, doc_vector)
print(f"Similarity: {similarity:.4f}")
# 使用 Matryoshka 降维
emb = JinaDenseEmbedding(
api_key="your-jina-api-key",
model="jina-embeddings-v5-text-small",
dimension=256,
task="text-matching",
)
vector = emb.embed("Compact 256-dim vector")
print(f"Dimensions: {len(vector)}") # 256
# 轻量模型,适用于资源受限场景
nano_emb = JinaDenseEmbedding(
api_key="your-jina-api-key",
model="jina-embeddings-v5-text-nano",
dimension=128,
task="retrieval.query",
)
vector = nano_emb.embed("Efficient embedding")
print(f"Dimensions: {len(vector)}") # 128
```
**支持的任务类型:**
| 任务 | 用途 |
| ------------------- | ------------- |
| `retrieval.query` | 为检索编码搜索查询 |
| `retrieval.passage` | 为检索编码文档/段落 |
| `text-matching` | 对称相似度(例如重复检测) |
| `classification` | 为分类任务编码文本 |
| `separation` | 为聚类/主题分离编码文本 |
更多详情请参阅[技术报告](https://arxiv.org/abs/2602.15547)和 [HuggingFace 模型卡片](https://huggingface.co/jinaai)。
## 稀疏 Embedding [#稀疏-embedding]
稀疏 Embedding 使用高维稀疏向量表示文本,适合词汇匹配。
### DefaultLocalSparseEmbedding - 本地稀疏 Embedding [#1-defaultlocalsparseembedding---本地稀疏-embedding]
使用 SPLADE 模型生成稀疏向量,适合词汇匹配和混合检索。
**模型详情:**
* 模型:`naver/splade-cocondenser-ensembledistil`
* 大小:\~100MB
* 输出:稀疏字典格式
```python
from zvec.extension import DefaultLocalSparseEmbedding
# 查询 Embedding(用于搜索查询)
query_embedding = DefaultLocalSparseEmbedding(encoding_type="query")
query_vec = query_embedding.embed("machine learning algorithms")
# 文档 Embedding(用于文档索引)
doc_embedding = DefaultLocalSparseEmbedding(encoding_type="document")
doc_vec = doc_embedding.embed("Machine learning is a subfield of artificial intelligence")
# 稀疏向量格式:{维度索引: 权重}
print(f"Non-zero dimensions: {len(query_vec)}")
print(f"First 5 dimensions: {list(query_vec.items())[:5]}")
# 清除模型缓存
DefaultLocalSparseEmbedding.clear_cache()
```
### BM25EmbeddingFunction - DashText SDK BM25 稀疏 Embedding [#2-bm25embeddingfunction---dashtext-sdk-bm25-稀疏-embedding]
使用 DashText 的本地 BM25 编码器进行词汇匹配。**无需 API 密钥或网络连接。**
**两种方式:**
* **内置编码器**(推荐用于通用场景):预训练模型,支持中文(`language="zh"`)和英文(`language="en"`)
* **自定义编码器**:使用自己的语料库训练,适用于领域特定术语,支持 BM25 参数(`b`、`k1`)
```python
from zvec.extension import BM25EmbeddingFunction
# 方式 1:使用内置编码器(无需语料库)
# 中文查询编码
bm25_query_zh = BM25EmbeddingFunction(language="zh", encoding_type="query")
query_vec = bm25_query_zh.embed("深度学习神经网络")
# 中文文档编码
bm25_doc_zh = BM25EmbeddingFunction(language="zh", encoding_type="document")
doc_vec = bm25_doc_zh.embed("机器学习是人工智能的重要分支")
# 英文查询编码
bm25_query_en = BM25EmbeddingFunction(language="en", encoding_type="query")
query_vec_en = bm25_query_en.embed("deep learning neural networks")
# 方式 2:使用自定义语料库以获得更好的领域准确性
corpus = [
"Machine learning is an important branch of artificial intelligence",
"Deep learning uses neural networks",
"Natural language processing handles text data"
]
bm25_custom = BM25EmbeddingFunction(
corpus=corpus,
encoding_type="query",
b=0.75, # 文档长度归一化
k1=1.2 # 词频饱和度
)
query_vec = bm25_custom.embed("deep learning neural networks")
```
### QwenSparseEmbedding - Dashscope API 稀疏 Embedding [#3-qwensparseembedding---dashscope-api-稀疏-embedding]
\*\*需要 Dashscope API 密钥。\*\*访问 [Dashscope 控制台](https://dashscope.console.aliyun.com/) 获取你的 API 密钥。
```python
from zvec.extension import QwenSparseEmbedding
embedding_func = QwenSparseEmbedding(
api_key="your-dashscope-api-key",
dimension=256, # Dashscope API 需要输入维度
)
sparse_vec = embedding_func.embed("sparse vector")
```
## 自定义实现指南 [#自定义实现指南]
了解如何创建自己的 Embedding 函数。
### 自定义 Embedding 函数 [#自定义-embedding-函数]
Zvec 提供了**协议基类**和**框架特定基类**用于自定义 Embedding:
**协议基类:**
* `DenseEmbeddingFunction[T]`:稠密 Embedding 协议
* `SparseEmbeddingFunction[T]`:稀疏 Embedding 协议
**框架特定基类:**
* `SentenceTransformerFunctionBase`:Sentence Transformers 模型基类(在 `sentence_transformer_function.py` 中)
* `QwenFunctionBase`:Qwen Dashscope API 基类(在 `qwen_function.py` 中)
### 示例 1:从零开始自定义稠密 Embedding [#示例-1从零开始自定义稠密-embedding]
```python
from zvec.extension import DenseEmbeddingFunction
from zvec.common.constants import TEXT, DenseVectorType
from typing import Optional
import numpy as np
class MyCustomDenseEmbedding(DenseEmbeddingFunction[TEXT]):
"""自定义稠密 Embedding 函数示例"""
def __init__(self, model_name: str = "custom-model", **kwargs):
self._model_name = model_name
self._dimension = 768 # 自定义维度
self._extra_params = kwargs
# 初始化模型
self._model = self._load_model()
@property
def dimension(self) -> int:
"""返回 Embedding 向量维度"""
return self._dimension
@property
def extra_params(self) -> dict:
"""返回额外参数"""
return self._extra_params
def _load_model(self):
"""加载自定义模型"""
# 在此实现模型加载逻辑
# 例如:return YourModelClass.from_pretrained(self._model_name)
pass
def embed(self, input: str) -> DenseVectorType:
"""
生成稠密 Embedding 向量
Args:
input: 输入文本
Returns:
DenseVectorType: 浮点数列表,长度 = self.dimension
"""
# 输入验证
if not isinstance(input, str):
raise TypeError(f"Expected str, got {type(input).__name__}")
input = input.strip()
if not input:
raise ValueError("Input cannot be empty")
# 使用模型生成 Embedding
# embedding = self._model.encode(input)
# return embedding.tolist()
# 示例:返回随机向量
return np.random.randn(self._dimension).tolist()
def __call__(self, input: str) -> DenseVectorType:
"""使函数可调用"""
return self.embed(input)
# 使用自定义 Embedding
custom_emb = MyCustomDenseEmbedding(model_name="my-model")
vector = custom_emb.embed("Test text")
print(f"Dimensions: {len(vector)}")
```
### 示例 2:从零开始自定义稀疏 Embedding [#示例-2从零开始自定义稀疏-embedding]
```python
from zvec.extension import SparseEmbeddingFunction
from zvec.common.constants import TEXT, SparseVectorType
from typing import Dict
class MyCustomSparseEmbedding(SparseEmbeddingFunction[TEXT]):
"""自定义稀疏 Embedding 函数示例"""
def __init__(self, vocab_size: int = 30000, **kwargs):
self._vocab_size = vocab_size
self._extra_params = kwargs
self._tokenizer = self._load_tokenizer()
@property
def extra_params(self) -> dict:
return self._extra_params
def _load_tokenizer(self):
"""加载分词器"""
# 实现分词器加载逻辑
pass
def embed(self, input: str) -> SparseVectorType:
"""
生成稀疏 Embedding 向量
Args:
input: 输入文本
Returns:
SparseVectorType: 字典 {维度索引: 权重},仅包含非零值
"""
if not isinstance(input, str):
raise TypeError(f"Expected str, got {type(input).__name__}")
input = input.strip()
if not input:
raise ValueError("Input cannot be empty")
# 实现稀疏 Embedding 逻辑
# tokens = self._tokenizer.tokenize(input)
# sparse_vec = self._compute_sparse_representation(tokens)
# 示例:返回简单的词频向量
sparse_vec = {
100: 0.5,
250: 1.2,
500: 0.8
}
# 确保按索引排序
return dict(sorted(sparse_vec.items()))
def __call__(self, input: str) -> SparseVectorType:
return self.embed(input)
# 使用自定义稀疏 Embedding
sparse_emb = MyCustomSparseEmbedding(vocab_size=50000)
sparse_vec = sparse_emb.embed("Test text")
print(f"Non-zero dimensions: {len(sparse_vec)}")
```
### 示例 3:使用 SentenceTransformerFunctionBase [#示例-3使用-sentencetransformerfunctionbase]
如果你想使用不同的 Sentence Transformers 模型,可以继承 `SentenceTransformerFunctionBase`:
```python
from zvec.extension.sentence_transformer_function import SentenceTransformerFunctionBase
from zvec.extension import DenseEmbeddingFunction
from zvec.common.constants import TEXT, DenseVectorType
from typing import Literal, Optional
class CustomSentenceTransformerEmbedding(
SentenceTransformerFunctionBase,
DenseEmbeddingFunction[TEXT]
):
"""使用自定义 Sentence Transformer 模型"""
def __init__(
self,
model_name: str = "all-mpnet-base-v2", # 使用不同的模型
model_source: Literal["huggingface", "modelscope"] = "huggingface",
normalize_embeddings: bool = True,
**kwargs
):
# 初始化基类
SentenceTransformerFunctionBase.__init__(
self,
model_name=model_name,
model_source=model_source,
)
self._normalize_embeddings = normalize_embeddings
self._extra_params = kwargs
# 加载模型并获取维度
model = self._get_model()
self._dimension = model.get_sentence_embedding_dimension()
@property
def dimension(self) -> int:
return self._dimension
@property
def extra_params(self) -> dict:
return self._extra_params
def embed(self, input: str) -> DenseVectorType:
if not isinstance(input, str):
raise TypeError(f"Expected str, got {type(input).__name__}")
input = input.strip()
if not input:
raise ValueError("Input cannot be empty")
model = self._get_model()
embedding = model.encode(
input,
convert_to_numpy=True,
normalize_embeddings=self._normalize_embeddings
)
return embedding.tolist()
def __call__(self, input: str) -> DenseVectorType:
return self.embed(input)
# 使用自定义模型
# 使用更大的 MPNet 模型(768 维)
custom_emb = CustomSentenceTransformerEmbedding(
model_name="all-mpnet-base-v2"
)
vector = custom_emb.embed("High-quality text embedding")
print(f"Dimensions: {len(vector)}") # 768
# 使用多语言模型
multilingual_emb = CustomSentenceTransformerEmbedding(
model_name="paraphrase-multilingual-MiniLM-L12-v2"
)
```
### 示例 4:使用 QwenFunctionBase [#示例-4使用-qwenfunctionbase]
如果你想使用 Qwen Dashscope API 实现自定义 Embedding:
```python
from zvec.extension.qwen_function import QwenFunctionBase
from zvec.extension import DenseEmbeddingFunction
from zvec.common.constants import TEXT, DenseVectorType
from typing import Optional
class CustomQwenEmbedding(QwenFunctionBase, DenseEmbeddingFunction[TEXT]):
"""自定义 Qwen Embedding 实现"""
def __init__(
self,
api_key: str,
model: str = "text-embedding-v3",
**kwargs
):
# 使用 API 密钥初始化基类
QwenFunctionBase.__init__(self, api_key=api_key)
self._model = model
self._extra_params = kwargs
self._dimension = None # 首次调用后设置
@property
def dimension(self) -> int:
if self._dimension is None:
# 通过首次 Embedding 调用获取维度
test_result = self.embed("test")
self._dimension = len(test_result)
return self._dimension
@property
def extra_params(self) -> dict:
return self._extra_params
def embed(self, input: str) -> DenseVectorType:
if not isinstance(input, str):
raise TypeError(f"Expected str, got {type(input).__name__}")
input = input.strip()
if not input:
raise ValueError("Input cannot be empty")
# 使用基类的 embed_text 方法
result = self._embed_text(
text=input,
model=self._model
)
return result
def __call__(self, input: str) -> DenseVectorType:
return self.embed(input)
# 使用自定义 Qwen Embedding
custom_qwen_emb = CustomQwenEmbedding(
api_key="your-dashscope-api-key",
model="text-embedding-v3"
)
vector = custom_qwen_emb.embed("Custom Qwen embedding")
```
## 最佳实践 [#最佳实践]
遵循以下模式来构建高效的搜索流水线。
### 混合搜索(多向量检索) [#1-混合搜索多向量检索]
结合稠密和稀疏 Embedding 以获得最佳检索效果:
```python
from zvec.extension import (
DefaultLocalDenseEmbedding,
DefaultLocalSparseEmbedding,
RrfReRanker
)
from zvec import Query
# 创建 Embedding 函数
dense_emb = DefaultLocalDenseEmbedding()
sparse_emb = DefaultLocalSparseEmbedding(encoding_type="query")
# 查询文本
query = "What is a vector database"
# 生成两种 Embedding
dense_vec = dense_emb.embed(query)
sparse_vec = sparse_emb.embed(query)
# 使用 RRF 融合结果
rrf_ranker = RrfReRanker(rank_constant=60)
# 查询两个向量字段并融合结果
final_results = collection.query(
queries=[
Query(field_name="dense", vector=dense_vec),
Query(field_name="sparse", vector=sparse_vec),
],
topk=3,
reranker=rrf_ranker,
)
```
### 中国大陆用户网络配置 [#2-中国大陆用户网络配置]
中国大陆用户可配置网络设置以稳定下载模型:
```python
import os
from zvec.extension import DefaultLocalDenseEmbedding
# 方式 1:使用 ModelScope
embedding = DefaultLocalDenseEmbedding(model_source="modelscope")
# 方式 2:在 Python 中使用 Hugging Face 镜像
os.environ["HF_ENDPOINT"] = "https://hf-mirror.com"
embedding = DefaultLocalDenseEmbedding(model_source="huggingface")
```
## 重要说明 [#重要说明]
**关键注意事项:**
1. **模型下载**:模型在首次使用时会自动下载。请确保网络连通性。
2. **内存管理**:本地模型会消耗内存。使用后调用 `clear_cache()` 释放内存。
3. **API 速率限制**:使用基于 API 的函数(Qwen、OpenAI)时,请注意配额和速率限制。
4. **线程安全**:Embedding 函数是线程安全的,可在多线程环境中使用。
5. **仅文本**:目前 Zvec 仅支持文本模态 Embedding。未来版本可能会添加对其他模态的支持。
## 相关文档 [#相关文档]
探索源代码和实现细节:
* [Dense Embedding Function Protocol](/api-reference/python/extension/#zvec.extension.DenseEmbeddingFunction)
* [Sparse Embedding Function Protocol](/api-reference/python/extension/#zvec.extension.SparseEmbeddingFunction)
* [Sentence Transformers Base Class](/api-reference/python/extension/#zvec.extension.SentenceTransformerFunctionBase)
* [Qwen Function Base Class](/api-reference/python/extension/#zvec.extension.QwenFunctionBase)
* [Openai Function Base Class](/api-reference/python/extension/#zvec.extension.OpenAIFunctionBase)
# 关于 Zvec
**Zvec** 是一款开源、高性能、轻量级且功能丰富的向量数据库,完全以**进程内**(嵌入式)方式运行 — 无需服务器、守护进程或外部软件设施。[安装](./quickstart/#安装)完成后,即刻进行向量索引与查询 🚀。
[向量](./concepts/vector-embedding/)数据库广泛用于驱动语义搜索、检索增强生成(RAG)、推荐系统及其他基于相似度的 AI 应用。
Zvec 既可作为**独立的向量数据库**进行端到端的存储与检索,也可**集成到既有搜索系统**(如传统 SQL 数据库)中,充当专用的向量搜索引擎。
Zvec 经历了阿里巴巴集团严苛的**生产级工作负载验证**,提供**高可靠**、**低延迟**和**可扩展**的相似度搜索。得益于极简的依赖与纯进程内嵌入式的设计,Zvec 具备极高的通用性,可广泛覆盖各类应用场景:
* 💻 从**快速原型**和**本地开发**
* 📱 到**嵌入式应用**和**边缘部署**
* 🌐 再到**超十亿级规模的生产系统**
## 核心特性 [#核心特性]
* ⚡ **极致高效**:毫秒级响应,轻松检索数十亿级向量。
* 🧩 **开箱即用**:纯本地运行 — 安装后几分钟内就能开始搜索。无需服务器、无需复杂配置。
* ✨ **稠密 + 稀疏向量**:支持稠密向量和稀疏向量,提供多向量联合查询的原生支持。
* 🎯 **混合搜索**:向量语义搜索 + 标量条件过滤,获得精确结果。
* 🛡️ **持久存储**:WAL 预写日志保障数据持久性 — 即使进程崩溃或意外断电,数据也不会丢失。
* 🔒 **并发访问**:支持多进程同时读取同一个 Collection;写入为单进程独占模式。
* 📦 **进程内运行**:无需单独部署服务,纯进程内运行。Notebook、高性能服务器、CLI 工具、边缘设备 — 随处可用。
## 下一步 [#下一步]
# 快速开始
想动手试试代码示例?欢迎查看 [Jupyter Notebook 教程](/downloads/walkthrough-zh.zip)。它会手把手带你完成一个多模态图片检索的实操示例。
## 安装 [#安装]
Python
Node.js
```bash
# 需要 64 位 Python 3.10-3.14
pip install zvec
```
```bash
npm install @zvec/zvec
```
## 创建 Collection [#创建-collection]
[Collection](../collections/) 用于存储你的 Document。每个 [Document](../concepts/data-modeling/#documents) 包含标量字段和[向量](../concepts/vector-embedding/)字段。
定义 Schema 并创建 Collection。Schema 包含两部分:`fields` 用于标量字段,`vectors` 用于向量字段。
Python
Node.js
```python title="创建 collection"
import zvec
# [!code word:embedding]
# [!code word:publish_year]
# 定义 collection schema
collection_schema = zvec.CollectionSchema( # [!code highlight]
name="my_collection",
fields=[
zvec.FieldSchema(
name="publish_year",
data_type=zvec.DataType.INT32,
index_param=zvec.InvertIndexParam(enable_range_optimization=True),
),
],
vectors=[
zvec.VectorSchema(
name="embedding",
data_type=zvec.DataType.VECTOR_FP32,
dimension=768,
index_param=zvec.HnswIndexParam(metric_type=zvec.MetricType.COSINE),
),
],
)
# 创建 collection
collection = zvec.create_and_open( # [!code highlight]
path="./my_collection_data",
schema=collection_schema,
)
```
```ts title="创建 collection"
import { ZVecCollectionSchema, ZVecCreateAndOpen, ZVecDataType, ZVecIndexType, ZVecMetricType } from "@zvec/zvec"
// [!code word:embedding]
// [!code word:publish_year]
// 定义 collection schema
const collectionSchema = new ZVecCollectionSchema({ // [!code highlight]
name: "my_collection",
fields: [
{
name: "publish_year",
dataType: ZVecDataType.INT32,
indexParams: { indexType: ZVecIndexType.INVERT, enableRangeOptimization: true }
}
],
vectors: [
{
name: "embedding",
dataType: ZVecDataType.VECTOR_FP32,
dimension: 768,
indexParams: { indexType: ZVecIndexType.HNSW, metricType: ZVecMetricType.COSINE }
}
]
});
// 创建 collection
const collection = ZVecCreateAndOpen("./my_collection_data", collectionSchema); // [!code highlight]
```
**注意**:在插入或查询数据时,必须严格使用此处定义的字段名(`publish_year`、`embedding`),确保名称完全一致。
## 添加 Document [#添加-document]
[插入](../data-operations/insert/)包含标量和向量字段的 Document:
Python
Node.js
```python title="插入 document"
# [!code word:embedding]
# [!code word:publish_year]
collection.insert( # [!code highlight]
zvec.Doc(
id="book_1", # document 的唯一标识
vectors={"embedding": [0.1] * 768}, # 请替换为你实际的向量数据
fields={"publish_year": 1936},
)
)
```
```ts title="插入 document"
// [!code word:embedding]
// [!code word:publish_year]
collection.insertSync({ // [!code highlight]
id: "book_1", // document 的唯一标识
vectors: { "embedding": Array(768).fill(0.1) }, // 请替换为你实际的向量数据
fields: { "publish_year": 1936 }
});
```
**注意**:字段名必须完全匹配。`publish_year` 字段和 `embedding` 向量必须与你之前在 Schema 中定义的名称保持一致。
## 优化 Collection [#优化-collection]
新插入的向量会先暂存在临时索引。调用 [`optimize()`](../collections/optimize/) 构建向量索引以加速检索:
Python
Node.js
```python title="优化 collection"
# [!code word:optimize]
collection.optimize()
```
```ts title="优化 collection"
// [!code word:optimizeSync]
// 同步
collection.optimizeSync();
// [!code word:optimize]
// 异步
await collection.optimize();
```
## 按 ID 获取 Document [#按-id-获取-document]
通过 `id` 直接 [获取](../data-operations/fetch/) 一个 Document:
Python
Node.js
```python title="获取 document"
result = collection.fetch(ids="book_1") # [!code highlight]
print(result)
```
```ts title="获取 document"
let result = collection.fetchSync("book_1"); // [!code highlight]
console.log(result);
```
Python
Node.js
```json
{
"book_1": {
"id": "book_1",
"score": 0.0,
"fields": {"publish_year": 1936},
"vectors": {"embedding": [0.1, 0.1, ...]}
}
}
```
```json
{
book_1: {
id: 'book_1',
score: 0,
vectors: { embedding: [Array] },
fields: { publish_year: 1936 }
}
}
```
## 向量检索 [#向量检索]
### 相似度检索 [#相似度检索]
使用 [`query()`](../data-operations/query/) 检索与给定向量最相似的 Documents:
Python
Node.js
```python title="相似度检索"
# [!code word:embedding]
result = collection.query( # [!code highlight]
queries=zvec.Query(
field_name="embedding",
vector=[0.3] * 768, # 请替换为你实际的向量数据
),
topk=10,
)
print(result)
```
```ts title="相似度检索"
// [!code word:embedding]
// 同步
let result = collection.querySync({ // [!code highlight]
fieldName: "embedding",
vector: Array(768).fill(0.3), // 请替换为你实际的向量数据
topk: 10
});
console.log(result);
// 异步
let resultAsync = await collection.query({ // [!code highlight]
fieldName: "embedding",
vector: Array(768).fill(0.3), // 请替换为你实际的向量数据
topk: 10
});
console.log(resultAsync);
```
Python
Node.js
```json
[
{
"id": "book_1",
"score": 0.12222,
"fields": {"publish_year": 1936},
"vectors": {},
},
{
"id": "book_2",
"score": 0.34444,
"fields": {"publish_year": 1894},
"vectors": {},
},
......
......
]
```
```json
[
{
id: 'book_1',
score: 0.12222,
vectors: {},
fields: { publish_year: 1936 }
},
{
id: 'book_2',
score: 0.34444,
vectors: {},
fields: { publish_year: 1894 }
},
......
......
]
```
结果按相似度分数排序。
### 带条件过滤的相似度检索 [#带条件过滤的相似度检索]
将向量检索与条件过滤结合 — 检索时仅考虑满足条件的 documents:
Python
Node.js
```python title="带条件过滤的相似度检索"
# [!code word:embedding]
result = collection.query( # [!code highlight]
queries=zvec.Query(
field_name="embedding",
vector=[0.3] * 768, # 请替换为你实际的向量数据
),
topk=10,
filter="publish_year > 1936", # [!code highlight]
)
print(result)
```
```ts title="带条件过滤的相似度检索"
// [!code word:embedding]
// 同步
let result = collection.querySync({ // [!code highlight]
fieldName: "embedding",
vector: Array(768).fill(0.3), // 请替换为你实际的向量数据
topk: 10,
filter: "publish_year > 1936" // [!code highlight]
});
console.log(result);
// 异步
let resultAsync = await collection.query({ // [!code highlight]
fieldName: "embedding",
vector: Array(768).fill(0.3), // 请替换为你实际的向量数据
topk: 10,
filter: "publish_year > 1936" // [!code highlight]
});
console.log(resultAsync);
```
Python
Node.js
```json
[
{
"id": "book_5",
"score": 0.56666,
"fields": {"publish_year": 1998},
"vectors": {},
},
{
"id": "book_21",
"score": 0.67777,
"fields": {"publish_year": 1999},
"vectors": {},
},
......
......
]
```
```json
[
{
id: 'book_5',
score: 0.56666,
vectors: {},
fields: { publish_year: 1998 }
},
{
id: 'book_21',
score: 0.67777,
vectors: {},
fields: { publish_year: 1999 }
},
......
......
]
```
## 查看 Collection 信息 [#查看-collection-信息]
查看 collection schema:
Python
Node.js
```python title="查看 collection schema"
# [!code word:schema]
print(collection.schema)
```
```ts title="查看 collection schema"
// [!code word:schema]
console.log(collection.schema.toString());
```
查看 collection 的统计信息:
Python
Node.js
```python title="查看 collection 的统计信息"
# [!code word:stats]
print(collection.stats)
```
```ts title="查看 collection 的统计信息"
// [!code word:stats]
console.log(collection.stats);
```
## 删除 Document [#删除-document]
通过 `id` [删除](../data-operations/delete/#按-id-删除) document:
Python
Node.js
```python title="删除 document"
# [!code word:delete]
collection.delete(ids="book_1")
```
```ts title="删除 document"
// [!code word:deleteSync]
collection.deleteSync("book_1");
```
按筛选条件[删除](../data-operations/delete/#按筛选条件删除) document:
Python
Node.js
```python title="按筛选条件删除 document"
# [!code word:delete_by_filter]
collection.delete_by_filter(filter="publish_year < 1900")
```
```ts title="按筛选条件删除 document"
// [!code word:deleteByFilterSync]
// 同步
collection.deleteByFilterSync("publish_year < 1900");
// [!code word:deleteByFilter]
// 异步
await collection.deleteByFilter("publish_year < 1900");
```
***
✨ 您现在已经准备好使用 **Zvec** 来存储、获取和检索向量数据了!
💙 感谢您对 **Zvec** 的关注!希望您能尽情探索 **Zvec** 的强大功能!
# Reranker
本页介绍 **Zvec 的重排序函数系统**,用于对检索结果进行重新排序以提升相关性和准确性。它提供多种**开箱即用的实现**,并支持**自定义扩展**以集成你自己的模型。
\*\*依赖项:\*\*要运行本文档中的示例,请先安装以下包:
```bash
pip install openai dashscope sentence-transformers
```
## 概述 [#概述]
Zvec 的重排序系统提供了开箱即用的**重排序函数**,对检索结果进行重新排序以提升搜索相关性。
### 重排序函数类型 [#重排序函数类型]
| 类型 | 实现 | 描述 |
| ------------ | ---------------------- | ----------------------------------------------------------------- |
| **本地重排序** | `DefaultLocalReRanker` | 使用 Cross-Encoder `cross-encoder/ms-marco-MiniLM-L6-v2` 模型(\~80MB) |
| **Qwen 重排序** | `QwenReRanker` | 使用 Qwen Dashscope API |
| **RRF 重排序** | `RrfReRanker` | 倒数排名融合,用于多向量检索结果 |
| **加权重排序** | `WeightedReRanker` | 加权融合,用于多向量检索结果 |
## 本地重排序 [#本地重排序]
### DefaultLocalReRanker - 本地 Cross-Encoder 重排序 [#defaultlocalreranker---本地-cross-encoder-重排序]
使用 Cross-Encoder 模型进行重排序。
**模型详情:**
* 模型:`cross-encoder/ms-marco-MiniLM-L6-v2`
* 大小:\~80MB
```python
from zvec.extension import DefaultLocalReRanker
from zvec import Doc
# 初始化重排序器
reranker = DefaultLocalReRanker(
query="What are machine learning algorithms",
topn=5,
rerank_field="content" # 指定用于重排序的字段
)
# 准备 Document 列表
documents = {
"vector1": [
Doc(
id="1",
fields={
"content": "Machine learning is a subset of artificial intelligence that focuses on building systems that can learn from data."
},
),
Doc(
id="2",
fields={
"content": "The weather is nice today with clear skies and sunshine."
},
),
Doc(
id="3",
fields={
"content": "Deep learning is a specialized branch of machine learning using neural networks with multiple layers."
},
),
],
}
# 执行重排序
reranked_docs = reranker.rerank(documents)
for doc in reranked_docs:
print(doc)
```
## 基于 API 的重排序 [#基于-api-的重排序]
### QwenReRanker - Dashscope API 重排序 [#qwenreranker---dashscope-api-重排序]
\*\*需要 Dashscope API 密钥。\*\*访问 [Dashscope 控制台](https://dashscope.console.aliyun.com/) 获取你的 API 密钥。
```python
from zvec.extension import QwenReRanker
from zvec import Doc
reranker = QwenReRanker(
query="What is a vector database",
model="gte-rerank-v2",
api_key="your-dashscope-api-key",
topn=3,
rerank_field="content",
)
documents = {
"vector1": [
Doc(
id="1",
fields={
"content": "Vector databases store and retrieve vectors"
},
),
Doc(
id="2",
fields={
"content": "Relational databases store structured data"
},
),
Doc(
id="3",
fields={
"content": "Vector retrieval is based on similarity computation"
},
),
],
}
# 执行重排序
reranked_docs = reranker.rerank(documents)
for doc in reranked_docs:
print(doc)
```
## 融合重排序 [#融合重排序]
融合重排序器专为**多向量检索场景**设计,适用于拥有多种 Embedding 方法(例如稠密 + 稀疏)结果的情况。
### RrfReRanker - 倒数排名融合 [#rrfreranker---倒数排名融合]
使用\*\*倒数排名融合(RRF)\*\*融合多个检索结果。
\*\*注意:\*\*此重排序器仅使用排名位置,无需评分。
```python
from zvec import Doc
from zvec.extension import RrfReRanker
# 准备多个检索结果
query_results = [
[
Doc(id="1", score=0.8),
Doc(id="2", score=0.7),
],
[
Doc(id="2", score=0.9),
Doc(id="3", score=0.75),
],
]
reranker = RrfReRanker(rank_constant=60)
fused_results = reranker.rerank(query_results, topn=3)
```
### WeightedReRanker - 加权融合 [#weightedreranker---加权融合]
根据权重融合多个有评分的检索结果。
```python
import zvec
# 准备多个检索结果及其对应的向量 Schema
query_results = [
[zvec.Doc(id="1", score=0.8), zvec.Doc(id="2", score=0.7)],
[zvec.Doc(id="2", score=0.9), zvec.Doc(id="3", score=0.75)],
]
fields = [
zvec.VectorSchema(
name="dense_embedding",
data_type=zvec.DataType.VECTOR_FP32,
dimension=3,
index_param=zvec.HnswIndexParam(metric_type=zvec.MetricType.IP),
),
zvec.VectorSchema(
name="sparse_embedding",
data_type=zvec.DataType.SPARSE_VECTOR_FP32,
index_param=zvec.HnswIndexParam(metric_type=zvec.MetricType.IP),
),
]
reranker = zvec.WeightedReRanker(
weights=[0.7, 0.3], # 按相同顺序为每个结果列表设置一个权重
)
fused_results = reranker.rerank(
query_results,
topn=3,
fields=fields, # 直接调用 rerank() 时,评分归一化需要此参数
)
print(fused_results)
```
将 `WeightedReRanker` 传给 `Collection.query()` 时,Zvec 会自动获取字段 Schema:
```python
fused_results = collection.query(
queries=[
zvec.Query(field_name="dense_embedding", vector=[0.1] * 768),
zvec.Query(field_name="sparse_embedding", vector={1: 0.1, 37: 0.43}),
],
topk=3,
reranker=zvec.WeightedReRanker(weights=[0.7, 0.3]),
)
```
## 自定义实现指南 [#自定义实现指南]
了解如何创建自己的重排序函数。
### 自定义重排序函数 [#自定义重排序函数]
重排序函数需要继承 `RerankFunction` 基类(导出为 `ReRanker`)。
### 示例 1:从零开始自定义重排序函数 [#示例-1从零开始自定义重排序函数]
```python
from zvec.extension import ReRanker
from typing import List, Dict, Any, Optional
class MyCustomReRanker(ReRanker):
"""自定义重排序函数示例"""
def __init__(
self,
topn: int = 10,
model_name: str = "custom-reranker",
**kwargs
):
self._topn = topn
self._model_name = model_name
self._extra_params = kwargs
self._model = self._load_model()
@property
def topn(self) -> int:
"""返回 top-N"""
return self._topn
@topn.setter
def topn(self, value: int):
"""设置 top-N"""
if value <= 0:
raise ValueError("topn must be positive")
self._topn = value
@property
def extra_params(self) -> dict:
return self._extra_params
def _load_model(self):
"""加载重排序模型"""
# 实现模型加载逻辑
pass
def rerank(
self,
documents: List[Dict[str, Any]],
query: Optional[str] = None,
rerank_field: str = "content",
**kwargs
) -> List[Dict[str, Any]]:
"""
对 Document 进行重排序
Args:
documents: Document 列表
query: 查询文本(注意:基类不接受 query 参数,
如需要请在子类中实现)
rerank_field: 用于重排序的字段名
**kwargs: 额外参数
Returns:
重排序后的 Document 列表,保留原始字段并添加重排序评分
"""
if not documents:
return []
# 提取用于重排序的内容
contents = [doc.get(rerank_field, "") for doc in documents]
# 使用模型计算重排序评分
# scores = self._model.predict(query, contents)
# 示例:随机评分
import random
scores = [random.random() for _ in contents]
# 将评分添加到 Document
scored_docs = []
for doc, score in zip(documents, scores):
doc_copy = doc.copy()
doc_copy["rerank_score"] = score
scored_docs.append(doc_copy)
# 按评分降序排序
scored_docs.sort(key=lambda x: x["rerank_score"], reverse=True)
# 返回 top-N
return scored_docs[:self._topn]
def __call__(
self,
documents: List[Dict[str, Any]],
**kwargs
) -> List[Dict[str, Any]]:
"""使函数可调用"""
return self.rerank(documents, **kwargs)
# 使用自定义重排序器
reranker = MyCustomReRanker(topn=5, model_name="my-reranker")
documents = [
{"id": 1, "content": "Document content 1"},
{"id": 2, "content": "Document content 2"},
{"id": 3, "content": "Document content 3"},
]
reranked = reranker.rerank(
documents,
query="Query text",
rerank_field="content"
)
for doc in reranked:
print(f"ID: {doc['id']}, Score: {doc['rerank_score']:.4f}")
```
### 示例 2:基于查询的重排序器 [#示例-2基于查询的重排序器]
```python
from zvec.extension import ReRanker
from typing import List, Dict, Any
class QueryBasedReRanker(ReRanker):
"""在初始化时需要查询的重排序器"""
def __init__(self, query: str, topn: int = 10):
if not query:
raise ValueError("Query is required")
self._query = query
self._topn = topn
@property
def query(self) -> str:
return self._query
@property
def topn(self) -> int:
return self._topn
@topn.setter
def topn(self, value: int):
if value <= 0:
raise ValueError("topn must be positive")
self._topn = value
@property
def extra_params(self) -> dict:
return {}
def rerank(
self,
documents: List[Dict[str, Any]],
rerank_field: str = "content",
**kwargs
) -> List[Dict[str, Any]]:
"""
基于查询对 Document 进行重排序
注意:查询在初始化时提供,而非作为参数
"""
if not documents:
return []
# 使用 self._query 和 Document 内容计算相关性
scored_docs = []
for doc in documents:
content = doc.get(rerank_field, "")
# 计算相关性评分
score = self._compute_relevance(self._query, content)
doc_copy = doc.copy()
doc_copy["rerank_score"] = score
scored_docs.append(doc_copy)
# 排序并返回 top-N
scored_docs.sort(key=lambda x: x["rerank_score"], reverse=True)
return scored_docs[:self._topn]
def _compute_relevance(self, query: str, content: str) -> float:
"""计算相关性评分(示例实现)"""
# 简单的词重叠评分
query_words = set(query.lower().split())
content_words = set(content.lower().split())
overlap = len(query_words & content_words)
return overlap / (len(query_words) + 1e-6)
def __call__(
self,
documents: List[Dict[str, Any]],
**kwargs
) -> List[Dict[str, Any]]:
return self.rerank(documents, **kwargs)
# 使用
reranker = QueryBasedReRanker(
query="machine learning algorithms",
topn=3
)
documents = [
{"id": 1, "content": "Machine learning is an important AI algorithm"},
{"id": 2, "content": "Deep learning uses neural networks"},
{"id": 3, "content": "Supervised learning is a common ML method"},
]
reranked = reranker.rerank(documents, rerank_field="content")
```
### 示例 3:使用 QwenFunctionBase 自定义重排序 [#示例-3使用-qwenfunctionbase-自定义重排序]
```python
from zvec.extension.qwen_function import QwenFunctionBase
from zvec.extension import ReRanker
from typing import List, Dict, Any
class CustomQwenReRanker(QwenFunctionBase, ReRanker):
"""自定义 Qwen 重排序实现"""
def __init__(
self,
query: str,
api_key: str,
topn: int = 10,
model: str = "gte-rerank",
**kwargs
):
# 初始化基类
QwenFunctionBase.__init__(self, api_key=api_key)
if not query:
raise ValueError("Query is required")
self._query = query
self._topn = topn
self._model = model
self._extra_params = kwargs
@property
def query(self) -> str:
return self._query
@property
def topn(self) -> int:
return self._topn
@topn.setter
def topn(self, value: int):
if value <= 0:
raise ValueError("topn must be positive")
self._topn = value
@property
def extra_params(self) -> dict:
return self._extra_params
def rerank(
self,
documents: List[Dict[str, Any]],
rerank_field: str = "content",
**kwargs
) -> List[Dict[str, Any]]:
if not documents:
return []
# 提取内容
contents = [doc.get(rerank_field, "") for doc in documents]
# 使用基类的 rerank_text 方法
scores = self._rerank_text(
query=self._query,
documents=contents,
model=self._model
)
# 将评分添加到 Document
scored_docs = []
for doc, score in zip(documents, scores):
doc_copy = doc.copy()
doc_copy["rerank_score"] = score
scored_docs.append(doc_copy)
# 按评分降序排序
scored_docs.sort(key=lambda x: x["rerank_score"], reverse=True)
return scored_docs[:self._topn]
def __call__(
self,
documents: List[Dict[str, Any]],
**kwargs
) -> List[Dict[str, Any]]:
return self.rerank(documents, **kwargs)
# 使用自定义 Qwen 重排序器
custom_qwen_reranker = CustomQwenReRanker(
query="What is a vector database",
api_key="your-dashscope-api-key",
topn=5
)
reranked = custom_qwen_reranker.rerank(documents, rerank_field="text")
```
## 最佳实践 [#最佳实践]
遵循以下模式来构建高效的搜索流水线。
### 两阶段检索 [#两阶段检索]
先进行快速召回,然后应用精确重排序:
```python
from zvec.extension import (
DefaultLocalDenseEmbedding,
DefaultLocalReRanker
)
from zvec import Query
# 第一阶段:快速召回
dense_emb = DefaultLocalDenseEmbedding()
query_vec = dense_emb.embed("machine learning tutorial")
# 第二阶段:精确重排序
reranker = DefaultLocalReRanker(
query="machine learning tutorial",
rerank_field="content",
)
# 召回 top-100,再对候选列表进行重排序
candidates = collection.query(
queries=Query(field_name="dense", vector=query_vec),
topk=100,
)
final_results = reranker.rerank([candidates], topn=10)
```
### 多向量融合 [#多向量融合]
使用 RRF 或加权重排序器进行多向量检索:
```python
from zvec.extension import (
DefaultLocalDenseEmbedding,
DefaultLocalSparseEmbedding,
RrfReRanker
)
from zvec import Query
# 创建 Embedding 函数
dense_emb = DefaultLocalDenseEmbedding()
sparse_emb = DefaultLocalSparseEmbedding(encoding_type="query")
# 查询文本
query = "What is a vector database"
# 生成两种 Embedding
dense_vec = dense_emb.embed(query)
sparse_vec = sparse_emb.embed(query)
# 使用 RRF 融合结果
rrf_ranker = RrfReRanker(rank_constant=60)
# 查询两个向量字段并融合结果
final_results = collection.query(
queries=[
Query(field_name="dense", vector=dense_vec),
Query(field_name="sparse", vector=sparse_vec),
],
topk=3,
reranker=rrf_ranker,
)
```
## 重要说明 [#重要说明]
**关键注意事项:**
1. **模型下载**:本地模型在首次使用时会自动下载。请确保网络连通性。
2. **内存管理**:本地模型会消耗内存。使用后调用 `clear_cache()` 释放内存。
3. **API 速率限制**:使用基于 API 的函数(Qwen)时,请注意配额和速率限制。
4. **线程安全**:重排序函数是线程安全的,可在多线程环境中使用。
5. **多向量重排序**:`RrfReRanker` 和 `WeightedReRanker` 专为融合多种检索方法(例如稠密 + 稀疏)的结果而设计。对于单向量结果,请使用 `DefaultLocalReRanker` 或 `QwenReRanker`。
## 相关文档 [#相关文档]
探索源代码和实现细节:
* [Reranking Function Protocol](/api-reference/python/extension/#zvec.extension.ReRanker)
* [Sentence Transformers Base Class](/api-reference/python/extension/#zvec.extension.SentenceTransformerFunctionBase)
* [Qwen Function Base Class](/api-reference/python/extension/#zvec.extension.QwenFunctionBase)
# 检索与权限
# 接入 AI Agent
`zg install` 会将 Codex、Claude Code、Qwen Code、Cursor 或 OpenCode 接入 Zvec-Grep。Agent 与 CLI 使用同一个工作区索引,并获得紧凑且带来源位置的证据。
## 安装 [#安装]
使用引导式安装,或直接配置一个或多个目标:
```bash
zg install
zg install --target codex --yes
zg install --target claude --target cursor --yes
```
支持的目标包括 `codex`、`claude`、`qwen`、`cursor`、`opencode`、`all` 和 `auto`。安装器会保留 Zvec-Grep 管理块之外的配置。安装后请重启 Agent 或新建会话。
默认 stdio 连接会自动管理本地服务,无需手动配置 Server。
## 可用的 MCP Tool [#可用的-mcp-tool]
默认 Agent 接入只会暴露一个 Zvec-Grep 工具:
| 工具 | 用途 |
| ------------------ | ---------------------------------- |
| `zvec_grep_search` | 当措辞或位置未知,或需要语义理解、跨文件理解时,在索引中发现相关证据 |
精确词语、文件名、路径和正则仍使用 Agent 自带的 grep 或 rg;它们不是额外的 Zvec-Grep MCP Tool。
## 检索路由 [#检索路由]
Zvec-Grep 增加了工作区语义发现能力,但不会取代精确搜索工具:
| 意图 | 路径 |
| ------------------------- | ---------------------------------- |
| 精确词语、原文、标识符、文件名、路径或正则已经足够 | 原生 grep 或 rg |
| 措辞或位置未知,或需要跨文件理解信息 | `zvec_grep_search` |
| 已知精确线索,但仍需要更广的上下文 | 先 `zvec_grep_search`,再定向 grep 或 rg |
| 最新外部事实或与工作区无关的开放知识 | 外部信息源,而非 Zvec-Grep |
默认 Agent 工具集只暴露索引检索。索引创建、重建和删除仍由用户通过 CLI 显式执行。
## 移除 [#移除]
```bash
zg uninstall --target codex --yes
zg uninstall --target all --yes
```
该操作只移除 Zvec-Grep 管理的 Agent 配置,不会删除 npm 包或工作区索引。如果安装或连接失败,请查看[故障排查](../troubleshooting/)。
# Benchmark
Zvec-Grep 的评测对象是完整的 Agent 任务,而不只是孤立的检索延迟。它关注的是:更好的检索能否让 Agent 在保持回答质量的同时,使用更少上下文、更少工具调用和更短时间完成任务。
每个样例都使用相同的任务、Agent、模型、Prompt、环境和资源限制。实验组只增加预先构建的 Zvec-Grep 索引、工具和通用使用说明。索引准备耗时与 Agent 执行耗时分开统计。
## 结果概览 [#结果概览]
| 工作负载 | 回答质量 | 输入 Token | 工具调用 | Agent 耗时 |
| ---------------------- | -----------: | ----------: | ----------: | ----------: |
| 代码理解 · SWE-QA-Bench | **+1.50 pp** | **−47.3%** | **−58.6%** | **−37.5%** |
| 通用文本 · BrowseComp-Plus | **+0.33 pp** | **−37.56%** | **−43.52%** | **−38.58%** |
代码评测包含 11 个仓库中的 20 个任务,每组配置运行三次;通用文本评测包含 100,195 篇文档上的 80 个样例,每组配置运行两次。
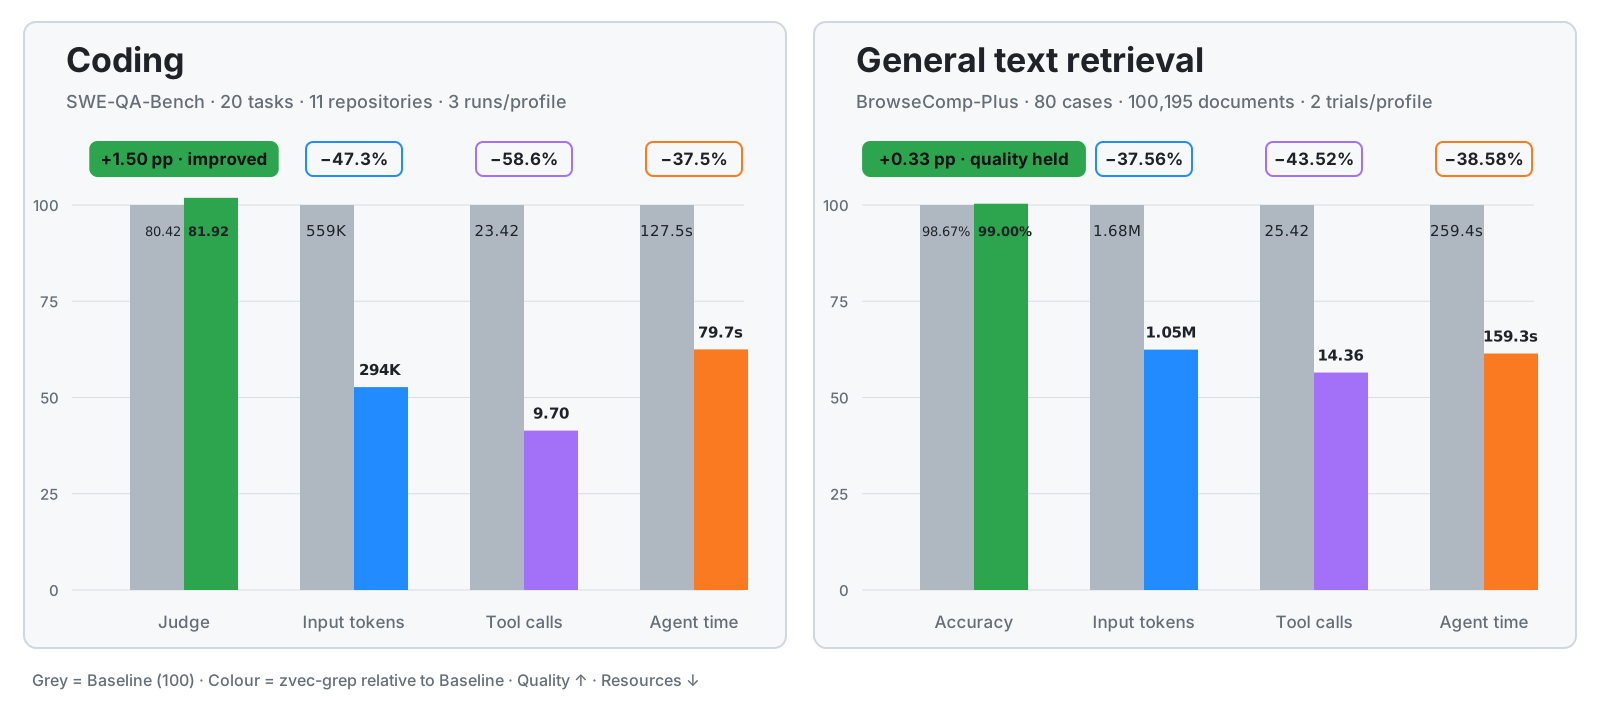
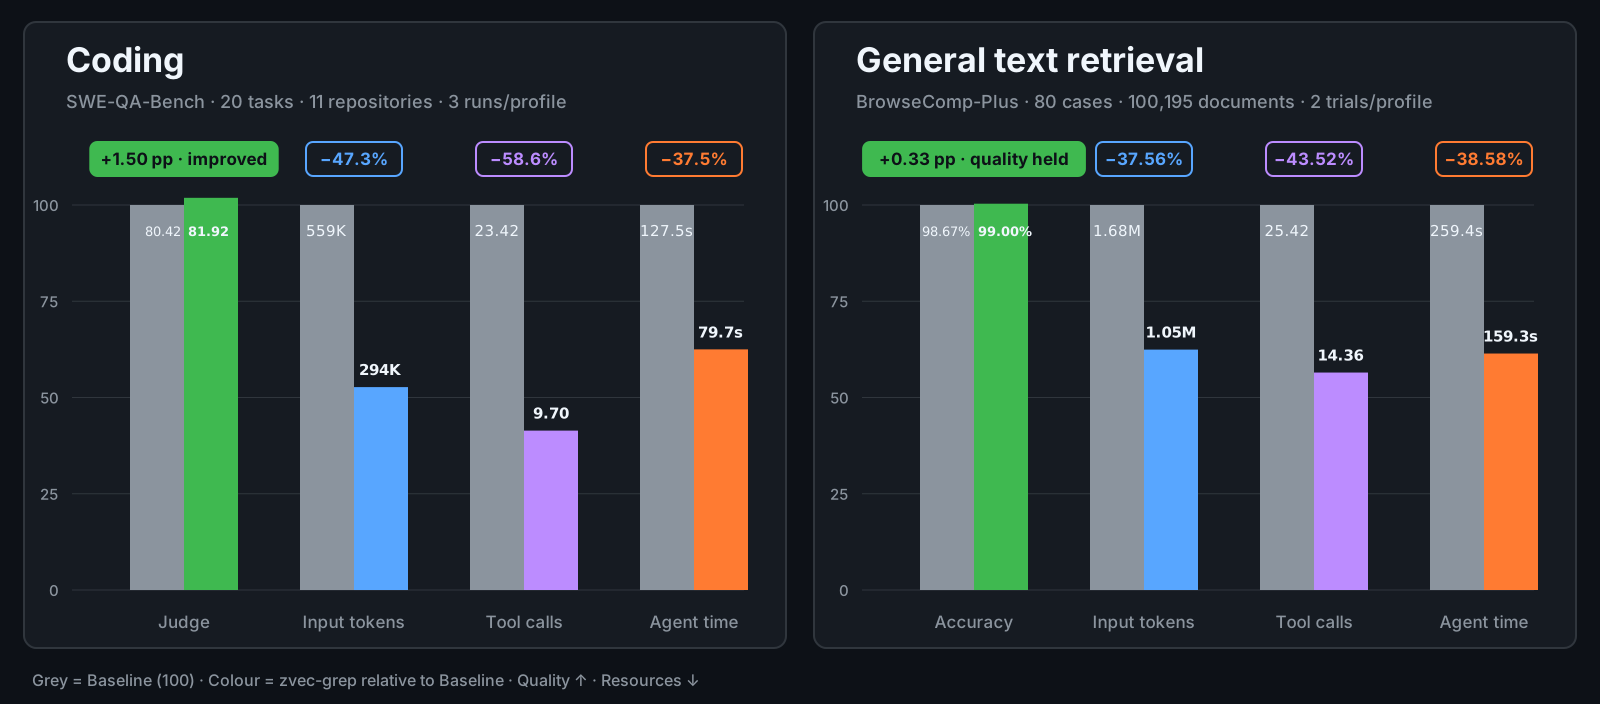
## 评测哪些指标 [#1-评测哪些指标]
* **回答质量:** 任务对应的 Judge 得分或准确率。
* **输入 Token:** Agent 完成任务时消耗的模型上下文。
* **工具调用:** 执行轨迹中记录的搜索与内容读取次数。
* **Agent 耗时:** 不包含 Zvec-Grep 索引准备时间的任务执行耗时。
回答质量应保持稳定或提升;Token、工具调用和执行时间则越低越好。
## 两套评测 [#2-两套评测]
### SWE-QA-Bench [#swe-qa-bench]
评测代码仓库级、跨文件和多跳的软件工程问答。它面向相关实现分散在多个文件、且入口位置事先未知的问题。
[查看 SWE-QA-Bench 配置与评测方法](https://github.com/zvec-ai/zvec-grep/tree/main/benchmarks/swe-qa-bench)
### BrowseComp-Plus [#browsecomp-plus]
在固定的大规模文本语料上评测多文档证据检索与回答准确率,观察语义与词法联合排序能否在不降低答案质量的前提下减少大范围文档扫描。
[查看 BrowseComp-Plus 配置与评测方法](https://github.com/zvec-ai/zvec-grep/tree/main/benchmarks/browse-comp-plus)
## 如何理解结果 [#3-如何理解结果]
这些结果反映的是“为 Agent 工作流增加 Zvec-Grep”带来的影响,不是单次 CLI 查询延迟对比。Agent 行为存在随机性,因此多次运行的均值比单次结果更有参考价值。
当任务需要语义发现、跨文件归纳或从大量文档中组合证据时,效率收益通常更明显。对于已知字面量或符号,原生 ripgrep 仍可能是最直接的路径。
## 复现评测 [#4-复现评测]
两套评测都固定了输入和依赖,将生成产物隔离在 Agent 可见工作区之外,并分别提供运行、评测和报告流程。
[查看完整 Benchmark 文档](https://github.com/zvec-ai/zvec-grep/tree/main/benchmarks)
# CLI 参考
`zg` 是人与脚本访问本地检索层的终端入口,AI Agent 使用的也是同一个检索层。先通过命令概览找到入口,需要深入理解检索或索引行为时,再进入对应主题文档。
不同版本的参数可能发生变化。使用 `zg help`、`zg help ` 或 `zg --help` 查看当前安装版本支持的完整命令。
## 命令地图 [#命令地图]
| 命令 | 用途 | 深入阅读 |
| ----------------------------- | ------------------- | ------------------------------------ |
| `zg query` | 搜索索引或运行内置 ripgrep | [检索指南](../search/) |
| `zg index` / `zg status` | 构建、更新或检查工作区索引 | [管理索引](../indexing/) |
| `zg install` / `zg uninstall` | 接入或移除 AI Agent | [接入 AI Agent](../agents/) |
| `zg server` | 启动、停止或检查本地服务 | [本地 Server](../server/) |
| `zg config` / `zg auth` | 配置模型、Provider 与远程访问 | [Embedding 模型](../embedding-models/) |
| `zg help` / `zg version` | 查看当前安装版本的命令面 | 使用内置帮助 |
构建大型索引前,还应阅读[支持的内容](../supported-content/),了解内容提取与文件类型边界。
## 常用起点 [#常用起点]
```bash
# 使用默认混合检索
zg query --human "主题偏好在启动时从哪里恢复" --limit 5
# 构建或检查当前工作区索引
zg index --embedding local/potion-code-16m-v2
zg status
# 接入 Agent
zg install --target codex --yes
```
需要理解选择逻辑和完整流程时进入专题指南;需要查找命令时使用本页和内置帮助。
## 使用内置帮助 [#使用内置帮助]
```bash
zg help
zg help query
zg help models
zg help file-types
zg help environment
zg version
```
最常用的环境变量包括 `ZVEC_GREP_MODE`、`ZVEC_GREP_EMBEDDING`、`ZVEC_GREP_MODEL_CACHE` 和 `ZVEC_GREP_DEVICE`。完整列表及优先级请运行 `zg help environment`。
# Zvec-Grep 如何工作
# Embedding 模型
Embedding 模型会影响语言覆盖、内存、输入长度、索引速度与语义质量。
## 建议起点 [#建议起点]
直接使用内置默认模型:
```bash
zg index
```
未配置模型时,Zvec-Grep 使用 `local/potion-code-16m-v2`。仅当工作区对语言覆盖、输入长度或检索质量有不同要求时再更换模型。
## 配置本地模型 [#配置本地模型]
### 默认值与覆盖 [#默认值与覆盖]
新索引依次读取 `--embedding`、`ZVEC_GREP_EMBEDDING` 和全局默认配置。以下是三种相互独立的用法:
```bash
# 仅为本次建索引指定模型
zg index --embedding local/potion-multilingual-128m
# 设置后续新索引的全局默认模型
zg config model set local/potion-multilingual-128m --default
# 仅覆盖当前进程的默认模型
ZVEC_GREP_EMBEDDING=local/potion-retrieval-32m zg index
```
### 支持的本地模型 [#支持的本地模型]
| 模型 | 适用场景 | 运行时 |
| ------------------------------------ | ---------- | -------------- |
| `local/potion-code-16m-v2` | 快速建立代码索引 | Model2Vec FP16 |
| `local/potion-retrieval-32m` | 英文文档 | Model2Vec FP32 |
| `local/potion-multilingual-128m` | 多语言文档 | Model2Vec FP32 |
| `local/all-minilm-l6-v2` | 较短的英文文本 | ONNX Q4 |
| `local/bge-small-en-v1.5` | 英文段落 | ONNX Q4 |
| `local/multilingual-e5-small` | 轻量多语言检索 | ONNX Q8 |
| `local/jina-embeddings-v2-base-code` | 长上下文、多语言代码 | ONNX Q8 |
| `local/gte-modernbert-base` | 较长的英文文档 | ONNX Q4 |
| `local/nomic-embed-text-v1.5` | 较长的英文文档与查询 | ONNX Q4 |
| `local/embeddinggemma-300m` | 多语言代码与文档 | GGUF Q8\_0 |
| `local/qwen3-embedding-0.6b` | 更高容量的多语言检索 | GGUF Q8\_0 |
### 设备与缓存 [#设备与缓存]
Transformer 与 GGUF 模型支持 `auto`、`cpu`、`metal`、`vulkan` 和 `cuda`。Potion 模型使用静态查表,GPU 不会提升运行速度。
```bash
zg index --embedding local/jina-embeddings-v2-base-code --device auto
zg config model set local/jina-embeddings-v2-base-code --device metal
```
可通过 `ZVEC_GREP_DEVICE` 临时覆盖设备。本地模型默认缓存在 `~/.zvec-grep/models`,可通过 `--model-cache` 或 `ZVEC_GREP_MODEL_CACHE` 修改。
### 更换本地模型 [#更换本地模型]
已有索引沿用建索引时保存的模型。更换模型需要重建,仅更换设备则不需要。
```bash
zg index --rebuild --embedding local/potion-multilingual-128m
```
## 配置远程模型 [#配置远程模型]
远程模型无需本地推理,但会将已授权的工作区内容和查询发送给所配置的提供方。
### 支持的远程模型 [#支持的远程模型]
| 模型 | 适用场景 |
| ----------------------------- | ------- |
| `qwen/text-embedding-v4` | 托管文本检索 |
| `qwen/qwen3.7-text-embedding` | 超长文本输入 |
| `qwen/qwen3-vl-embedding` | 文本与图片检索 |
### 配置 Provider [#配置-provider]
```bash
zg config provider set qwen --api-key "$DASHSCOPE_API_KEY"
zg config model set qwen/text-embedding-v4 --default
```
### 授权远程访问 [#授权远程访问]
Provider 凭据只用于访问服务,不等于允许传输数据。可以只授权一次命令,或为当前工作区持续授权:
```bash
zg index --embedding qwen/text-embedding-v4 --allow-remote
zg auth grant --capability embedding --scope workspace \
--embedding qwen/text-embedding-v4
```
使用 `zg auth status` 查看授权,使用 `zg auth revoke` 撤销授权。
### 更换远程配置 [#更换远程配置]
更换模型或 Endpoint 需要重建索引,仅更换 API Key 则不需要。
# 什么是 Zvec-Grep?
**Zvec-Grep** 是面向开发者与 AI Agent 的本地工作区检索工具。它通过 `zg` CLI 或本地 MCP,将源代码、文档和文本数据转化为紧凑、来源可追溯的证据。
## 按问题查找文档 [#按问题查找文档]
| 我想要…… | 参考文档 |
| ------------------------- | ----------------------------------- |
| 跑通一套可复现的完整流程 | [快速上手](./quickstart/) |
| 查找命令或参数 | [CLI 参考](./cli/) |
| 创建、更新、重建或删除索引 | [管理索引](./indexing/) |
| 选择检索路径并调整结果 | [检索指南](./search/) |
| 确认哪些文件和格式可以索引 | [支持的内容](./supported-content/) |
| 为工作区选择模型 | [Embedding 模型](./embedding-models/) |
| 接入 Agent 并了解检索路由 | [接入 AI Agent](./agents/) |
| 管理显式 Server 或 HTTP MCP 连接 | [本地 Server](./server/) |
| 排查安装、索引或检索问题 | [故障排查](./troubleshooting/) |
| 了解 Agent 评测结果 | [性能评测](./benchmarks/) |
# 管理索引
索引检索提供 BM25、向量与混合检索。精确的 `--rg` 检索无需索引即可使用。
索引大型工作区前,请先确认[支持的内容](../supported-content/)与 [Embedding 模型](../embedding-models/)。
## 创建第一个索引 [#创建第一个索引]
在工作区根目录运行:
```bash
zg index --embedding local/potion-code-16m-v2
zg status --check-ready
```
索引保存在 `/.zvec-grep/` 下,后续扫描会自动排除该目录。
## 限定首次构建范围 [#限定首次构建范围]
大型工作区应在第一次构建时选择相关路径:
```bash
zg index \
--embedding local/potion-code-16m-v2 \
-g "src/**" \
-g "docs/**" \
-g "!dist/**"
```
## 保持索引更新 [#保持索引更新]
已有索引会复用模型与文件选择设置:
```bash
# 增量更新
zg index
# 查看文件、失败信息和下一步建议
zg status
```
更换模型需要显式重建:
```bash
zg index --rebuild --embedding local/jina-embeddings-v2-base-code
```
只有确实需要替换已有包含与排除规则时,才使用 `--reset-paths`。
## 删除索引 [#删除索引]
删除索引是显式且具有破坏性的操作:
```bash
zg index --drop --yes
```
# 快速上手
## 安装 [#1-安装]
Zvec-Grep 需要 Node.js 22 或更新版本:
```bash
npm install -g @zvec/zvec-grep
zg version
```
## 准备示例书架 [#2-准备示例书架]
下载两本公版书,并使用英文检索模型建立索引:
```bash
mkdir zg-mystery && cd zg-mystery
curl --retry 3 --retry-all-errors --progress-bar -fL \
-o alice-in-wonderland.txt https://raw.githubusercontent.com/GITenberg/Alice-s-Adventures-in-Wonderland_11/master/11.txt \
-o sherlock-holmes.txt https://raw.githubusercontent.com/GITenberg/The-Memoirs-of-Sherlock-Holmes_834/master/834.txt
zg index --embedding local/potion-retrieval-32m
```
示例工作区是英文小说,因此这里显式覆盖了面向代码的默认模型。
## 检索 [#3-检索]
### 面向 Agent:通过 OpenCode 提问 [#面向-agent通过-opencode-提问]
安装 [OpenCode](https://opencode.ai/) 后运行:
```bash
zg install --target opencode --yes
opencode run --model opencode/deepseek-v4-flash-free \
"An unseen creature left a few marks. What did the detective infer? Cite local evidence."
```
OpenCode 会自行选择 Zvec-Grep,提示词无需指定工具。
Agent 返回示例
```text
⚙ zvec_grep_zvec_grep_search {"root":".../zg-mystery","query":"An unseen creature left a few marks. What did the detective infer?","fts":["marks","unseen creature","inferred","detective"],"fuse":true}
→ Read sherlock-holmes.txt [offset=5440, limit=120]
回答:
侦探是《驼背人》中的 Sherlock Holmes。他从动物留下的痕迹判断:
- 它不是常见动物,脚印有五个肉垫和长指甲;
- 它身体很长,但腿很短;
- 它爬向金丝雀笼,因此属于食肉动物;
- 它很可能是体型异常巨大的鼬或白鼬。
证据:sherlock-holmes.txt:5479-5516
```
不同 Agent 和模型的措辞可能不同,但引用的证据应基本一致。
### 面向用户:直接使用 CLI 检索 [#面向用户直接使用-cli-检索]
用户可以通过 CLI 直接检索同一个书架:
```bash
zg query --human \
"An unseen creature left a few marks. What did the detective infer?" \
--limit 3
```
Zvec-Grep 应优先返回 `sherlock-holmes.txt` 中的相关段落,并附带可核验的来源位置。
## 更多参考 [#更多参考]
* [文档导航](../):根据问题找到对应页面。
* [CLI 参考](../cli/):查找命令和参数。
* [故障排查](../troubleshooting/):定位常见问题。
# 优化检索
# 检索指南
Zvec-Grep 在同一个 `zg query` 命令下提供多条互补路径。先选择与你掌握的信息相匹配的方式,再缩小搜索空间,而不是直接增加结果数量。
## 选择检索路径 [#选择检索路径]
| 你的意图 | 命令 | 结果特点 |
| ----------------- | --------------------------------------- | ---------- |
| 按语义发现,或同时使用语义与关键词 | `zg query "认证流程"` | 混合检索后的排序样本 |
| 按相关性排列已知关键词 | `zg query --fts "AuthService"` | BM25 排序样本 |
| 只按概念相似度检索 | `zg query --vector "凭证在哪里校验"` | 向量排序样本 |
| 找到所有文本或正则匹配 | `zg query --rg -n -F "AuthService" src` | 默认穷举匹配 |
精确或穷举任务使用 `--rg`。措辞或位置未知,或者需要理解跨文件关系时,使用索引检索。
默认位置参数会联合词法与向量检索:
```bash
zg query --human "用户偏好在启动时从哪里恢复" --limit 5
```
问题中还包含精确线索时,可以将它们融合为一个排序计划:
```bash
zg query --hybrid "authentication flow" --fts "ForbiddenError" --fuse --limit 10
```
## 缩小工作区范围 [#缩小工作区范围]
```bash
zg query "plugin lifecycle" -g "src/**" -g "!src/generated/**" -t ts
```
| 参数 | 用途 |
| ---------------------------------------- | ------- |
| `-g`、`--glob`、`--iglob` | 包含或排除路径 |
| `-t`、`--type`、`-T`、`--type-not` | 过滤文件类型 |
| `--modified-after` / `--modified-before` | 按修改时间筛选 |
## 控制结果与新鲜度 [#控制结果与新鲜度]
| 参数 | 效果 |
| --------------------------------- | ------------- |
| `--limit ` | 每个查询组的最大结果数 |
| `--human` | 展示更完整的终端预览 |
| `--preview none\|short\|full` | 控制索引结果的源码预览长度 |
| `--debug` / `--trace` | 查询与单条命中的诊断信息 |
| `--refresh background\|wait\|off` | 选择索引新鲜度策略 |
索引结果会报告 `fresh` 或 `possibly_stale`。只有必须包含最新文件变更时,才使用 `--refresh wait`。
## 改善较弱的结果 [#改善较弱的结果]
1. 使用 `zg status` 确认工作区根目录和索引状态。
2. 限制到相关路径或文件类型。
3. 通过 `--fts` 增加一到两个明确线索。
4. 已知目标文本时切换到 `--rg`。
5. 检查[支持的内容](../supported-content/)与所选 [Embedding 模型](../embedding-models/)。
运行 `zg help query` 查看已安装版本的完整参数。结果仍然较弱时,请查看[故障排查](../troubleshooting/)。
# 本地 Server
多数用户无需手动管理 Server。CLI 默认使用 `auto` 模式:已有可用服务时连接服务,否则直接执行。默认 stdio Agent 接入会自动启动并重新连接服务。
仅在连续执行 CLI 查询、使用 HTTP MCP 或排查问题时需要主动管理。常驻进程可以:
* 复用已加载的 Embedding 模型和运行时资源;
* 避免每条命令都重新初始化检索资源;
* 降低多个终端或脚本之间的模型冷启动开销。
## 管理服务 [#管理服务]
| 命令 | 用途 |
| -------------------------------- | ----------- |
| `zg server on` | 在后台启动服务 |
| `zg server status` | 查看当前状态 |
| `zg server status --check-ready` | 未就绪时返回非零退出码 |
| `zg server run` | 在前台运行服务 |
| `zg server off` | 停止后台服务 |
```bash
zg server on
zg server status --check-ready
zg server off
```
需要在当前终端观察进程和日志时,使用前台模式:
```bash
zg server run
```
## CLI 连接模式 [#cli-连接模式]
CLI 支持 `direct`、`server` 和 `auto` 三种模式。通过 `ZVEC_GREP_MODE` 或 `--mode` 覆盖默认的 `auto` 模式:
```bash
ZVEC_GREP_MODE=server zg query "发布清单"
zg query --mode server "发布清单"
```
`ZVEC_GREP_SERVER_URL` 用于指定 CLI 客户端连接的服务地址。
## 监听地址与鉴权 [#监听地址与鉴权]
服务仅监听本地回环地址,默认为 `127.0.0.1:7999`。主动启动时可以指定地址:
```bash
zg server on --listen 127.0.0.1:7999
zg server run --listen 127.0.0.1:7999
```
本地回环地址默认不启用鉴权。可以通过 Token 文件或环境变量要求 Bearer 鉴权:
```bash
zg server on --token-file /path/to/token
ZVEC_GREP_SERVER_TOKEN="your-token" zg server run
```
相关设置包括 `ZVEC_GREP_SERVER_TOKEN`、`ZVEC_GREP_SERVER_TOKEN_FILE` 和 `ZVEC_GREP_HOME`。工作区索引仍保存在 `/.zvec-grep/` 下。
修改影响 Embedding 运行时的环境设置后,请重启服务。
当前版本支持的完整选项请运行 `zg help server` 和 `zg help environment`。服务无法就绪时,请查看[故障排查](../troubleshooting/)。
# 支持的内容
Zvec-Grep 会将每个被选中的文件分配到一条提取路径。结构化提取器保留有用的源码上下文,其他文本文件则回退为普通文本切块。
## 结构化代码 [#结构化代码]
以下语言会保留符号、签名、面包屑和周边源码:
* C 与 C++
* Go
* Java
* JavaScript 与 JSX
* TypeScript 与 TSX
* Python
* Rust
Vue 和 Svelte 文件中的脚本代码也会尽可能使用结构化提取。
## 文档与结构化文本 [#文档与结构化文本]
| 内容 | 索引表示 |
| ------------------------ | -------- |
| Markdown 与 MDX | 标题章节和面包屑 |
| TXT、RST、HTML、XML | 纯文本切块 |
| CSV、JSON、JSONC、TOML、YAML | 纯文本切块 |
| 其他非二进制文件 | 纯文本回退 |
Ruby、PHP、Swift、Kotlin、C#、Scala、Shell、SQL 与 CSS 等其他代码,在没有结构化语法时也会使用纯文本切块。
## 图片 [#图片]
图片默认不进入索引。若要索引 GIF、JPEG、PNG 或 WebP,需显式包含,并选择支持图片的 Embedding 模型。
## 当前跳过的内容 [#当前跳过的内容]
PDF 与 Office 文件、压缩包、编译产物、音视频、数据库文件、空文件、根据扩展名或内容采样识别的二进制文件,以及超过大小限制的文件不会进入索引。
使用 `zg index --debug` 可以查看被跳过文件的数量和示例。通过 glob、文件类型、ignore 文件、深度和最大文件大小控制扫描范围。
# 故障排查
先运行三项检查:
```bash
zg version
zg status
zg help
```
## 找不到 `zg` 命令 [#找不到-zg-命令]
Zvec-Grep 要求 Node.js 22 或更新版本:
```bash
node --version
npm install -g @zvec/zvec-grep
zg version
```
如果 npm 安装成功但仍找不到 `zg`,请将 npm 的全局二进制目录加入 shell 的 `PATH`。
## 索引不存在或已过期 [#索引不存在或已过期]
在预期的工作区根目录中运行:
```bash
zg status --check-ready
zg index
zg query "release checklist" --refresh wait
```
只有更换 Embedding 模型或明确替换索引配置时,才使用 `--rebuild`。
## 检索结果为空或质量较弱 [#检索结果为空或质量较弱]
1. 已知文本、标识符、路径或正则时使用 `--rg`。
2. 已知关键词但需要排序时使用 `--fts`。
3. 措辞或位置未知时使用默认混合查询。
4. 使用 `-g`、`-t` 或 `-T` 限制大型工作区。
5. 确认内容已被索引,并且模型适合该内容。
```bash
zg query "authentication flow" --debug --trace
zg index --debug
```
参见[检索指南](../search/)、[支持的内容](../supported-content/)和 [Embedding 模型](../embedding-models/)。
## 显式 Server 模式未就绪 [#显式-server-模式未就绪]
本节仅适用于 `--mode server` 或 HTTP MCP 连接。默认 stdio Agent 接入会自动管理服务。
```bash
zg server status --check-ready
zg server on
zg server status --check-ready
```
需要查看前台日志时运行 `zg server run`。生命周期、CLI 连接模式、监听地址和鉴权方式参见[本地 Server](../server/)。
## Agent 无法使用 Zvec-Grep [#agent-无法使用-zvec-grep]
```bash
zg install --target codex --yes
```
重启 Agent 或新建会话。精确标识符和文件名可能会正确地使用 Agent 原生 grep,而不是 Zvec-Grep。参见[接入 AI Agent](../agents/)。
## 远程 Embedding 被拒绝 [#远程-embedding-被拒绝]
检查或授予独立的工作区授权:
```bash
zg auth status
zg auth grant --capability embedding --scope workspace --embedding qwen/text-embedding-v4
```
单次命令可以使用 `--allow-remote`;内容不能离开本机时,请选择本地模型。
## 安全重置 [#安全重置]
```bash
zg index --rebuild --embedding local/potion-code-16m-v2
zg index --drop --yes
```
`--drop` 会删除工作区索引,但不会删除源码文件。在重新构建索引前,索引检索将不可用。
反馈问题时,请提供版本、操作系统、失败命令、相关的 `zg status` 和脱敏后的诊断信息,并移除凭据、私有路径和敏感片段。
[提交 Zvec-Grep Issue](https://github.com/zvec-ai/zvec-grep/issues)
# MCP 服务器
在 AI 编程助手(如 Claude Code 和 Qoder)的日常工作流中,开发者经常需要与向量数据库交互 — 创建 Collection、插入数据和运行语义搜索。然而,这些操作通常需要切换到终端手动执行代码,打断了与 AI 的对话流程。
Zvec MCP 服务器通过 [MCP (Model Context Protocol)](https://modelcontextprotocol.io/) 将 Zvec 的全部功能作为标准化工具暴露给 AI 助手。配置完成后,AI 可以在对话中直接调用向量数据库操作 — 无需离开编辑器,无需编写任何代码。
**GitHub**:[https://github.com/zvec-ai/zvec-mcp-server](https://github.com/zvec-ai/zvec-mcp-server)
\*\*前提条件:\*\*请确保已安装 [uv](https://docs.astral.sh/uv/)。MCP 服务器通过 `uvx` 分发,无需手动设置依赖。
## 快速配置 [#快速配置]
### Qoder(推荐) [#qoder推荐]
**使用 Qoder CLI(一键配置):**
```bash
# OpenAI
qodercli mcp add zvec-mcp uvx zvec-mcp-server \
-e OPENAI_API_KEY=sk-xxx \
-e OPENAI_BASE_URL=https://api.openai.com/v1 \
-e OPENAI_EMBEDDING_MODEL=text-embedding-3-small
# 或 DashScope
qodercli mcp add zvec-mcp uvx zvec-mcp-server \
-e OPENAI_API_KEY=sk-xxx \
-e OPENAI_BASE_URL=https://dashscope.aliyuncs.com/compatible-mode/v1 \
-e OPENAI_EMBEDDING_MODEL=text-embedding-v4
```
**手动配置**(`~/.qoder/mcp.json`):
```json
{
"mcpServers": {
"zvec-mcp": {
"command": "uvx",
"args": ["zvec-mcp-server"],
"env": {
"OPENAI_API_KEY": "sk-xxx",
"OPENAI_BASE_URL": "https://api.openai.com/v1",
"OPENAI_EMBEDDING_MODEL": "text-embedding-3-small"
}
}
}
}
```
### Claude Code [#claude-code]
```bash
claude mcp add zvec-mcp uvx zvec-mcp-server \
-e OPENAI_API_KEY=sk-xxx \
-e OPENAI_BASE_URL=https://api.openai.com/v1 \
-e OPENAI_EMBEDDING_MODEL=text-embedding-3-small
```
### Claude Desktop [#claude-desktop]
配置文件:`~/Library/Application Support/Claude/claude_desktop_config.json`
```json
{
"mcpServers": {
"zvec-mcp": {
"command": "uvx",
"args": ["zvec-mcp-server"],
"env": {
"OPENAI_API_KEY": "sk-xxx"
}
}
}
}
```
### 本地开发 [#本地开发]
从源码本地运行:
```json
{
"mcpServers": {
"zvec-mcp": {
"command": "uv",
"args": ["run", "python", "-m", "zvec_mcp"],
"cwd": "/path/to/zvec-mcp-server",
"env": {
"OPENAI_API_KEY": "sk-xxx"
}
}
}
}
```
**环境变量:**
* `OPENAI_API_KEY`(必填):你的 API 密钥
* `OPENAI_BASE_URL`(可选):自定义端点,例如 DashScope
* `OPENAI_EMBEDDING_MODEL`(可选):默认为 `text-embedding-3-small`
## 验证连接 [#验证连接]
配置完成后,输入以下提示进行验证:
```plain
List all available MCP tools
```
你应该看到返回 17 个 zvec-mcp 工具。如果没有,请检查配置并重启客户端。
## 快速开始(日志排查场景) [#快速开始日志排查场景]
**第 1 步 — 创建日志知识库**
```plain
Create a collection named log_knowledge, stored in the ./data/log_kb directory,
for storing system log troubleshooting knowledge.
```
**第 2 步 — 插入数据库故障日志**
```plain
Insert the following fault cases into log_knowledge:
- "ERROR: Connection pool exhausted. Max connections (100) reached. Unable to acquire connection from pool within 30s timeout. Consider increasing max pool size or check for connection leaks."
- "WARN: Slow query detected (execution time: 15.3s). Query: SELECT * FROM large_table WHERE unindexed_column = 'value'. Consider adding index on unindexed_column."
```
**第 3 步 — 插入应用层故障日志**
```plain
Insert the following fault cases into log_knowledge:
- "ERROR: OutOfMemoryError: Java heap space. Heap dump triggered. Analysis shows 85% memory consumed by cached user sessions. Recommendation: review session timeout settings and implement LRU cache eviction."
- "WARN: Circuit breaker 'payment-service' opened after 50 consecutive failures. Fallback strategy activated. Root cause: payment-service timeout (5s) insufficient under high load."
```
**第 4 步 — 插入基础设施故障日志**
```plain
Insert the following fault cases into log_knowledge:
- "ERROR: Disk full (99% usage) on /var/log. Log rotation failed due to permission denied on /etc/logrotate.d/app. Syslog daemon stopped accepting new messages."
- "CRITICAL: SSL certificate expired on 2024-01-15. HTTPS connections rejected. Renewal automation failed due to DNS challenge timeout."
```
### 语义搜索示例 [#语义搜索示例]
**按错误症状搜索解决方案:**
```plain
Search log_knowledge for "database connection timeout"
```
**按严重级别过滤:**
```plain
Search log_knowledge for "memory issues"
```
**按类别精确定位:**
```plain
Search log_knowledge for "certificate-related errors"
```
**组合查询并指定输出格式:**
```plain
Search log_knowledge for "service unavailable", return in JSON format
```
## 工具概览 [#工具概览]
| 类别 | 工具 | 描述 |
| ------------- | ----------------------------------------------------------------------------------------------------- | ----------------------- |
| Collection 管理 | `create_and_open_collection` / `open_collection` / `get_collection_info` / `destroy_collection` | 创建 / 打开 / 删除 Collection |
| Document 操作 | `insert_documents` / `upsert_documents` / `update_documents` / `delete_documents` / `fetch_documents` | CRUD 操作 |
| 向量查询 | `vector_query` / `multi_vector_query` | 单向量 / 多向量搜索 |
| 索引管理 | `create_index` / `drop_index` / `optimize_collection` | 索引管理 |
| AI Embedding | `generate_dense_embedding` / `embedding_write` / `embedding_search` | 文本 Embedding 与搜索 |
## 故障排除 [#故障排除]
| 问题 | 解决方案 |
| -------------- | ----------------------------------- |
| 工具未显示 | 检查配置文件路径,重启客户端 |
| Embedding 错误 | 验证 `OPENAI_API_KEY` 和环境变量 |
| Collection 未找到 | 先使用 `open_collection` 打开 Collection |
| 维度不匹配 | 在 `get_collection_info` 中检查维度定义 |
| 无搜索结果 | 确保数据存在、索引已构建且过滤条件有效 |
# Skills
MCP 使 AI 助手能够*操作*向量数据库,但它并不理解 Zvec 的最佳实践 — 哪种场景该用哪种索引?如何正确设计 Schema?Document 应该如何分块和存储?这类经验性知识无法仅通过工具调用获得。
Zvec Agent Skills 将 Zvec 领域知识注入 AI 助手,使其不仅能调用工具,还能像深度熟悉 Zvec 的开发者一样思考。安装后,你只需描述业务场景,AI 就会提供完整的 Schema 设计、索引策略和可运行的代码。
**GitHub**:[https://github.com/zvec-ai/zvec-agent-skills](https://github.com/zvec-ai/zvec-agent-skills)
\*\*前提条件:\*\*在使用 Skill 之前,请先安装适用于你编程语言的 Zvec SDK(Python 或 Node.js)。
## 安装 [#安装]
### 安装 Skill [#1-安装-skill]
```bash
npx skills add github:zvec-ai/zvec-agent-skills --skill "zvec"
```
### 安装 Zvec 依赖 [#2-安装-zvec-依赖]
根据你的开发语言选择安装方式:
**Python:**
```bash
pip install zvec
```
**Node.js:**
```bash
npm install @zvec/zvec
```
## 在 Qoder/Claude 中使用 [#在-qoderclaude-中使用]
### 开始对话 [#开始对话]
Qoder/Claude 会自动检测已安装的 Skill。你可以在对话中直接提出 Zvec 相关问题:
```plain
I want to build a RAG document retrieval system using Zvec
```
```plain
How do I perform hybrid search (vector + filter conditions) with Zvec?
```
```plain
Help me create a Collection for storing product information with name, price, and vector fields
```
### 最佳实践 [#最佳实践]
#### 指定你的开发语言 [#1-指定你的开发语言]
在与 Qoder/Claude 聊天时,先说明你的开发语言以获得准确的代码示例:
```plain
I'm using Python and want to implement semantic search with Zvec...
```
```plain
I need to use Zvec's multi-vector search in my Node.js project...
```
#### 描述你的使用场景 [#2-描述你的使用场景]
提供具体的业务场景,让 Qoder/Claude 能给出更有针对性的建议:
```plain
I need to build an e-commerce product search system with the following requirements:
- Support semantic search by product description
- Filter by price range and stock status
- Approximately 500K product records
```
#### 寻求决策指导 [#3-寻求决策指导]
对于技术选型问题,你可以直接向 Qoder/Claude 请求推荐:
```plain
I have 5 million records — what index type should I use?
```
```plain
In a RAG system, how should documents be chunked and stored in Zvec?
```
## 典型使用场景 [#典型使用场景]
### 场景 1:RAG 文档检索系统 [#场景-1rag-文档检索系统]
**用户输入:**
```plain
I want to build a RAG document retrieval system using Python and Zvec for a technical support knowledge base.
The documents are in Markdown format and need to support semantic search.
```
**Qoder/Claude 将提供:**
* Collection Schema 设计建议
* Document 分块策略
* 向量生成和存储代码
* 检索查询示例
### 场景 2:电商产品搜索 [#场景-2电商产品搜索]
**用户输入:**
```plain
I need to implement e-commerce product search in a Node.js project:
- Support semantic search on product names and descriptions
- Filter by price, category, and brand
- Support multimodal (image + text) search
```
**Qoder/Claude 将提供:**
* 多字段 Schema 定义
* 混合搜索(向量 + 标量过滤)代码
* 多向量查询和加权排序示例
## 提示词技巧 [#提示词技巧]
### 有效的提问模板 [#有效的提问模板]
#### 模板 1:快速开始 [#模板-1快速开始]
```plain
I'm a [Python/Node.js] developer and want to use Zvec for [use case].
Please give me a complete quick-start code example.
```
#### 模板 2:具体问题 [#模板-2具体问题]
```plain
I'm having an issue with Zvec:
- Language: [Python/Node.js]
- Problem: [specific description]
- Current code: [relevant code snippet]
- Error message: [if any]
```
#### 模板 3:架构咨询 [#模板-3架构咨询]
```plain
I need to design a [system description] using Zvec as the vector database.
- Data scale: [volume]
- Query types: [search/filter/hybrid]
- Performance requirements: [latency/throughput]
Please help me design the Schema and indexing strategy.
```
## 相关资源 [#相关资源]
* [Zvec 文档](/zh/docs/db/)
* [Zvec Python API](/api-reference/python/)
* [Zvec Node.js API](/api-reference/nodejs/)
* [Zvec GitHub](https://github.com/alibaba/zvec)
# 从源码构建
本章节将介绍如何直接从源代码编译并安装本项目。
如果您有以下需求,建议采用源码编译的方式:
* 🧪 **尝鲜**:测试尚未发布的最新功能。
* 🐛 **调试**:在源代码级别排查问题。
* ⚙️ **定制**:针对特定硬件或环境进行编译定制。
* 🤝 **贡献**:参与项目的开发工作。
如果您只需要使用稳定版本,建议通过包管理器(如 `pip` 或 `npm`)直接安装。
# Node.js
本指南介绍如何从源码安装 Node.js SDK。
## 前置要求 [#前置要求]
开始之前,请确保你的环境满足以下要求:
* **Node.js**:建议使用最新的 LTS 版本
* **编译器**:支持 C++17 的编译器
* **CMake**: `>=3.26, <4.0`
* **GNU Make**:用于编译原生组件
* **平台**:
* **Linux**(ARM64/x86\_64)
* **macOS**(ARM64/x86\_64)
* **Windows**(x86\_64)— 注意:目前在 MSVC 2022 (Visual Studio 17.0+) 上测试通过
* **Git**:用于克隆包含子模块的仓库
## 源码安装 [#源码安装]
```bash
# 克隆仓库
git clone --recurse-submodules https://github.com/zvec-ai/zvec-node.git
cd zvec-node
# 安装依赖
npm install
# 运行本地打包脚本
# 该脚本会从源码编译原生代码,并在项目根目录生成可独立安装的 tarball 文件
npm run pack-local
```
本仓库使用了 **Git submodules**,克隆过程可能需要几分钟,具体时间取决于网络状况。
如果你的**构建环境**位于**中国内地**,可以启用 OSS 镜像来加速第三方依赖下载(如 **Arrow** 所需的资源):
```bash
USE_OSS_MIRROR=ON npm run pack-local
```
# Python
本指南介绍如何从源码安装 Python SDK。
## 前置要求 [#前置要求]
开始之前,请确保你的环境满足以下要求:
* **Python**:3.9 或更高版本(仅支持 64 位)
* **编译器**:支持 C++17 的编译器
* **CMake**: `>=3.26, <4.0`
* **平台**:
* **Linux**(x86\_64/ARM64)
* **macOS**(x86\_64/ARM64)
* **Windows**(x86\_64)— 注意:目前在 MSVC 2022 (Visual Studio 17.0+) 上测试通过
* **Git**:用于克隆包含子模块的仓库
* **scikit-build**(作为构建依赖会被自动安装,但在某些环境中可能需要手动配置)
## 源码安装 [#源码安装]
```bash
# 克隆仓库
git clone --recurse-submodules https://github.com/alibaba/zvec.git
cd zvec
# 源码安装
pip install .
```
本仓库使用了 **Git submodules**,克隆过程可能需要几分钟,具体时间取决于网络状况。
如果你的**构建环境**位于**中国内地**,可以启用 OSS 镜像来加速第三方依赖的下载(如 **Arrow** 所需的资源):
```bash
USE_OSS_MIRROR=ON pip install .
```
## (可选)构建配置 [#可选构建配置]
### 构建目录 [#构建目录]
如果在构建过程中遇到问题,可以尝试为 **scikit-build** 设置自定义构建目录。这有助于避免缓存不一致,也便于查看详细的构建日志:
```bash
export SKBUILD_BUILD_DIR=/tmp/build # 或其他目录
pip install .
```
构建完成后,你可以检查 **/tmp/build** (或你指定的目录) 中的内容,查看编译器输出并诊断错误。
### 构建系统 [#构建系统]
默认情况下,**scikit-build** 使用 **Ninja** 作为构建系统,会自动使用所有可用 CPU 进行编译。如需改用 **Unix Makefiles**,请设置:
```bash
export CMAKE_GENERATOR="Unix Makefiles"
pip install .
```
* 使用 **Make** 时,需要手动配置并行编译以加快构建速度:
```bash
# 方式一:通过环境变量设置并行级别
export CMAKE_BUILD_PARALLEL_LEVEL=32
export CMAKE_GENERATOR="Unix Makefiles"
pip install .
# 方式二:通过配置参数传递并行标志
export CMAKE_GENERATOR="Unix Makefiles"
pip install . --config-settings=build.tool-args="-j$(nproc)"
```
# 删除
删除 collection 会**将其文件从磁盘上永久删除**。此操作**不可撤销**。
**警告**:Collection 中的所有数据将会丢失。在调用 `destroy()` 之前,请确保你不再需要该 collection,或已创建备份。
Python
Node.js
```python title="删除 collection"
import zvec
collection = zvec.open(path="/path/to/my/collection")
# 永久删除 collection
collection.destroy() # [!code highlight]
```
```ts title="删除 collection"
import { ZVecCollection, ZVecOpen } from "@zvec/zvec";
const collection: ZVecCollection = ZVecOpen("/path/to/my/collection");
// 永久删除 collection
collection.destroySync(); // [!code highlight]
```
调用 `destroy()` 后,collection 目录及其内容将从文件系统中被移除。
调用 `destroy()` 后,请勿再使用该 `collection` 对象 — 它已不再有效。
# Collection
[**Collection**](../concepts/data-modeling/#collections) 是 Zvec 中用于存储 [document](../concepts/data-modeling/#documents) 的具名容器。
可以把 collection 想象成关系型数据库中的数据表:它是你**存储、组织和查询数据**的地方。
本章节将详细介绍管理 collection 的相关操作。
# 检视
Collection 加载完成后,你可以检查其结构、配置及运行时状态,以更好地了解它的组织方式和运行情况。这在开发、调试或监控系统时尤为有用。
Python
Node.js
```python title="打开 Collection"
import zvec
# [!code word:collection]
collection = zvec.open(path="/your/specified/path/")
print(collection.schema) # 查看 Schema [!code highlight]
```
```ts title="打开 Collection"
import { ZVecCollection, ZVecOpen } from "@zvec/zvec";
// [!code word:collection]
const collection: ZVecCollection = ZVecOpen("/your/specified/path/");
console.log(collection.schema.toString()); // 查看 Schema [!code highlight]
```
***
## 快速参考 [#快速参考]
| 属性 | 说明 |
| ------------------- | ------------------------------ |
| `Collection.schema` | Collection 的结构和字段 (如向量维度、数据类型) |
| `Collection.stats` | 运行时指标,如 document 数量和索引构建进度 |
| `Collection.option` | 运行时配置 (如只读模式、内存映射) |
| `Collection.path` | Collection 目录的具体路径 |
***
## Collection Schema [#collection-schema]
查看 [Schema](../create/schema):
Python
Node.js
```python
print(collection.schema)
```
```ts
console.log(collection.schema.toString());
```
Python
Node.js
```json
// [!code word:fields]
// [!code word:vectors]
{
"name": "my_collection",
"fields": {
"price": {
"name": "price",
"data_type": "INT32",
"nullable": false,
"index_param": {
"enable_range_optimization": true,
"enable_extended_wildcard": false
}
},
"category": {
"name": "category",
"data_type": "ARRAY_STRING",
"nullable": true,
"index_param": {
"enable_range_optimization": false,
"enable_extended_wildcard": false
}
},
"image_url": {
"name": "image_url",
"data_type": "STRING",
"nullable": true,
"index_param": null
}
},
"vectors": {
"image_embedding": {
"name": "image_embedding",
"data_type": "VECTOR_FP32",
"dimension": 256,
"index_param": {
"type": "HNSW",
"metric_type": "COSINE",
"m": 50,
"ef_construction": 500,
"quantize_type": "UNDEFINED"
}
}
}
}
```
```bash
# [!code word:scalar]
# [!code word:vector]
CollectionSchema{
name: 'my_collection',
max_doc_count_per_segment: 10000000,
fields: [
FieldSchema[vector]{
name: 'image_embedding',
data_type: VECTOR_FP32,
dimension: 256,
index_params: HnswIndexParams{metric:COSINE,quantize:UNDEFINED,m:50,ef_construction:500}
},
FieldSchema[scalar]{
name: 'price',
data_type: INT32,
nullable: false,
index_params: InvertIndexParams{enable_range_optimization:true, enable_extended_wildcard:false}
},
FieldSchema[scalar]{
name: 'category',
data_type: ARRAY_STRING,
nullable: true,
index_params: InvertIndexParams{enable_range_optimization:false, enable_extended_wildcard:false}
},
FieldSchema[scalar]{
name: 'image_url',
data_type: STRING,
nullable: true,
index_params: null
}
]
}
```
1. `"name": "my_collection"`:collection 的名称。
2. **标量字段**:
* `"price"`:32 位整数(**必需**),启用了倒排索引和范围查询优化。
* `"category"`:字符串数组(**可选**),启用了倒排索引;但未启用范围查询优化 (该优化对数组类型无意义)。
* `"image_url"`:字符串(**可选**),未建索引。
如果标量字段的 `index_param` **不为空**,则表示该字段已建立[倒排索引](../../concepts/inverted-index/)。
3. **向量字段**:
* `"image_embedding"`:**256 维**的浮点向量,使用 [HNSW](../../concepts/vector-index/hnsw-index/) 索引,余弦相似度,无量化。
查看**标量字段**:
Python
Node.js
```python
print(collection.schema.fields)
```
```ts
console.log(collection.schema.fields());
```
返回标量字段的列表。
Python
Node.js
```json
[{
"name": "price",
"data_type": "INT32",
"nullable": false,
"index_param": {
"enable_range_optimization": true,
"enable_extended_wildcard": false
}
}, {
"name": "category",
"data_type": "ARRAY_STRING",
"nullable": true,
"index_param": {
"enable_range_optimization": false,
"enable_extended_wildcard": false
}
}, {
"name": "image_url",
"data_type": "STRING",
"nullable": true,
"index_param": null
}]
```
```json
[
{
name: 'price',
dataType: 4,
nullable: false,
indexParams: {
indexType: 10,
enableRangeOptimization: true,
enableExtendedWildcard: false
}
},
{
name: 'category',
dataType: 41,
nullable: true,
indexParams: {
indexType: 10,
enableRangeOptimization: false,
enableExtendedWildcard: false
}
},
{ name: 'image_url', dataType: 2, nullable: true }
]
```
查看**向量字段**:
Python
Node.js
```python
print(collection.schema.vectors)
```
```ts
console.log(collection.schema.vectors());
```
返回向量字段的列表。
Python
Node.js
```json
[{
"name": "image_embedding",
"data_type": "VECTOR_FP32",
"dimension": 256,
"index_param": {
"type": "HNSW",
"metric_type": "COSINE",
"m": 50,
"ef_construction": 500,
"quantize_type": "UNDEFINED"
}
}]
```
```json
[
{
name: 'image_embedding',
dataType: 23,
dimension: 256,
indexParams: {
indexType: 1,
metricType: 3,
m: 50,
efConstruction: 500,
quantizeType: 0
}
}
]
```
***
## Collection 统计信息 [#collection-统计信息]
`stats` 属性提供实时运行状态:
Python
Node.js
```python
print(collection.stats)
```
```ts
console.log(collection.stats);
```
Python
Node.js
```json
{"doc_count":100, "index_completeness":{"image_embedding":1.000000}}
```
```json
{ docCount: 100, indexCompleteness: { image_embedding: 1 } }
```
1. `doc_count`:当前存储的 document 总数。
2. `index_completeness`:向量数据已建立索引的比例 (0.0\~1.0)。1.0 表示索引已完成。
***
## Collection 选项 [#collection-选项]
加载 collection 时传入的选项决定了其运行时行为:
Python
Node.js
```python
print(collection.option)
```
```ts
console.log(collection.options);
```
Python
Node.js
```json
{"enable_mmap":1, "read_only":0}
```
```json
{ readOnly: false, enableMMAP: true }
```
1. `enable_mmap: 1/true` → 已启用内存映射 I/O,可加速访问。
2. `read_only: 0/false` → Collection 可读可写。
***
## Collection 路径 [#collection-路径]
`path` 属性返回 collection 在磁盘上的位置:
Python
Node.js
```python
print(collection.path)
```
```ts
console.log(collection.path);
```
```text
./my_collection/
```
此路径与传入 `open()` 的路径一致。
# 打开
使用 `open()` 函数从磁盘加载已有的 collection。
指定的路径**必须指向一个已有的 Zvec collection**。如果未找到有效的 collection,`open()` 将抛出错误。
## 用法 [#用法]
Python
Node.js
```python title="打开 Collection"
import zvec
existing_collection = zvec.open( # [!code highlight]
path="/path/to/my/collection",
option=zvec.CollectionOption(read_only=False, enable_mmap=True),
)
```
```ts title="打开 Collection"
import { ZVecCollection, ZVecOpen } from "@zvec/zvec";
const existingCollection: ZVecCollection = ZVecOpen( // [!code highlight]
"/path/to/my/collection",
{ readOnly: false, enableMMAP: true }
);
```
## 参数 [#参数]
* `path`:Collection 目录的具体路径。
* `option`:控制运行时行为的配置。
* `read_only`:以只读模式打开 collection。在此模式下,任何写入尝试均会触发错误异常。
当需要在多个进程间共享集合时,请使用只读模式。这能确保并发访问的安全性,有效规避数据损坏的风险。
* `enable_mmap`:
启用内存映射 I/O 以加速数据访问 (默认为 `True`)。该机制通过略微增加内存缓存的占用,来换取显著的性能提升。
# 优化
`optimize()` 方法将 Flat 暂存区中累积的向量合并构建到配置的向量索引中,从而**提升检索性能**。该操作在**后台运行**,**不会阻塞读取或写入操作**,从而确保应用程序始终保持响应。
***
## 为什么需要优化 [#为什么需要优化]
在 Zvec 中,新插入的向量**不会直接**添加到已配置的向量索引中。这些新向量会先被暂存到一个轻量级的 [Flat 索引 (暴力检索)](../../concepts/vector-index/flat-index/)缓冲区。
这种设计带来了显著的优势,但也伴随着一定的取舍:
* ✅ **优势**
* **最大化写入吞吐量**:实现高速数据写入。
* **流式写入**:为原生不支持流式增量更新的索引类型 (如 [IVF](../../concepts/vector-index/ivf-index/)),提供实时写入的能力。
* ⚠️ **取舍**
* **搜索性能随写入量衰减**:随着 Flat 暂存区增长,搜索性能会下降。
🔁 **解决方案**
定期调用 `optimize()`。这会触发后台工作线程,将暂存区中的向量合并到已配置的向量索引中 — 且**不会中断正在进行的读写操作**。🚀
`optimize()` **不会锁定 collection**。优化过程中,其他线程和操作可以继续无感地读取、写入和查询 — 应用程序将保持完全响应。
***
## 使用示例 [#使用示例]
Python
Node.js
```python title="优化 collection"
import zvec
collection = zvec.open(path="/path/to/my/collection")
# 插入一些 documents
for i in range(1000):
doc = zvec.Doc(id=f"doc_{i}", vectors={"embedding": [i + 0.1, i + 0.2, i + 0.3]})
collection.insert(doc)
# 优化 collection
collection.optimize() # [!code highlight]
```
```ts title="优化 collection"
import { ZVecCollection, ZVecDocInput, ZVecOpen } from "@zvec/zvec";
const collection: ZVecCollection = ZVecOpen("/path/to/my/collection");
// 插入一些 documents
for (let i = 0; i < 1000; i++) {
const doc: ZVecDocInput = { id: `doc_${i}`, vectors: { embedding: [i + 0.1, i + 0.2, i + 0.3] } };
collection.insertSync(doc);
}
// 优化 collection(同步)
collection.optimizeSync(); // [!code highlight]
// 优化 collection(异步)
await collection.optimize(); // [!code highlight]
```
***
## 检查索引状态 [#检查索引状态]
使用 `stats` 属性获取 collection 索引状态的实时信息:
Python
Node.js
```python
print(collection.stats)
```
```ts
console.log(collection.stats);
```
Python
Node.js
```json
{"doc_count":1000, "index_completeness":{"embedding":1.000000}}
```
```json
{ docCount: 1000, indexCompleteness: { embedding: 1 } }
```
1. `doc_count`:当前存储的 document 总数。
2. `index_completeness`:表示向量数据已建立索引的比例 (0.0\~1.0)。
* `1.0` → 该向量字段的所有向量均已建立索引
* `0.0` → 尚未进行任何索引;所有向量仍暂存在 Flat 缓冲区中,并通过暴力检索进行查询
* **介于两者之间** → 部分向量已构建索引,或正在索引中
***
## 何时调用 `optimize()` [#何时调用-optimize]
**定期**执行优化,但**不宜过于频繁**:
* **频率过低** → Flat 缓冲区过大,导致检索性能下降
* **频率过高** → 浪费资源,过早优化小批量数据
请根据您的**数据写入速率**和**查询延迟要求**进行权衡。
**最佳实践:**\
如果感觉检索速度变慢,请检查 collection 索引状态。\
原则上,建议在**未索引 documents 数量达到10万条以上时**进行优化 — 但请务必根据您的具体业务场景灵活调整。
# Schema 演进
Zvec 支持**动态 Schema 演进**,允许你在 Collection 创建后修改其结构——无需停机、数据重新导入或重新索引。
支持的操作:
* ✅ **添加或删除标量字段**
* ✅ **重命名字段**或**更改数据类型**(需确保变更安全,如从 `INT32` 到 `INT64`)
* ✅ **创建或删除字段索引**
* ❌ 添加或删除向量字段(🔜 即将支持)
***
## 数据定义语言(DDL) [#数据定义语言ddl]
在 Zvec 中,Schema 变更通过\*\*数据定义语言(DDL)\*\*方法执行,分为两类:
* **Column DDL**:定义*你存储什么数据*。
管理 Collection 的结构,包括[添加](#添加列)、[删除](#删除列)、[重命名或修改](#修改列)字段。
* **Index DDL**:定义*你如何搜索数据*。
控制字段上索引的[创建](#创建索引)和[删除](#删除索引)。
💡 **Zvec 索引规则**
* **每个向量字段都必须建索引**,使用合适的[向量索引](../../concepts/vector-index/)以支持相似度搜索。
* **标量字段索引是可选的**——但你应该为计划在过滤查询中使用的标量字段建立[倒排索引](../../concepts/inverted-index/)(如 `WHERE category = 'music'`)。
***
## 前置条件 [#前置条件]
本指南假设你已打开一个 Collection 并准备好了 `collection` 对象。
该示例 Collection 包含一个标量字段 `publish_year`。
Python
Node.js
```python title="打开 Collection"
import zvec
collection_schema = zvec.CollectionSchema( # [!code highlight]
name="example_collection",
# [!code word:publish_year]
fields=[zvec.FieldSchema(name="publish_year", data_type=zvec.DataType.INT64)],
vectors=[
zvec.VectorSchema(
name="dense_embedding",
data_type=zvec.DataType.VECTOR_FP32,
dimension=768,
index_param=zvec.HnswIndexParam(metric_type=zvec.MetricType.COSINE),
),
],
)
collection = zvec.open(path="/path/to/collection") # [!code highlight]
```
```ts title="打开 Collection"
import { ZVecCollection, ZVecCollectionSchema, ZVecDataType, ZVecIndexType, ZVecMetricType, ZVecOpen } from "@zvec/zvec";
const collectionSchema: ZVecCollectionSchema = new ZVecCollectionSchema({ // [!code highlight]
name: "example_collection",
// [!code word:publish_year]
fields: [{ name: "publish_year", dataType: ZVecDataType.INT64 }],
vectors: [
{
name: "dense_embedding",
dataType: ZVecDataType.VECTOR_FP32,
dimension: 768,
indexParams: { indexType: ZVecIndexType.HNSW, metricType: ZVecMetricType.COSINE },
}
]
});
const collection: ZVecCollection = ZVecOpen("/path/to/collection"); // [!code highlight]
```
***
## Column DDL [#column-ddl]
### 添加列 [#添加列]
使用 `add_column()` 向已有 Collection 添加新的标量字段:
Python
Node.js
```python title="添加列"
import zvec
new_field = zvec.FieldSchema(name="rating", data_type=zvec.DataType.INT32)
collection.add_column(field_schema=new_field, expression="5") # [!code highlight]
```
```ts title="添加列"
import { ZVecCollection, ZVecDataType, ZVecFieldSchema, ZVecOpen } from "@zvec/zvec";
const newField: ZVecFieldSchema = { name: "rating", dataType: ZVecDataType.INT32 };
collection.addColumnSync({ fieldSchema: newField, expression: "5" }); // [!code highlight]
```
* `field_schema`:
定义新字段的名称和数据类型。详见[标量字段 Schema](../create/schema/#标量字段-step)。
* `expression`:
为已有 Document 指定默认值。由于已有 Document 没有 `rating` 字段,Zvec 使用此 `expression` 填充缺失值——本例中将所有现有 Document 的 `rating` 设为 5。
目前仅支持通过 `add_column()` 添加**数值型标量字段**。对 `string` 和 `boolean` 类型的支持即将推出。
因此,`expression` 必须求值为数字——可以是单个数字字面量(如 `"5"`)或涉及已有数值字段的简单算术表达式(如 `"publish_year + 1"`)。
### 删除列 [#删除列]
使用 `drop_column()` 永久删除标量字段:
Python
Node.js
```python title="删除列"
# [!code word:drop_column]
collection.drop_column(field_name="publish_year")
```
```ts title="删除列"
// [!code word:dropColumnSync]
collection.dropColumnSync("publish_year");
```
此操作会**从 Collection 中每个 Document 删除该字段及其所有数据**。该操作**不可逆**。
### 修改列 [#修改列]
使用 `alter_column()` 重命名列或更新其 Schema:
Python
Node.js
```python title="修改列"
# 重命名
collection.alter_column(old_name="publish_year", new_name="release_year") # [!code highlight]
# 更改类型(需兼容)
updated = zvec.FieldSchema(name="rating", data_type=zvec.DataType.FLOAT)
collection.alter_column(field_schema=updated) # [!code highlight]
```
```ts title="修改列"
// 重命名
collection.alterColumnSync({ columnName: "publish_year", newColumnName: "release_year" }); // [!code highlight]
// 更改类型(需兼容)
const updated: ZVecFieldSchema = { name: "rating", dataType: ZVecDataType.FLOAT };
collection.alterColumnSync({ columnName: "rating", fieldSchema: updated }); // [!code highlight]
```
### 查看当前 Schema [#查看当前-schema]
修改完成后,你可以随时打印 Schema 来查看 Collection 的当前结构:
Python
Node.js
```python title="查看当前 Schema"
print(collection.schema)
```
```ts title="查看当前 Schema"
console.log(collection.schema.toString());
```
详见 [Schema 示例](../inspect/#collection-schema)。
## Index DDL [#index-ddl]
### 创建索引 [#创建索引]
你可以使用 `create_index()` 在**向量**和**标量**字段上创建(或替换)索引以加速搜索:
Python
Node.js
```python title="创建索引"
import zvec
# 将已有的 HNSW 索引替换为 FLAT 索引
collection.create_index( # [!code highlight]
field_name="dense_embedding",
index_param=zvec.FlatIndexParam(metric_type=zvec.MetricType.COSINE),
)
# 创建倒排索引
collection.create_index( # [!code highlight]
field_name="publish_year",
index_param=zvec.InvertIndexParam(),
)
```
```ts title="创建索引"
// 将已有的 HNSW 索引替换为 FLAT 索引
collection.createIndexSync({ // [!code highlight]
fieldName: "dense_embedding",
indexParams: { indexType: ZVecIndexType.FLAT, metricType: ZVecMetricType.COSINE }
});
// 创建倒排索引
collection.createIndexSync({ // [!code highlight]
fieldName: "publish_year",
indexParams: { indexType: ZVecIndexType.INVERT }
});
```
* **向量字段**必须使用以下索引类型之一:
* [`HnswIndexParam`](../../concepts/vector-index/hnsw-index/#索引构建参数)
* [`HnswRabitqIndexParam`](../../concepts/vector-index/hnsw-rabitq-index/#索引构建参数)
* [`IVFIndexParam`](../../concepts/vector-index/ivf-index/#索引构建参数)
* `FlatIndexParam`
* **标量字段**使用 `InvertIndexParam` 以启用高效过滤。
### 删除索引 [#删除索引]
使用 `drop_index()` 删除标量字段上的索引:
Python
Node.js
```python title="删除索引"
# [!code word:drop_index]
collection.drop_index(field_name="publish_year")
```
```ts title="删除索引"
// [!code word:dropIndexSync]
collection.dropIndexSync("publish_year");
```
**不允许删除向量字段的索引**。
在 Zvec 中,每个向量字段必须始终有且仅有一个索引以支持相似度搜索。
# 数据结构
Zvec 采用 **Collection** 和 **Document** 的结构来组织数据。
***
## Collections [#collections]
**Collection** 是用来存放 [documents](#documents) 的具名容器 — 类似于关系型数据库 (如 MySQL) 中的**数据表**,其中每个 **document** 对应表中的**一行**。Collection 用于存储、组织和查询数据。
每个 Collection 由一个 **Schema** 定义,Schema 描述了其包含的标量字段和向量及其[类型](#数据类型)和[索引设置](#索引)。
**同一个 collection 中的所有 documents 都必须遵循相同的 schema**。
Zvec 中的 collection schema 是**动态的**:你可以随时添加或删除标量字段和向量,无需重建 collection。
**不支持跨 collection 查询**:不支持 Join、Union 或多 collection 检索。请据此合理设计你的数据模型。
### 为什么要使用 Collection? [#为什么要使用-collection]
Collection 提供了**隔离**,确保每个业务场景都拥有独立的 schema 和索引配置。这种隔离既避免了不同业务之间的相互干扰,也让它们可以独立调整。
例如:
* **检索增强生成(RAG)collection** 可能存储文本向量以及元数据 — 如标题、章节、源 URL 和最后更新时间戳。
* **图片搜索 collection** 可以存储高维度的图片向量以及相关字段,如图片 ID、文件路径或描述。
### 持久化 [#持久化]
* **每个 collection 独立持久化在磁盘上的专属目录中**,从而在不同的业务场景之间提供隔离。
* 每个 collection **完全自包含于其目录中**。这意味着你可以自由迁移 collection 的文件夹,只需提供正确的路径,Zvec 就能顺利加载它。
***
## Documents [#documents]
Document 是数据存储的基本单元 — 类似于关系型数据库表中的一条记录或一行。每个 document 都存在于一个 [collection](#collections) 中,并且必须符合该 collection 的 schema。
### Document 的结构 [#document-的结构]
Document 是由三个核心部分组成的**结构化**对象。
* 🔑 `id`:Document 的唯一字符串标识符,在 document 被写入后不可修改
* 📐 `vectors`:一组具名向量
* 🗂️ `fields`:一组具名标量 (非向量) 字段,可包含字符串、数值、布尔值或这些类型的数组
### Document 示例 [#document-示例]
这个 document 属于一个定义了如下 schema 的 collection:
1. 两个稠密向量:`vector_1`(4 维)和 `vector_2`(6 维)
2. 一个稀疏向量:`vector_3`
3. 标量字段:`category`(字符串)、`price`(整数)和 `languages`(字符串数组)
```json
{
// 这个 document 的唯一标识符
// [!code word:id]
"id": "my_doc_123",
// 一组具名向量
// [!code word:vectors]
"vectors": {
// 一个4维稠密向量,表示为列表
"vector_1": [ 0.1, 0.2, 0.3, 0.4 ],
// 一个6维稠密向量,表示为列表
"vector_2": [ -0.6, -0.5, -0.4, -0.3, -0.2, -0.1 ],
// 一个稀疏向量,表示为映射
"vector_3": { 11: 0.02, 37: 0.41, 1701: 0.13 }
},
// 一组具名标量字段
// [!code word:fields]
"fields": {
"category": "music", // 字符串字段
"price": 99, // 数值字段
"languages": [ "English", "Chinese", "Korean" ] // 数组字段
}
}
```
**所有字段必须符合 schema 中声明的类型**。向量必须匹配指定的类型(稠密或稀疏)和维度(例如,768维的向量字段不能接受512维的向量)。
Document 插入后,可以通过 [`upsert()`](../../data-operations/upsert/) 或局部 [`update()`](../../data-operations/update/) 操作进行更新,但所有修改仍必须遵守 collection schema 约束。
***
## 数据类型 [#数据类型]
Zvec 实现了强类型的 schema 系统,并使用 `DataType` 枚举,其支持的类型可分为以下两类:
1. **标量类型** — 字符串、整数、浮点数、布尔值以及这些类型的数组
2. **向量类型** — 稠密向量和稀疏向量
**数据写入阶段会执行类型安全检查**:Document 内的每个字段都必须严格符合其声明的 `DataType`。
### 标量类型 [#标量类型]
* 基础类型
| `STRING` | `BOOL` | `INT32` | `INT64` | `UINT32` | `UINT64` | `FLOAT` | `DOUBLE` |
| -------- | ------ | ------- | ------- | -------- | -------- | ------- | -------- |
* 数组类型
| `ARRAY_STRING` | `ARRAY_BOOL` | `ARRAY_INT32` | `ARRAY_INT64` | `ARRAY_UINT32` | `ARRAY_UINT64` | `ARRAY_FLOAT` | `ARRAY_DOUBLE` |
| -------------- | ------------ | ------------- | ------------- | -------------- | -------------- | ------------- | -------------- |
数组不支持混合类型或嵌套结构,所有元素均须严格匹配声明的元素类型。
### 向量类型 [#向量类型]
* [稠密向量](../vector-embedding/#稠密向量):以固定长度的数值数组表示,例如 `[0.1, -0.5, ..., 0.9]`
| `VECTOR_FP16` | `VECTOR_FP32` | `VECTOR_INT8` |
| ------------- | ------------- | ------------- |
* [稀疏向量](../vector-embedding/#稀疏向量):以整数索引到浮点值的映射表示,例如 `{ 42: 0.85, 1024: 0.13 }`
| `SPARSE_VECTOR_FP32` | `SPARSE_VECTOR_FP16` |
| -------------------- | -------------------- |
***
## 索引 [#索引]
除了基础的数据存储外,索引是实现高效数据检索的关键。在 Zvec 中:
* **向量字段:必须为其配置相应的[向量索引](../vector-index/)**,以支持相似度检索。
* **标量字段:支持可选索引** — 若标量字段将用于过滤查询(如 `WHERE category = 'music'`),则强烈建议为其建立[倒排索引](../inverted-index/)。
你可以在[创建 collection](../../collections/create/) 时,通过在 schema 中为每个标量或向量指定 `index_param` 来定义索引。\
或者,你也可以在 collection 创建好之后动态调用 [`create_index()`](../../collections/schema-evolution/#创建索引) 创建索引 — 此操作无需重新导入数据。
Python
Node.js
```python title="创建 collection"
import zvec
# 定义 collection schema,包含一个标量字段和一个向量字段,且均通过 "index_param" 配置索引。
# [!code word:index_param]
schema = zvec.CollectionSchema( # [!code highlight]
name="my_collection",
fields=[
zvec.FieldSchema(
name="price",
data_type=zvec.DataType.INT32,
index_param=zvec.InvertIndexParam(enable_range_optimization=True),
),
],
vectors=[
zvec.VectorSchema(
name="vector",
data_type=zvec.DataType.VECTOR_FP32,
dimension=256,
index_param=zvec.HnswIndexParam(metric_type=zvec.MetricType.COSINE),
),
],
)
collection = zvec.create_and_open(path="/path/to/my/collection", schema=schema) # [!code highlight]
```
```ts title="创建 collection"
import { ZVecCollectionSchema, ZVecCreateAndOpen, ZVecDataType, ZVecIndexType, ZVecMetricType } from "@zvec/zvec";
// 定义 collection schema,包含一个标量字段和一个向量字段,且均通过 "indexParams" 配置索引。
// [!code word:indexParams]
const schema = new ZVecCollectionSchema( // [!code highlight]
{
name: "my_collection",
fields: [
{
name: "price",
dataType: ZVecDataType.INT32,
indexParams: { indexType: ZVecIndexType.INVERT, enableRangeOptimization: true }
}
],
vectors: [
{
name: "vector",
dataType: ZVecDataType.VECTOR_FP32,
dimension: 256,
indexParams: { indexType: ZVecIndexType.HNSW, metricType: ZVecMetricType.COSINE }
}
],
}
);
const collection = ZVecCreateAndOpen("/path/to/my/collection", schema); // [!code highlight]
```
# 全文索引
全文索引是一种专门用于***高效的文本内容检索***的数据结构。
它将文本字段拆分为词项(Token),构建倒排映射,使得按关键词查找 Document 无需逐条扫描,结合 BM25 评分实现**按相关性排序的文本检索**。
## 何时使用全文索引 [#何时使用全文索引]
当你需要**对文本内容进行关键词检索并按相关性排序**时,应使用全文索引。它在以下场景中表现出色:
* ✅ 自然语言查询:用户输入日常用语搜索内容
* ✅ 精确短语匹配:`"向量数据库"` 匹配完整短语而非单独的词
* ✅ 布尔检索:`+机器学习 -深度学习` 指定必须包含或排除的词项
* ✅ 中文文本检索:使用 Jieba 分词器处理中文及中英混合文本
* ✅ 纯文本场景:无需向量字段即可建立全文检索 Collection
全文索引与[倒排索引](../inverted-index/)的区别:**倒排索引**用于标量字段的精确过滤(如 `status = "active"`),而**全文索引**用于文本内容的关键词检索与相关性排序。
## 工作原理 [#工作原理]
假设你有一个包含文章内容的 Collection:
| Doc ID | Content |
| ------ | --------------- |
| 1 | 机器学习模型的训练与优化 |
| 2 | 深度学习在自然语言处理中的应用 |
| 3 | 向量数据库与机器学习的结合 |
### 分词 [#1-分词]
全文索引首先通过分词器将文本拆分为 Token。以 Jieba 分词器为例:
| Doc ID | Token 列表 |
| ------ | --------------------- |
| 1 | `[机器学习, 模型, 训练, 优化]` |
| 2 | `[深度学习, 自然语言处理, 应用]` |
| 3 | `[向量, 数据库, 机器学习, 结合]` |
### Token 过滤 [#2-token-过滤]
分词后,全文索引会按配置顺序应用 Token 过滤器,例如:
* `lowercase`:将 Token 转为小写,实现大小写无关匹配。
索引构建和查询会使用同一套分词器与过滤器配置,因此需要在创建字段时确定好文本分析策略。
### 构建倒排映射 [#3-构建倒排映射]
将分词结果反转,构建从词项到 Document 列表的映射:
| 词项 | Doc IDs |
| ------ | -------- |
| 机器学习 | `[1, 3]` |
| 模型 | `[1]` |
| 训练 | `[1]` |
| 深度学习 | `[2]` |
| 自然语言处理 | `[2]` |
| 向量 | `[3]` |
| 数据库 | `[3]` |
| ... | ... |
### BM25 评分 [#4-bm25-评分]
查询"机器学习"时,全文索引直接定位到包含该词项的 Document `[1, 3]`,然后使用 [BM25](https://en.wikipedia.org/wiki/Okapi_BM25) 算法计算每个 Document 的相关性评分。
BM25 综合考虑以下因素对结果排序:
| 因素 | 影响 |
| -------------- | ----------------------------- |
| **词频(TF)** | 词项在 Document 中出现越多,评分越高(存在衰减) |
| **逆文档频率(IDF)** | 词项在整个 Collection 中越罕见,权重越高 |
| **文档长度** | 较短的 Document 中出现同一词项,评分相对更高 |
### WAND 优化 [#5-wand-优化]
当查询包含多个词项(如"机器学习 自然语言处理")时,全文索引使用 **WAND(Weak AND)** 算法优化检索性能:
1. 为每个词项预计算评分上界
2. 跳过不可能进入 top-k 结果的 Document
3. 结合 Block-Max 策略,以 128 个 Document 为一个块进行快速跳跃
这使得在大规模数据集上也能高效返回 top-k 结果,无需对所有候选 Document 完整评分。
## 分词器 [#分词器]
分词器决定了文本如何被拆分为词项,直接影响检索效果。索引和查询使用相同的分词配置。详见[分词器](../../data-operations/query/fts/#分词器)。
## 关键参数 [#关键参数]
### 索引构建参数 [#索引构建参数]
| 参数 | 说明 | 调优建议 |
| ---------------- | -------------------------- | ---------------------------------------------------------------------------------------------------------------------------------- |
| `tokenizer_name` | **分词器**,用于将文本拆分为可检索 Token | 英文或类英文文本用 `standard`;它实现了 Unicode UAX #29 词边界规则,行为类似 Elasticsearch standard tokenizer;需要保留空白切分语义时用 `whitespace`,中文或中英混合文本用 `jieba` |
| `filters` | 分词后的 **Token 过滤器**,按数组顺序执行 | 英文文本建议使用 `["lowercase", "stemmer"]`;类英文文本或包含重音符号的文本还可以加入 `ascii_folding`,以获得重音无关匹配 |
| `extra_params` | **分词器和过滤器专用 JSON 配置** | 详见各分词器和 Token 过滤器的配置说明 |
### 查询参数 [#查询参数]
| 参数 | 说明 | 调优建议 |
| -------------------------------------- | ----------------------- | ----------------------------------- |
| `match_string` / `matchString` | 由字段分词器处理的**自然语言查询文本** | 适合简单的用户输入搜索 |
| `query_string` / `queryString` | 支持短语和布尔运算符的**结构化查询表达式** | 当调用方需要显式指定必选词、排除词、分组或短语时使用 |
| `default_operator` / `defaultOperator` | 裸词之间的**默认布尔运算符** | 需要更高召回时使用 `OR`,希望每个裸词都必须匹配时使用 `AND` |
## 与向量搜索的关系 [#与向量搜索的关系]
全文索引和向量索引解决的是**不同维度**的检索需求:
| 维度 | 全文索引 | 向量索引 |
| ---- | ------------ | -------------- |
| 匹配方式 | 精确关键词匹配 | 语义相似度 |
| 输入 | 文本关键词 | 向量 Embedding |
| 排序依据 | BM25 评分 | 距离/相似度 |
| 典型场景 | "包含这些关键词的文档" | "和这段内容语义相近的文档" |
在 Zvec 中,全文检索和向量检索在**单个查询路线**中互斥:同一个 `Query` / `ZVecQuery` 不应同时设置 `fts` 和 `vector` / `id`。如需结合关键词匹配与语义检索,请使用多条查询路线配合重排序,或分别执行查询后在应用层合并结果。
## 权衡 [#权衡]
* ⚠️ **存储开销**:倒排映射、词频统计和位置信息需要额外存储空间。
* ⚠️ **写放大**:每次写操作都需要分词并更新倒排索引,增加写入延迟。
* ⚠️ **分词器依赖**:检索效果与分词质量直接相关 — 中文文本需要使用 Jieba 分词器而非 Standard 分词器。
# 概念
本节介绍 Zvec 设计与使用中的核心术语和基础概念。
# 倒排索引
倒排索引是一种专门用于***高效的基于值的搜索与检索***的数据结构。
它广泛应用于数据库系统、搜索引擎和分析平台中,用于**加速过滤操作和关键词匹配**。
## 何时使用倒排索引 [#何时使用倒排索引]
当你需要**频繁地按特定字段值进行查找**时,应使用倒排索引。它在以下场景中表现出色:
* ✅ 精确值过滤:
* `status = "active"`
* `category IN ("electronics", "books")`
* ✅ 范围查询:
* `age > 25`
* ✅ 文本模式匹配:
* 前缀匹配:`product_name LIKE "Wireless%"`
* 后缀匹配:`email LIKE "%@engineering.company.com"`
* ✅ 数组或集合成员查询:
* 包含任一:`tags CONTAIN_ANY ["sport", "music"]`
* 包含全部:`permissions CONTAIN_ALL ["read", "write"]`
## 工作原理 [#工作原理]
假设你正在整理一个食谱 Collection。每个食谱是一个 `document`,包含结构化字段 `cuisine`、`author` 和 `url`。
| Doc ID | Cuisine | Author | URL |
| ------ | ------- | ----------- | --------------------------------------------- |
| 1 | Italian | Julia Chen | `https://cooking.com/italian-pasta-carbonara` |
| 2 | Thai | Liam Tran | `https://cooking.com/thai-basil-42` |
| 3 | Mexican | Elena Gomez | `https://cooking.com/mexican-pork-chicken-65` |
| 4 | Italian | Marco Rossi | `https://cooking.com/italian-pizza-37` |
| 5 | Italian | Marco Rossi | `https://cooking.com/italian-pasta-20` |
| 6 | Chinese | Julia Chen | `https://cooking.com/chinese-spicy-hot-pot` |
常规的("正向")视角的问题是:
> Document #1 包含哪些值? → Cuisine: Italian, Author: Julia Chen
但**倒排索引将这个映射反转**。它回答的是:
> 哪些 Document 包含值 Italian? → \[1, 4, 5]
为了实现快速查找,我们对**频繁被搜索的字段**(如 `cuisine` 和 `author`)构建倒排索引。
**倒排索引:`cuisine`**
| Cuisine | Doc IDs |
| ------- | ----------- |
| Italian | `[1, 4, 5]` |
| Thai | `[2]` |
| Mexican | `[3]` |
| Chinese | `[6]` |
**倒排索引:`author`**
| Author | Doc IDs |
| ----------- | -------- |
| Julia Chen | `[1, 6]` |
| Liam Tran | `[2]` |
| Elena Gomez | `[3]` |
| Marco Rossi | `[4, 5]` |
有了这些索引,查询变得极其高效 ✨:
* "查找所有意大利菜谱" → 在 `cuisine` 索引中查找 "Italian" → `[1, 4, 5]`
* "查看 Marco Rossi 的菜谱" → 在 `author` 索引中查找 "Marco Rossi" → `[4, 5]`
* "查找 Julia Chen 的意大利菜谱" → 取交集 `[1, 4, 5]` 和 `[1, 6]` → `[1]`
我们**不对 `url` 建立索引**,因为它很少用于查询。对其建立索引会浪费存储空间并减慢写入速度,而收益甚微。一旦我们有了 Document ID,可以直接从原始数据中获取其 `url`。
## 为什么叫"倒排"? [#为什么叫倒排]
因为它将标准映射进行了反转:
| 方向 | 映射 |
| -- | ------------------- |
| 正向 | Document ID → 词项列表 |
| 倒排 | 词项 → Document ID 列表 |
这种反转使得基于关键词的搜索变得高效。无需检查每个 Document 是否包含查询词项,而是直接跳转到该词项并立即获取所有匹配的 Document。
## 权衡 [#权衡]
虽然倒排索引功能强大,但也有一定代价:
* ⚠️ **存储开销**:索引需要额外的存储空间。
* ⚠️ **写放大**:每次写操作 — `INSERT`、`UPSERT` 和 `UPDATE` — 都需要维护索引,增加了写入延迟和 I/O 负载。
# 向量
## 什么是向量? [#什么是向量]
在人工智能与向量数据库的语境下,***向量是由 embedding 模型生成的一组数字,用于捕捉非结构化数据的语义信息*** — 例如文本、图片或音频。
这些模型将原始输入映射到一个高维空间中,***使得语义相似的内容能够生成相近的向量***,从而让 AI 系统能够基于含义进行比较,而不再局限于关键词匹配。
***
## 如何在数据库中使用向量? [#如何在数据库中使用向量]
1. 🗂️ **存储**:用 embedding 模型将数据 (如文档、商品图片或用户画像) 转化为向量,并存入向量数据库。
2. 🔍 **搜索**:当收到新的查询请求时 (例如一段文本或一张图片),用相同的 embedding 模型将其转化为**查询向量**,随后使用数据库检索并返回与之最相似的向量。
借助[高效的索引机制](../vector-index/),即使在大规模数据场景下,数据库也能迅速返回相关结果。这正是语义搜索的核心:**寻找含义相同的内容,而非仅仅是文字相同的内容**。
***
## 向量如何赋能应用? [#向量如何赋能应用]
**图像搜索**就是一个绝佳的例子:
* 每张图像都会被转化为一个向量,用来捕捉其形状、色彩和物体类别等视觉特征。
* **视觉或语义上相似的图像会生成相近的向量**。
通过比较这些向量,搜索系统能够:
* ✅ **在不同照片中识别同一个人**:即使光照、姿势或表情发生变化,同一个人的照片也会生成相似的向量,这让系统能够可靠地匹配身份。
* ✅ **在电商平台中查找相似商品**:当用户拍摄一件裙子、灯具或沙发的照片时,系统会将其向量与商品库中的向量进行比对,并检索出外观或风格相似的商品。
这一切都得益于向量数据库提供的高效的向量相似度检索功能。
***
## 什么是 Embedding 模型? [#什么是-embedding-模型]
Embedding 模型是一种将原始数据转化为向量的 AI 模型 — 正如顶部[示意图](#vector-embedding-diagram)所示。
这些模型通过海量训练数据学习内在规律,确保语义相似的对象在向量空间中生成的向量彼此邻近 — 通常使用**余弦相似度**、**点积**或**欧氏距离**等距离度量来衡量。
**距离度量的选择至关重要。** 如果 embedding 模型是基于特定度量标准 (如余弦相似度) 训练的,那么在向量数据库中进行搜索时,也必须使用相同的度量标准,才能保证语义关系的准确性,从而获得最优的搜索结果。
若要探索和比较最新的 embedding 模型,你可以查看 [Hugging Face 的 Embedding 排行榜](https://huggingface.co/spaces/mteb/leaderboard),该榜单评估了数百种模型在不同任务和语言环境下的表现。
***
## 向量类型 [#向量类型]
向量主要分为两类:**稠密向量**和**稀疏向量**,它们各自以独特的方式捕捉数据特征。
### 稠密向量 [#稠密向量]
稠密向量是固定长度的实值数组,其(几乎)每一个维度都承载着语义信息。这类向量通常由深度学习模型生成,这些模型将文本、图像、音频等原始输入转化为结构化的向量空间,从而反映出它们在语义上的相似性。
```python
# 示例:神经网络模型生成的384维稠密向量
dense_vector = [ 0.012, -0.034, 0.005, 0.041, -0.022, ..., 0.018 ] # 长度 = 384
```
* **✅ 语义丰富**:能够理解上下文和深层含义 (例如,"国王 – 男人 + 女人 ≈ 皇后")
* **⚠️ 不可解释**:难以直观判断究竟是哪些特征导致了相似性
### 稀疏向量 [#稀疏向量]
稀疏向量通常是极高维的 (维度大小往往等同于词汇表大小),但其中只有极少部分维度是非零值。每一个被激活的维度都对应一个特定的词项 (如单词或 n-gram),并带有如 **BM25** 之类的相关性权重。
在这种模型下,每篇文档都会被转化为一个向量 — 称为文档向量 — 用于记录其中出现了哪些词项以及它们的重要性。同样地,搜索查询也会使用相同的加权方案转化为稀疏向量。
与精确关键词匹配不同,查询与文档之间的相似度是通过计算两者向量的点积得出的。这种方式衡量的是加权词项的匹配程度:包含了与查询相同且重要的词项的文档会获得更高的分数 — 从而同时兼顾了词项的**重叠度**和**重要性**。
```python
# 示例:基于 50,000 个词项词汇表的稀疏向量,以 {词项: 权重} 形式存储
sparse_vector = {
"puppy": 2.31,
"dog": 1.85,
"pet": 1.12,
"animal": 0.76
}
# 其余约 49,996 个维度隐式为零。
```
为了计算效率,稀疏向量使用整数索引将词项映射到词表字典中的位置,而不直接存储词项字符串。
```python
# 词表映射,包含约 50,000 个词项,以整数 ID 索引
vocab = {
"animal": 124,
"dog": 309,
"pet": 1822,
"puppy": 4017,
"cat": 5001,
"kitten": 7890,
# ...(其他词项填充字典的剩余部分)
# 总大小 ≈ 50,000
}
# 稀疏向量以 {索引: 权重} 的格式存储
sparse_vector = {
4017: 2.31, # "puppy"
309: 1.85, # "dog"
1822: 1.12, # "pet"
124: 0.76 # "animal"
}
# 其余约 49,996 个维度隐式为零。
```
* **✅ 可解释性强**:非零维度直接对应已知的词项 (例如,`4017` → "puppy")
* **⚠️ 缺乏语义理解**:除非建立明确关联,否则会将 "car" 和 "automobile" 视为互不相关的词
# 删除
Zvec 提供两种删除 [Document](../../concepts/data-modeling/#documents) 的方式。请根据场景选择合适的方法:
| 方法 | 输入 | 使用场景 |
| -------------------- | ------------------------------ | -------------------------------- |
| `delete()` | 一个或多个 Document `id` | 已知要删除的 Document 的确切 ID 时使用 |
| `delete_by_filter()` | 过滤表达式(如 `publish_year < 1900`) | 基于字段值批量删除——适用于清理符合特定条件的 Document |
删除操作是**即时**且**不可逆**的。
执行删除前请务必仔细核对输入。
***
## 按 ID 删除 [#按-id-删除]
假设你已打开 Collection 并准备好 `collection` 对象。
Python
Node.js
```python title="打开 Collection"
import zvec
collection = zvec.open(path="/path/to/example/collection") # [!code highlight]
```
```ts title="打开 Collection"
import { ZVecCollection, ZVecOpen } from "@zvec/zvec";
const collection: ZVecCollection = ZVecOpen("/path/to/example/collection"); // [!code highlight]
```
使用 `delete()` 在已知确切 ID 时删除一个或多个 Document。
Python
Node.js
```python title="按 ID 删除 Document"
# 删除单个 Document
result = collection.delete(ids="doc_id_1") # [!code highlight]
print(result) # {"code":0} 表示成功
# 批量删除多个 Document
result = collection.delete(ids=["doc_id_2", "doc_id_3"]) # [!code highlight]
print(result) # [{"code":0}, {"code":0}]
```
```ts title="按 ID 删除 Document"
// 删除单个 Document
let result = collection.deleteSync("doc_id_1"); // [!code highlight]
console.log(result); // { ok: true } 表示成功
// 批量删除多个 Document
let results = collection.deleteSync(["doc_id_2", "doc_id_3"]); // [!code highlight]
console.log(results); // [ { ok: true }, { ok: true } ]
```
* 传入单个 `id` 时,`delete()` 返回一个 `Status` 对象。
* 传入 `id` 列表时,返回相同顺序的 `Status` 对象列表。
***
## 按筛选条件删除 [#按筛选条件删除]
使用 `delete_by_filter()` 删除所有匹配布尔 `filter` 表达式的 Document。
`filter` 可以引用标量字段(如 `publish_year`、`language`),使用[比较和逻辑运算符](../query/filter/#supported-filter-syntax)。
Python
Node.js
```python title="按过滤条件删除 Document"
# 删除所有 1900 年之前出版的书
collection.delete_by_filter(filter="publish_year < 1900") # [!code highlight]
# 组合过滤条件
collection.delete_by_filter( # [!code highlight]
filter='publish_year < 1900 AND (language = "English" OR language = "Chinese")'
)
```
```ts title="按过滤条件删除 Document"
// 删除所有 1900 年之前出版的书(同步)
collection.deleteByFilterSync("publish_year < 1900"); // [!code highlight]
// 删除所有 1900 年之前出版的书(异步)
await collection.deleteByFilter("publish_year < 1900"); // [!code highlight]
// 组合过滤条件
collection.deleteByFilterSync('publish_year < 1900 AND (language = "English" OR language = "Chinese")'); // [!code highlight]
```
# 获取
使用 `fetch()` 按 `id` 获取 [Document](../../concepts/data-modeling/#documents)。
这是一个**直接查找**操作——不涉及搜索、评分或过滤。
Python
Node.js
```python title="获取 Document"
# [!code word:fetch]
# 获取单个 Document
result = collection.fetch(ids="book_1")
print(result) # { "book_1": Doc(...) }
# 获取多个 Document
result = collection.fetch(ids=["book_1", "book_2", "book_3"])
print(result) # { "book_1": Doc(...), "book_2": Doc(...), "book_3": Doc(...) }
```
```ts title="获取 Document"
// [!code word:fetchSync]
// 获取单个 Document
let result = collection.fetchSync("book_1");
console.log(result); // { "book_1": {...} }
// 获取多个 Document
let results = collection.fetchSync(["book_1", "book_2", "book_3"]);
console.log(results); // { "book_1": {...}, "book_2": {...}, "book_3": {...} }
```
* **输入**:单个 Document `id` 或 `id` 列表。
* **输出**:从每个**找到的** `id` 到对应 Document 对象的映射。
* 不存在的 `id` 会被**静默忽略**(不会抛出错误)。
* 返回的字典不保证输入顺序——请通过 `id` 访问 Document。
# 数据操作
Zvec 提供了一套完整的**数据操作方法**来管理 [Collection](../collections/) 中的 [Document](../concepts/data-modeling/#documents)。
| 操作 | 用途 |
| ----------------------- | --------------------------------------- |
| [`Insert`](./insert/) | 添加新 Document(如果 `ID` 已存在则失败) |
| [`Upsert`](./upsert/) | 插入新 Document 或按 `ID` 替换已有 Document |
| [`Update`](./update/) | 按 `ID` 修改已有 Document 的特定字段 |
| [`Delete`](./delete/) | 按 `ID` 或标量过滤条件删除 Document |
| [`Query`](./query/) | 执行向量相似度搜索或全文检索,可结合标量过滤和重排序 |
| [`Fetch`](./fetch/) | 按 `ID` 直接获取完整 Document |
| [`Iterate`](./iterate/) | 逐个流式遍历所有 Document,无需将整个 Collection 载入内存 |
所有写操作(`insert`、`upsert`、`update`、`delete`)都会立即对查询可见——支持真正的实时流式工作负载。
# 插入
使用 **`insert()`** 方法向 [Collection](../../collections/) 中添加一个或多个新的 [Document](../../concepts/data-modeling/#documents)(`Doc`)。
**性能提示**:
新向量会先缓冲以实现快速写入。为获得最佳搜索性能,建议在插入大批量 Document 后调用 [`optimize()`](../../collections/optimize/)。
***
## Document `Doc` [#document-doc]
传入 `insert()` 的每个 `Doc` 必须:
* 具有唯一的 `id`(Collection 中不能已存在)
* 提供符合 Collection [Schema](../../collections/create/schema/) 的数据:
1. **标量字段**:以键值对形式在 `fields` 中提供(标量字段名作为键)
2. **向量 Embedding**:以键值对形式在 `vectors` 中提供(向量名作为键)
* 可以省略 `nullable` 的标量字段
如果 Collection 中已存在相同 `id` 的 Document,该 Document 的插入将**失败**。
如需覆盖已有 Document 或无需检查即插入,请使用 [`upsert()`](../upsert/)。
***
## 插入单个 Document [#插入单个-document]
假设你已有一个 Collection,Schema 如下:
* 一个标量字段:`text`(字符串)
* 一个[稠密向量 Embedding](../../concepts/vector-embedding/#dense-vectors):`text_embedding`(4 维 FP32 向量)
4 维向量仅用于演示——实际 Embedding 通常维度更大。
你已打开 Collection 并准备好 `collection` 对象。
Python
Node.js
```python title="打开 Collection"
import zvec
collection_schema = zvec.CollectionSchema( # [!code highlight]
name="example_collection",
fields=[
zvec.FieldSchema(
name="text",
data_type=zvec.DataType.STRING,
index_param=zvec.InvertIndexParam(enable_range_optimization=False),
),
],
vectors=[
zvec.VectorSchema(
name="text_embedding",
data_type=zvec.DataType.VECTOR_FP32,
dimension=4,
index_param=zvec.HnswIndexParam(metric_type=zvec.MetricType.COSINE),
),
],
)
collection = zvec.open(path="/path/to/example/collection") # [!code highlight]
```
```ts title="打开 Collection"
import { ZVecCollection, ZVecCollectionSchema, ZVecDataType, ZVecIndexType, ZVecMetricType, ZVecOpen } from "@zvec/zvec";
const collectionSchema: ZVecCollectionSchema = new ZVecCollectionSchema({ // [!code highlight]
name: "example_collection",
fields: [
{
name: "text",
dataType: ZVecDataType.STRING,
indexParams: {
indexType: ZVecIndexType.INVERT,
enableRangeOptimization: false
}
}
],
vectors: [
{
name: "text_embedding",
dataType: ZVecDataType.VECTOR_FP32,
dimension: 4,
indexParams: {
indexType: ZVecIndexType.HNSW,
metricType: ZVecMetricType.COSINE
}
}
]
});
const collection: ZVecCollection = ZVecOpen("/path/to/example/collection"); // [!code highlight]
```
按如下方式插入 Document:
Python
Node.js
```python title="插入 Document"
import zvec
# 创建 Document
doc = zvec.Doc( # [!code highlight]
id="text_1", # ← 必须唯一
vectors={
"text_embedding": [0.1, 0.2, 0.3, 0.4], # ← 必须匹配向量名
# ↑ 浮点数列表;长度 = 维度 (4)
},
fields={
"text": "This is a sample text.", # ← 必须匹配标量字段名
},
)
# 插入 Document
result = collection.insert(doc) # [!code highlight]
print(result) # {"code": 0} 表示成功
```
```ts title="插入 Document"
import { ZVecCollection, ZVecDocInput, ZVecOpen } from "@zvec/zvec";
// 创建 Document
let doc: ZVecDocInput = { // [!code highlight]
id: "text_1", // ← 必须唯一
vectors: {
"text_embedding": [0.1, 0.2, 0.3, 0.4] // ← 必须匹配向量名
// ↑ 浮点数列表;长度 = 维度 (4)
},
fields: {
"text": "This is a sample text." // ← 必须匹配标量字段名
}
};
// 插入 Document
let result = collection.insertSync(doc); // [!code highlight]
console.log(result); // { ok: true } 表示成功
```
`insert()` 方法会先验证 Document:
* **错误用法**——如未知字段或向量维度不匹配——**会抛出错误**。
* **如果验证通过**,方法执行插入并返回 `Status` 对象,指示成功或失败(如重复 `ID`、磁盘空间不足)。
成功插入的 Document 立即可查询 🚀。
***
## 批量插入 Document [#批量插入-document]
传入 `Doc` 对象列表即可一次插入多个 Document。
每个 `Doc` 独立处理,方法返回 `Status` 对象列表——每个 Document 对应一个。
Python
Node.js
```python title="批量插入 Document"
import zvec
result = collection.insert( # [!code highlight]
[
zvec.Doc(
id="text_1",
vectors={"text_embedding": [0.1, 0.2, 0.3, 0.4]},
fields={"text": "This is a sample text."},
),
zvec.Doc(
id="text_2",
vectors={"text_embedding": [0.4, 0.3, 0.2, 0.1]},
fields={"text": "This is another sample text."},
),
zvec.Doc(
id="text_3",
vectors={"text_embedding": [-0.1, -0.2, -0.3, -0.4]},
fields={"text": "One more sample text."},
),
]
)
print(result) # [{"code":0}, {"code":0}, {"code":0}]
```
```ts title="批量插入 Document"
let result = collection.insertSync([ // [!code highlight]
{
id: "text_1",
vectors: { "text_embedding": [0.1, 0.2, 0.3, 0.4] },
fields: { "text": "This is a sample text." },
},
{
id: "text_2",
vectors: { "text_embedding": [0.4, 0.3, 0.2, 0.1] },
fields: { "text": "This is another sample text." },
},
{
id: "text_3",
vectors: { "text_embedding": [-0.1, -0.2, -0.3, -0.4] },
fields: { "text": "One more sample text." },
}
]);
console.log(result); // [ { ok: true }, { ok: true }, { ok: true } ]
```
如果批量中任何 Document 存在错误用法(如未知字段或向量维度不匹配),方法将抛出异常且**不会插入任何 Document**。
如果所有 Document 验证通过,方法会尝试逐一插入。某个 Document 失败(如 `id` 重复)**不会**阻止其他 Document 的插入。
🔍 **请始终检查结果列表中每个 `Status`。**
***
## 插入包含稀疏向量的 Document [#插入包含稀疏向量的-document]
假设你的 Collection 包含一个名为 `sparse_embedding` 的[稀疏向量](../../concepts/vector-embedding/#sparse-vectors)。
Python
Node.js
```python title="打开 Collection"
import zvec
collection_schema = zvec.CollectionSchema( # [!code highlight]
name="example_collection",
vectors=[
zvec.VectorSchema(
name="sparse_embedding",
data_type=zvec.DataType.SPARSE_VECTOR_FP32,
index_param=zvec.HnswIndexParam(metric_type=zvec.MetricType.IP),
),
],
)
collection = zvec.open(path="/path/to/example/collection") # [!code highlight]
```
```ts title="打开 Collection"
import { ZVecCollection, ZVecCollectionSchema, ZVecDataType, ZVecIndexType, ZVecMetricType, ZVecOpen } from "@zvec/zvec";
const collectionSchema: ZVecCollectionSchema = new ZVecCollectionSchema({ // [!code highlight]
name: "example_collection",
vectors: [
{
name: "sparse_embedding",
dataType: ZVecDataType.SPARSE_VECTOR_FP32,
indexParams: { indexType: ZVecIndexType.HNSW, metricType: ZVecMetricType.IP }
}
]
});
const collection: ZVecCollection = ZVecOpen("/path/to/example/collection"); // [!code highlight]
```
按如下方式插入包含稀疏向量的 Document:
Python
Node.js
```python title="插入包含稀疏向量的 Document"
import zvec
result = collection.insert( # [!code highlight]
zvec.Doc(
id="text_1",
vectors={
"sparse_embedding": {
42: 1.25, # ← 维度 42 的权重为 1.25
1337: 0.8, # ← 维度 1337 的权重为 0.8
2999: 0.63, # ← 维度 2999 的权重为 0.63
}
},
)
)
print(result) # {"code":0}
```
```ts title="插入包含稀疏向量的 Document"
let result = collection.insertSync({ // [!code highlight]
id: "text_1",
vectors: {
"sparse_embedding": {
42: 1.25, // ← 维度 42 的权重为 1.25
1337: 0.8, // ← 维度 1337 的权重为 0.8
2999: 0.63 // ← 维度 2999 的权重为 0.63
}
}
});
console.log(result); // { ok: true }
```
稀疏向量以`维度索引`(整数)到`值`(浮点数)的映射表示。
**没有固定的维度大小**——只需包含非零维度。
***
## 插入包含多个字段和向量的 Document [#插入包含多个字段和向量的-document]
实际应用中通常需要包含多个标量字段和向量 Embedding 的 Collection。在此示例中,假设你的 Collection 包含以下 Schema:
* **标量字段**:
1. `book_title`(字符串)
2. `category`(字符串数组)
3. `publish_year`(32 位整数)
* **向量 Embedding**:
1. `dense_embedding`:768 维稠密向量
2. `sparse_embedding`:稀疏向量
Python
Node.js
```python title="打开 Collection"
import zvec
collection_schema = zvec.CollectionSchema( # [!code highlight]
name="example_collection",
fields=[
zvec.FieldSchema(
name="book_title",
data_type=zvec.DataType.STRING,
index_param=zvec.InvertIndexParam(enable_range_optimization=False),
),
zvec.FieldSchema(
name="category",
data_type=zvec.DataType.ARRAY_STRING,
),
zvec.FieldSchema(
name="publish_year",
data_type=zvec.DataType.INT32,
index_param=zvec.InvertIndexParam(enable_range_optimization=True),
),
],
vectors=[
zvec.VectorSchema(
name="dense_embedding",
data_type=zvec.DataType.VECTOR_FP32,
dimension=768,
index_param=zvec.HnswIndexParam(metric_type=zvec.MetricType.COSINE),
),
zvec.VectorSchema(
name="sparse_embedding",
data_type=zvec.DataType.SPARSE_VECTOR_FP32,
index_param=zvec.HnswIndexParam(metric_type=zvec.MetricType.IP),
),
],
)
collection = zvec.open(path="/path/to/example/collection") # [!code highlight]
```
```ts title="打开 Collection"
import { ZVecCollection, ZVecCollectionSchema, ZVecDataType, ZVecIndexType, ZVecMetricType, ZVecOpen } from "@zvec/zvec";
const collectionSchema: ZVecCollectionSchema = new ZVecCollectionSchema({ // [!code highlight]
name: "example_collection",
fields: [
{
name: "book_title",
dataType: ZVecDataType.STRING,
indexParams: { indexType: ZVecIndexType.INVERT, enableRangeOptimization: false }
},
{
name: "category",
dataType: ZVecDataType.ARRAY_STRING
},
{
name: "publish_year",
dataType: ZVecDataType.INT32,
indexParams: { indexType: ZVecIndexType.INVERT, enableRangeOptimization: true }
}
],
vectors: [
{
name: "dense_embedding",
dataType: ZVecDataType.VECTOR_FP32,
dimension: 768,
indexParams: { indexType: ZVecIndexType.HNSW, metricType: ZVecMetricType.COSINE }
},
{
name: "sparse_embedding",
dataType: ZVecDataType.SPARSE_VECTOR_FP32,
indexParams: { indexType: ZVecIndexType.HNSW, metricType: ZVecMetricType.IP }
}
]
});
const collection: ZVecCollection = ZVecOpen("/path/to/example/collection"); // [!code highlight]
```
按如下方式插入包含多个字段和向量的 Document:
Python
Node.js
```python title="插入包含多个字段和向量的 Document"
import zvec
# 创建 Document
doc = zvec.Doc( # [!code highlight]
id="book_1",
vectors={
"dense_embedding": [0.1 for _ in range(768)], # ← 实际使用时替换为真实 Embedding
"sparse_embedding": {42: 1.25, 1337: 0.8, 1999: 0.64}, # ← 实际使用时替换为真实 Embedding
},
fields={
"book_title": "Gone with the Wind", # ← 字符串
"category": ["Romance", "Classic Literature"], # ← 字符串数组
"publish_year": 1936, # ← 整数
},
)
# 插入 Document
result = collection.insert(doc) # [!code highlight]
print(result) # {"code": 0} 表示成功
```
```ts title="插入包含多个字段和向量的 Document"
// 创建 Document
let doc: ZVecDocInput = { // [!code highlight]
id: "book_1",
vectors: {
"dense_embedding": Array(768).fill(0.1), // ← 实际使用时替换为真实 Embedding
"sparse_embedding": { 42: 1.25, 1337: 0.8, 1999: 0.64 } // ← 实际使用时替换为真实 Embedding
},
fields: {
"book_title": "Gone with the Wind", // ← 字符串
"category": ["Romance", "Classic Literature"], // ← 字符串数组
"publish_year": 1936 // ← 整数
}
};
// 插入 Document
let result = collection.insertSync(doc); // [!code highlight]
console.log(result); // { ok: true } 表示成功
```
# 遍历
使用 **`iter_docs()`** 逐个流式遍历 [Collection](../../collections/) 中的**所有** [Document](../../concepts/data-modeling/#documents)。
与按已知 `id` 获取 Document 的 [`fetch()`](../fetch/) 不同,迭代器执行**全量扫描**。Document 以有界窗口分批流式读取,因此不会将整个 Collection 一次性载入内存,适合导出、备份、迁移或离线处理等场景。
Python
Node.js
```python title="遍历所有 Document"
# [!code word:iter_docs]
with collection.iter_docs() as docs:
for doc in docs:
print(doc.id, doc.fields, doc.vectors)
```
```ts title="遍历所有 Document"
// [!code word:iterDocsSync]
for (const doc of collection.iterDocsSync()) {
console.log(doc.id, doc.fields, doc.vectors);
}
```
迭代器在 Collection 上持有一个原生资源槽位,因此交给语言自身来关闭它:Python 的 `with` 语句和 JavaScript 的 `for...of` 循环,都会在循环正常结束、提前 break 或抛出异常时释放迭代器。迭代器在被完全遍历耗尽时也会自动关闭。
***
## 选择字段与向量 [#选择字段与向量]
默认情况下,每个 Document 的所有标量字段和所有向量都会被读取。可以使用 `output_fields` 和 `include_vector` 减少读取的数据量:
* **`output_fields`**(`outputFields`):要返回的标量字段名列表。不传时返回所有标量字段;传入空列表则不返回任何标量字段。未知或重复的字段名会报错。
* **`include_vector`**(`includeVector`):是否读取向量数据。默认读取向量;如果只需要标量字段,将其关闭可以加快遍历速度。
Python
Node.js
```python title="选择输出字段并排除向量"
with collection.iter_docs( # [!code highlight]
output_fields=["book_title", "publish_year"],
include_vector=False,
) as docs:
for doc in docs:
print(doc.id, doc.field("book_title"), doc.field("publish_year"))
```
```ts title="选择输出字段并排除向量"
for (const doc of collection.iterDocsSync({ // [!code highlight]
outputFields: ["book_title", "publish_year"],
includeVector: false
})) {
console.log(doc.id, doc.fields.book_title, doc.fields.publish_year);
}
```
***
## 快照语义 [#快照语义]
`iter_docs()` 与 `iterDocsSync()` 遍历的都是**调用时刻创建的隔离快照**:
* 迭代器创建**之后**写入的数据(`insert`、`upsert`、`update`)对该迭代器**不可见**。
* 创建之后的删除不影响遍历;创建快照时已被删除的 Document 会被过滤掉。
* 对于可写 Collection,创建迭代器可能会封存(seal)当前写入段(每次调用都可能产生一个新的小段);只读 Collection 则直接扫描,不写入任何数据。
* 遍历顺序未定义——它**不是**插入顺序,且在 [`optimize()`](../../collections/optimize/) 重组段之后可能改变,因此切勿依赖它。
***
## 并发行为 [#并发行为]
当 Collection 上有迭代器处于打开状态时,以下操作会**报错**:
* Schema 变更——创建或删除索引,以及新增、修改、删除列
* [`optimize()`](../../collections/optimize/),它会在启动时立即失败
* `close()` 或 `destroy()` Collection
反之,当上述某个维护操作正在运行时,创建迭代器同样会失败。写入、`flush()`、`query()` 与 `fetch()` 均**不受影响**。
关闭 Collection 之前,请先关闭所有迭代器;所有迭代器关闭后,上述限制立即解除。
***
## 提前结束遍历 [#提前结束遍历]
提前停止是安全的——退出 `with` 块或 `for...of` 循环即会释放迭代器占用的槽位。如果你手动驱动迭代器,则需自行关闭:
Python
Node.js
```python title="提前结束遍历"
with collection.iter_docs() as docs:
for doc in docs:
if doc.field("publish_year") == 1936:
print("found:", doc.id)
break # with 块在此处关闭迭代器
```
```ts title="提前结束遍历"
for (const doc of collection.iterDocsSync()) {
if (doc.fields.publish_year === 1936) {
console.log("found:", doc.id);
break; // for...of 在此处关闭迭代器
}
}
// 手动驱动迭代器时,需自行关闭
const docs = collection.iterDocsSync();
const first = docs.next();
if (!first.done) console.log("first:", first.value.id);
docs.closeSync(); // [!code highlight]
```
# Update
使用 `update()` 修改**已有的** [Document](../../concepts/data-modeling/#documents)(`Doc`)。
只有你**明确提供的**标量字段和向量 Embedding 会被更新;其他内容保持不变。
该方法接受单个 `Doc` 对象或 `Doc` 对象列表。
***
## Document `Doc` [#document-doc]
传入 `update()` 的每个 `Doc` 必须:
* 指定一个 Collection 中**已存在**的 `id`(如果 Document 不存在,操作将失败)
* 仅包含你**打算更新的**字段和向量,格式须符合 Collection 的 [Schema](../../collections/create/schema/):
1. **标量字段**:以键值对形式在 `fields` 中提供(标量字段名作为键)
2. **向量 Embedding**:以键值对形式在 `vectors` 中提供(向量名作为键)
* 省略不需要更改的标量字段或向量——它们将保持不变。
***
## 更新单个 Document [#更新单个-document]
假设你已有一个 Collection,Schema 如下:
* **标量字段**:
1. `book_title`(字符串)
2. `category`(字符串数组)
3. `publish_year`(32 位整数)
* **向量 Embedding**:
1. `dense_embedding`:768 维稠密向量
2. `sparse_embedding`:稀疏向量
Python
Node.js
```python title="打开 Collection"
import zvec
collection_schema = zvec.CollectionSchema( # [!code highlight]
name="example_collection",
fields=[
zvec.FieldSchema(
name="book_title",
data_type=zvec.DataType.STRING,
index_param=zvec.InvertIndexParam(enable_range_optimization=False),
),
zvec.FieldSchema(
name="category",
data_type=zvec.DataType.ARRAY_STRING,
),
zvec.FieldSchema(
name="publish_year",
data_type=zvec.DataType.INT32,
index_param=zvec.InvertIndexParam(enable_range_optimization=True),
),
],
vectors=[
zvec.VectorSchema(
name="dense_embedding",
data_type=zvec.DataType.VECTOR_FP32,
dimension=768,
index_param=zvec.HnswIndexParam(metric_type=zvec.MetricType.COSINE),
),
zvec.VectorSchema(
name="sparse_embedding",
data_type=zvec.DataType.SPARSE_VECTOR_FP32,
index_param=zvec.HnswIndexParam(metric_type=zvec.MetricType.IP),
),
],
)
collection = zvec.open(path="/path/to/example/collection") # [!code highlight]
```
```ts title="打开 Collection"
import { ZVecCollection, ZVecCollectionSchema, ZVecDataType, ZVecIndexType, ZVecMetricType, ZVecOpen } from "@zvec/zvec";
const collectionSchema: ZVecCollectionSchema = new ZVecCollectionSchema({ // [!code highlight]
name: "example_collection",
fields: [
{
name: "book_title",
dataType: ZVecDataType.STRING,
indexParams: { indexType: ZVecIndexType.INVERT, enableRangeOptimization: false }
},
{
name: "category",
dataType: ZVecDataType.ARRAY_STRING
},
{
name: "publish_year",
dataType: ZVecDataType.INT32,
indexParams: { indexType: ZVecIndexType.INVERT, enableRangeOptimization: true }
}
],
vectors: [
{
name: "dense_embedding",
dataType: ZVecDataType.VECTOR_FP32,
dimension: 768,
indexParams: { indexType: ZVecIndexType.HNSW, metricType: ZVecMetricType.COSINE }
},
{
name: "sparse_embedding",
dataType: ZVecDataType.SPARSE_VECTOR_FP32,
indexParams: { indexType: ZVecIndexType.HNSW, metricType: ZVecMetricType.IP }
}
]
});
const collection: ZVecCollection = ZVecOpen("/path/to/example/collection"); // [!code highlight]
```
要更新已有 Document,提供其 `id` 以及要更改的字段或向量:
Python
Node.js
```python title="更新 Document"
import zvec
doc = zvec.Doc( # [!code highlight]
id="book_1", # ← 必须已存在于 Collection 中
vectors={
"sparse_embedding": { # ← 替换整个稀疏向量
35: 0.25,
237: 0.1,
369: 0.44,
},
},
fields={
"category": [ # ← 替换当前分类列表
"Romance",
"Classic Literature",
"American Civil War",
],
},
# 注意:`book_title`、`publish_year` 和 `dense_embedding` 被省略 → 保持不变
)
# 更新 Document
result = collection.update(doc) # [!code highlight]
print(result) # {"code": 0} 表示成功
```
```ts title="更新 Document"
let doc: ZVecDocInput = { // [!code highlight]
id: "book_1", // ← 必须已存在于 Collection 中
vectors: {
"sparse_embedding": { // ← 替换整个稀疏向量
35: 0.25,
237: 0.1,
369: 0.44
}
},
fields: {
"category": [ // ← 替换当前分类列表
"Romance",
"Classic Literature",
"American Civil War"
]
}
// 注意:`book_title`、`publish_year` 和 `dense_embedding` 被省略 → 保持不变
};
// 更新 Document
let result = collection.updateSync(doc); // [!code highlight]
console.log(result); // { ok: true } 表示成功
```
`update()` 方法会先验证 Document:
* **错误用法**——如未知字段或向量维度不匹配——**会抛出错误**。
* **如果验证通过**,方法执行更新并返回 `Status` 对象,指示成功或失败(如 `ID` 不存在)。
成功更新的 Document 立即可查询 🚀。
***
## 批量更新 Document [#批量更新-document]
传入 `Doc` 对象列表即可一次更新多个 Document。
每个 `Doc` 独立处理,方法返回 `Status` 对象列表——每个 Document 对应一个。
Python
Node.js
```python title="批量更新 Document"
import zvec
results = collection.update( # [!code highlight]
[
zvec.Doc(
id="book_1",
vectors={
"sparse_embedding": {35: 0.25, 237: 0.1, 369: 0.44},
},
fields={
"category": ["Romance", "Classic Literature", "American Civil War"],
},
),
zvec.Doc(
id="book_2",
fields={
"book_title": "The Great Gatsby",
},
),
zvec.Doc(
id="book_3",
fields={
"book_title": "A Tale of Two Cities",
"publish_year": 1859,
},
),
]
)
print(results) # [{"code":0}, {"code":0}, {"code":0}]
```
```ts title="批量更新 Document"
let result = collection.updateSync([ // [!code highlight]
{
id: "book_1",
vectors: { "sparse_embedding": { 35: 0.25, 237: 0.1, 369: 0.44 } },
fields: { "category": ["Romance", "Classic Literature", "American Civil War"] }
},
{
id: "book_2",
fields: { "book_title": "The Great Gatsby" }
},
{
id: "book_3",
fields: {
"book_title": "A Tale of Two Cities",
"publish_year": 1859
}
}
]);
console.log(result); // [ { ok: true }, { ok: true }, { ok: true } ]
```
如果批量中任何 Document 存在错误用法(如未知字段或向量维度不匹配),方法将抛出异常且**不会更新任何 Document**。
如果所有 Document 验证通过,方法会尝试逐一更新。某个 Document 失败(如 `id` 不存在)**不会**阻止其他 Document 的更新。
🔍 **请始终检查结果列表中每个 `Status`。**
# Upsert
`upsert()` 的用法与 `insert()` 类似——向 [Collection](../../collections/) 中添加一个或多个新的 [Document](../../concepts/data-modeling/#documents)(`Doc`)。
关键区别在于,如果已存在相同 `id` 的 Document,它将被**覆盖**。
* 如果你希望覆盖已有 Document(或不介意替换),使用 `upsert()`。
* 如果你希望避免意外覆盖——使用 `insert()`,当相同 id 的 Document 已存在时会失败。
**性能提示**:
新向量会先缓冲以实现快速写入。为获得最佳搜索性能,建议在 upsert 大批量 Document 后调用 [`optimize()`](../../collections/optimize/)。
***
## Document `Doc` [#document-doc]
传入 `upsert()` 的每个 `Doc` 必须:
* 具有 `id`(如果已存在相同 `id` 的 Document,将被替换)
* 提供符合 Collection [Schema](../../collections/create/schema/#define-a-collection-schema) 的数据:
1. **标量字段**:以键值对形式在 `fields` 中提供(标量字段名作为键)
2. **向量 Embedding**:以键值对形式在 `vectors` 中提供(向量名作为键)
* 可以省略 `nullable` 的标量字段
***
## Upsert 单个 Document [#upsert-单个-document]
假设你已有一个 Collection,Schema 如下:
* 一个标量字段:`text`(字符串)
* 一个[稠密向量 Embedding](../../concepts/vector-embedding/#dense-vectors):`text_embedding`(4 维 FP32 向量)
4 维向量仅用于演示——实际 Embedding 通常维度更大。
你已打开 Collection 并准备好 `collection` 对象。
Python
Node.js
```python title="打开 Collection"
import zvec
collection_schema = zvec.CollectionSchema( # [!code highlight]
name="example_collection",
fields=[
zvec.FieldSchema(
name="text",
data_type=zvec.DataType.STRING,
index_param=zvec.InvertIndexParam(enable_range_optimization=False),
),
],
vectors=[
zvec.VectorSchema(
name="text_embedding",
data_type=zvec.DataType.VECTOR_FP32,
dimension=4,
index_param=zvec.HnswIndexParam(metric_type=zvec.MetricType.COSINE),
),
],
)
collection = zvec.open(path="/path/to/example/collection") # [!code highlight]
```
```ts title="打开 Collection"
import { ZVecCollection, ZVecCollectionSchema, ZVecDataType, ZVecIndexType, ZVecMetricType, ZVecOpen } from "@zvec/zvec";
const collectionSchema: ZVecCollectionSchema = new ZVecCollectionSchema({ // [!code highlight]
name: "example_collection",
fields: [
{
name: "text",
dataType: ZVecDataType.STRING,
indexParams: {
indexType: ZVecIndexType.INVERT,
enableRangeOptimization: false
}
}
],
vectors: [
{
name: "text_embedding",
dataType: ZVecDataType.VECTOR_FP32,
dimension: 4,
indexParams: {
indexType: ZVecIndexType.HNSW,
metricType: ZVecMetricType.COSINE
}
}
]
});
const collection: ZVecCollection = ZVecOpen("/path/to/example/collection"); // [!code highlight]
```
按如下方式 upsert Document:
Python
Node.js
```python title="Upsert Document"
import zvec
# 创建 Document
doc = zvec.Doc( # [!code highlight]
id="text_1", # ← 必须唯一
vectors={
"text_embedding": [0.1, 0.2, 0.3, 0.4], # ← 必须匹配向量名
# ↑ 浮点数列表;长度 = 维度 (4)
},
fields={
"text": "This is a sample text.", # ← 必须匹配标量字段名
},
)
# Upsert Document
result = collection.upsert(doc) # [!code highlight]
print(result) # {"code": 0} 表示成功
```
```ts title="Upsert Document"
import { ZVecCollection, ZVecDocInput, ZVecOpen } from "@zvec/zvec";
// 创建 Document
let doc: ZVecDocInput = { // [!code highlight]
id: "text_1", // ← 必须唯一
vectors: {
"text_embedding": [0.1, 0.2, 0.3, 0.4] // ← 必须匹配向量名
// ↑ 浮点数列表;长度 = 维度 (4)
},
fields: {
"text": "This is a sample text." // ← 必须匹配标量字段名
}
};
// Upsert Document
let result = collection.upsertSync(doc); // [!code highlight]
console.log(result); // { ok: true } 表示成功
```
`upsert()` 方法会先验证 Document:
* **错误用法**——如未知字段或向量维度不匹配——**会抛出错误**。
* **如果验证通过**,方法执行 upsert 并返回 `Status` 对象,指示成功或失败(如磁盘空间不足)。
成功 upsert 的 Document 立即可查询 🚀。
***
## 批量 Upsert Document [#批量-upsert-document]
传入 `Doc` 对象列表即可一次 upsert 多个 Document。
每个 `Doc` 独立处理,方法返回 `Status` 对象列表——每个 Document 对应一个。
Python
Node.js
```python title="批量 Upsert Document"
import zvec
result = collection.upsert( # [!code highlight]
[
zvec.Doc(
id="text_1",
vectors={"text_embedding": [0.1, 0.2, 0.3, 0.4]},
fields={"text": "This is a sample text."},
),
zvec.Doc(
id="text_2",
vectors={"text_embedding": [0.4, 0.3, 0.2, 0.1]},
fields={"text": "This is another sample text."},
),
zvec.Doc(
id="text_3",
vectors={"text_embedding": [-0.1, -0.2, -0.3, -0.4]},
fields={"text": "One more sample text."},
),
]
)
print(result) # [{"code":0}, {"code":0}, {"code":0}]
```
```ts title="批量 Upsert Document"
let result = collection.upsertSync([ // [!code highlight]
{
id: "text_1",
vectors: { "text_embedding": [0.1, 0.2, 0.3, 0.4] },
fields: { "text": "This is a sample text." },
},
{
id: "text_2",
vectors: { "text_embedding": [0.4, 0.3, 0.2, 0.1] },
fields: { "text": "This is another sample text." },
},
{
id: "text_3",
vectors: { "text_embedding": [-0.1, -0.2, -0.3, -0.4] },
fields: { "text": "One more sample text." },
}
]);
console.log(result); // [ { ok: true }, { ok: true }, { ok: true } ]
```
如果批量中任何 Document 存在错误用法(如未知字段或向量维度不匹配),方法将抛出异常且**不会 upsert 任何 Document**。
如果所有 Document 验证通过,方法会尝试逐一 upsert。某个 Document 失败(如磁盘空间不足)**不会**阻止其他 Document 的 upsert。
🔍 **请始终检查结果列表中每个 `Status`。**
***
## Upsert 包含稀疏向量的 Document [#upsert-包含稀疏向量的-document]
假设你的 Collection 包含一个名为 `sparse_embedding` 的[稀疏向量](../../concepts/vector-embedding/#sparse-vectors)。
Python
Node.js
```python title="打开 Collection"
import zvec
collection_schema = zvec.CollectionSchema( # [!code highlight]
name="example_collection",
vectors=[
zvec.VectorSchema(
name="sparse_embedding",
data_type=zvec.DataType.SPARSE_VECTOR_FP32,
index_param=zvec.HnswIndexParam(metric_type=zvec.MetricType.IP),
),
],
)
collection = zvec.open(path="/path/to/example/collection") # [!code highlight]
```
```ts title="打开 Collection"
import { ZVecCollection, ZVecCollectionSchema, ZVecDataType, ZVecIndexType, ZVecMetricType, ZVecOpen } from "@zvec/zvec";
const collectionSchema: ZVecCollectionSchema = new ZVecCollectionSchema({ // [!code highlight]
name: "example_collection",
vectors: [
{
name: "sparse_embedding",
dataType: ZVecDataType.SPARSE_VECTOR_FP32,
indexParams: { indexType: ZVecIndexType.HNSW, metricType: ZVecMetricType.IP }
}
]
});
const collection: ZVecCollection = ZVecOpen("/path/to/example/collection"); // [!code highlight]
```
按如下方式 upsert 包含稀疏向量的 Document:
Python
Node.js
```python title="Upsert 包含稀疏向量的 Document"
import zvec
result = collection.upsert( # [!code highlight]
zvec.Doc(
id="text_1",
vectors={
"sparse_embedding": {
42: 1.25, # ← 维度 42 的权重为 1.25
1337: 0.8, # ← 维度 1337 的权重为 0.8
2999: 0.63, # ← 维度 2999 的权重为 0.63
}
},
)
)
print(result) # {"code":0}
```
```ts title="Upsert 包含稀疏向量的 Document"
let result = collection.upsertSync({ // [!code highlight]
id: "text_1",
vectors: {
"sparse_embedding": {
42: 1.25, // ← 维度 42 的权重为 1.25
1337: 0.8, // ← 维度 1337 的权重为 0.8
2999: 0.63 // ← 维度 2999 的权重为 0.63
}
}
});
console.log(result); // { ok: true }
```
稀疏向量以`维度索引`(整数)到`值`(浮点数)的映射表示。
**没有固定的维度大小**——只需包含非零维度。
***
## Upsert 包含多个字段和向量的 Document [#upsert-包含多个字段和向量的-document]
实际应用中通常需要包含多个标量字段和向量 Embedding 的 Collection。在此示例中,假设你的 Collection 包含以下 Schema:
* **标量字段**:
1. `book_title`(字符串)
2. `category`(字符串数组)
3. `publish_year`(32 位整数)
* **向量 Embedding**:
1. `dense_embedding`:768 维稠密向量
2. `sparse_embedding`:稀疏向量
Python
Node.js
```python title="打开 Collection"
import zvec
collection_schema = zvec.CollectionSchema( # [!code highlight]
name="example_collection",
fields=[
zvec.FieldSchema(
name="book_title",
data_type=zvec.DataType.STRING,
index_param=zvec.InvertIndexParam(enable_range_optimization=False),
),
zvec.FieldSchema(
name="category",
data_type=zvec.DataType.ARRAY_STRING,
),
zvec.FieldSchema(
name="publish_year",
data_type=zvec.DataType.INT32,
index_param=zvec.InvertIndexParam(enable_range_optimization=True),
),
],
vectors=[
zvec.VectorSchema(
name="dense_embedding",
data_type=zvec.DataType.VECTOR_FP32,
dimension=768,
index_param=zvec.HnswIndexParam(metric_type=zvec.MetricType.COSINE),
),
zvec.VectorSchema(
name="sparse_embedding",
data_type=zvec.DataType.SPARSE_VECTOR_FP32,
index_param=zvec.HnswIndexParam(metric_type=zvec.MetricType.IP),
),
],
)
collection = zvec.open(path="/path/to/example/collection") # [!code highlight]
```
```ts title="打开 Collection"
import { ZVecCollection, ZVecCollectionSchema, ZVecDataType, ZVecIndexType, ZVecMetricType, ZVecOpen } from "@zvec/zvec";
const collectionSchema: ZVecCollectionSchema = new ZVecCollectionSchema({ // [!code highlight]
name: "example_collection",
fields: [
{
name: "book_title",
dataType: ZVecDataType.STRING,
indexParams: { indexType: ZVecIndexType.INVERT, enableRangeOptimization: false }
},
{
name: "category",
dataType: ZVecDataType.ARRAY_STRING
},
{
name: "publish_year",
dataType: ZVecDataType.INT32,
indexParams: { indexType: ZVecIndexType.INVERT, enableRangeOptimization: true }
}
],
vectors: [
{
name: "dense_embedding",
dataType: ZVecDataType.VECTOR_FP32,
dimension: 768,
indexParams: { indexType: ZVecIndexType.HNSW, metricType: ZVecMetricType.COSINE }
},
{
name: "sparse_embedding",
dataType: ZVecDataType.SPARSE_VECTOR_FP32,
indexParams: { indexType: ZVecIndexType.HNSW, metricType: ZVecMetricType.IP }
}
]
});
const collection: ZVecCollection = ZVecOpen("/path/to/example/collection"); // [!code highlight]
```
按如下方式 upsert 包含多个字段和向量的 Document:
Python
Node.js
```python title="Upsert 包含多个字段和向量的 Document"
import zvec
# 创建 Document
doc = zvec.Doc( # [!code highlight]
id="book_1",
vectors={
"dense_embedding": [0.1 for _ in range(768)], # ← 实际使用时替换为真实 Embedding
"sparse_embedding": {42: 1.25, 1337: 0.8, 1999: 0.64}, # ← 实际使用时替换为真实 Embedding
},
fields={
"book_title": "Gone with the Wind", # ← 字符串
"category": ["Romance", "Classic Literature"], # ← 字符串数组
"publish_year": 1936, # ← 整数
},
)
# Upsert Document
result = collection.upsert(doc) # [!code highlight]
print(result) # {"code": 0} 表示成功
```
```ts title="Upsert 包含多个字段和向量的 Document"
// 创建 Document
let doc: ZVecDocInput = { // [!code highlight]
id: "book_1",
vectors: {
"dense_embedding": Array(768).fill(0.1), // ← 实际使用时替换为真实 Embedding
"sparse_embedding": { 42: 1.25, 1337: 0.8, 1999: 0.64 } // ← 实际使用时替换为真实 Embedding
},
fields: {
"book_title": "Gone with the Wind", // ← 字符串
"category": ["Romance", "Classic Literature"], // ← 字符串数组
"publish_year": 1936 // ← 整数
}
};
// Upsert Document
let result = collection.upsertSync(doc); // [!code highlight]
console.log(result); // { ok: true } 表示成功
```
# 创建
## 创建并打开 Collection [#创建并打开-collection]
要在 Zvec 中创建一个新的 collection,需要定义以下内容:
1. **Schema** — 数据的结构定义,用于指定标量和向量字段。
2. **Collection 选项** (可选) — 控制 Collection 的运行时行为 (如只读模式)。
定义完成后,调用 `create_and_open()` 即可在指定路径初始化新 collection,并返回一个可用于插入和查询的 `Collection` 对象。
如果指定路径下已存在 collection,`create_and_open()` 将抛出错误以防止意外覆盖。
Python
Node.js
```python title="创建并打开 collection"
import zvec
# [!code word:CollectionSchema]
# [!code word:CollectionOption]
# 定义 collection schema
collection_schema = zvec.CollectionSchema(
name="example_collection",
fields=[
zvec.FieldSchema(
name="string_field_example",
data_type=zvec.DataType.STRING,
nullable=True,
index_param=zvec.InvertIndexParam(enable_range_optimization=False),
),
],
vectors=[
zvec.VectorSchema(
name="dense_vector_example",
data_type=zvec.DataType.VECTOR_FP32,
dimension=768,
index_param=zvec.HnswIndexParam(metric_type=zvec.MetricType.COSINE),
),
],
)
# 创建并打开 collection
collection = zvec.create_and_open( # [!code highlight]
path="/path/to/my/collection",
schema=collection_schema,
option=zvec.CollectionOption(read_only=False, enable_mmap=True),
)
```
```ts title="创建并打开 collection"
import { ZVecCollectionSchema, ZVecCreateAndOpen, ZVecDataType, ZVecIndexType, ZVecMetricType } from "@zvec/zvec";
// [!code word:ZVecCollectionSchema]
// 定义 collection schema
const collectionSchema = new ZVecCollectionSchema({
name: "example_collection",
fields: [
{
name: "string_field_example",
dataType: ZVecDataType.STRING,
nullable: true,
indexParams: { indexType: ZVecIndexType.INVERT, enableRangeOptimization: false }
}
],
vectors: [
{
name: "dense_vector_example",
dataType: ZVecDataType.VECTOR_FP32,
dimension: 768,
indexParams: { indexType: ZVecIndexType.HNSW, metricType: ZVecMetricType.COSINE }
}
]
});
// 创建并打开 collection
const collection = ZVecCreateAndOpen( // [!code highlight]
"/path/to/my/collection",
collectionSchema,
{ readOnly: false, enableMMAP: true } // [!code highlight]
);
```
***
## 实战示例:🛒 商品搜索 [#实战示例-商品搜索]
如下 schema 建模了一个**多模态商品搜索系统**,结合视觉、文本和结构化元数据实现丰富的检索功能:
### 🗂️ 标量字段:用于过滤和展示 [#️-标量字段用于过滤和展示]
* `category` (字符串数组,启用索引):支持类似 `category CONTAIN_ANY ("electronics", "headphones")` 的查询,用于查找属于“电子产品”或“耳机” (或两者皆是) 的商品。
* `price` (整数,启用索引并带有范围优化):支持快速范围查询,如 `price > 100`。
* `in_stock`(布尔值,启用索引):支持按库存状态过滤 (例如“仅显示有货商品”)。
* `image_url` 和 `description` 仅存储但**不启用索引**,因为它们仅用于展示。
### 📐 向量:用于语义相关性检索 [#-向量用于语义相关性检索]
* 两个稠密向量捕获语义信息:
* `image_vec`:用商品图片生成的512维向量 (如来自视觉模型)。
* `description_vec`:用商品文字描述生成的768维向量 (如来自语言嵌入模型),启用量化存储。
* 一个稀疏向量 `keywords_sparse` 用于关键词匹配,支持混合稀疏-稠密检索。
Python
Node.js
```python title="创建 collection"
import zvec
collection_schema = zvec.CollectionSchema( # [!code highlight]
name="product_search",
fields=[ # [!code highlight]
zvec.FieldSchema(
name="image_url",
data_type=zvec.DataType.STRING, # 不用于过滤,因此不启用索引
nullable=True, # 允许为空
),
zvec.FieldSchema(
name="description",
data_type=zvec.DataType.STRING, # 不用于过滤,因此不启用索引
),
zvec.FieldSchema(
name="category",
data_type=zvec.DataType.ARRAY_STRING,
# 启用倒排索引,用于数组成员查询
index_param=zvec.InvertIndexParam(),
),
zvec.FieldSchema(
name="price",
data_type=zvec.DataType.INT32,
# 开启范围查询优化, 例如 price > 100
index_param=zvec.InvertIndexParam(enable_range_optimization=True),
),
zvec.FieldSchema(
name="in_stock",
data_type=zvec.DataType.BOOL,
# 启用倒排索引,用于布尔值查询
index_param=zvec.InvertIndexParam(),
),
],
vectors=[ # [!code highlight]
# 稠密向量:由商品图片生成
zvec.VectorSchema(
name="image_vec",
data_type=zvec.DataType.VECTOR_FP32,
dimension=512,
# 使用 HNSW 索引,度量方式为余弦距离
index_param=zvec.HnswIndexParam(metric_type=zvec.MetricType.COSINE),
),
# 稠密向量:由商品文字描述生成
zvec.VectorSchema(
name="description_vec",
data_type=zvec.DataType.VECTOR_FP32,
dimension=768,
# 启用量化以加速相似度检索
index_param=zvec.HnswIndexParam(metric_type=zvec.MetricType.COSINE, quantize_type=zvec.QuantizeType.INT8),
),
# 稀疏向量:由商品标签关键字生成
zvec.VectorSchema(
name="keywords_sparse",
data_type=zvec.DataType.SPARSE_VECTOR_FP32,
# 使用 HNSW 索引,度量方式为内积
index_param=zvec.HnswIndexParam(metric_type=zvec.MetricType.IP),
),
],
)
collection = zvec.create_and_open( # [!code highlight]
path="path/to/collection",
schema=collection_schema,
option=zvec.CollectionOption(read_only=False, enable_mmap=True),
)
```
```ts title="创建 collection"
import { ZVecCollection, ZVecCollectionSchema, ZVecCreateAndOpen, ZVecDataType, ZVecIndexType, ZVecMetricType, ZVecQuantizeType } from "@zvec/zvec";
const collectionSchema = new ZVecCollectionSchema({ // [!code highlight]
name: "product_search",
fields: [ // [!code highlight]
{
name: "image_url",
dataType: ZVecDataType.STRING, // 不用于过滤,因此不启用索引
nullable: true // 允许为空
},
{
name: "description",
dataType: ZVecDataType.STRING // 不用于过滤,因此不启用索引
},
{
name: "category",
dataType: ZVecDataType.ARRAY_STRING,
// 启用倒排索引,用于数组成员查询
indexParams: { indexType: ZVecIndexType.INVERT }
},
{
name: "price",
dataType: ZVecDataType.INT32,
// 开启范围查询优化, 例如 price > 100
indexParams: { indexType: ZVecIndexType.INVERT, enableRangeOptimization: true }
},
{
name: "in_stock",
dataType: ZVecDataType.BOOL,
// 启用倒排索引,用于布尔值查询
indexParams: { indexType: ZVecIndexType.INVERT }
}
],
vectors: [ // [!code highlight]
{ // 稠密向量:由商品图片生成
name: "image_vec",
dataType: ZVecDataType.VECTOR_FP32,
dimension: 512,
// 使用 HNSW 索引,度量方式为余弦距离
indexParams: { indexType: ZVecIndexType.HNSW, metricType: ZVecMetricType.COSINE }
},
{ // 稠密向量:由商品文字描述生成
name: "description_vec",
dataType: ZVecDataType.VECTOR_FP32,
dimension: 768,
// 启用量化以加速相似度检索
indexParams: { indexType: ZVecIndexType.HNSW, metricType: ZVecMetricType.COSINE, quantizeType: ZVecQuantizeType.INT8 }
},
{ // 稀疏向量:由商品标签关键字生成
name: "keywords_sparse",
dataType: ZVecDataType.SPARSE_VECTOR_FP32,
// 使用 HNSW 索引,度量方式为内积
indexParams: { indexType: ZVecIndexType.HNSW, metricType: ZVecMetricType.IP }
}
]
});
const collection: ZVecCollection = ZVecCreateAndOpen( // [!code highlight]
"path/to/collection",
collectionSchema,
{ readOnly: false, enableMMAP: true }
);
```
# 选项
`CollectionOption` 让用户在创建或打开一个 collection 时,对它的运行时行为进行精确控制:
* `read_only`:以只读模式打开 collection。在此模式下,任何尝试写入数据的操作均会触发错误异常。
**注意**:使用 `create_and_open()` 时,`read_only` 必须设为 `False`。这是因为 collection 的创建过程需要创建并写入文件。
* `enable_mmap`:启用内存映射 I/O 以实现更高效的数据访问 (默认为 `True`)。该机制通过略微增加内存缓存的占用,来换取显著的性能提升。
Python
Node.js
```python title="Collection 选项"
import zvec
# [!code word:CollectionOption]
collection_option = zvec.CollectionOption(read_only=False, enable_mmap=True)
```
```ts title="Collection 选项"
import { ZVecCollectionOptions } from "@zvec/zvec";
// [!code word:ZVecCollectionOptions]
const collectionOptions: ZVecCollectionOptions = { readOnly: false, enableMMAP: true };
```
# Schema
**Collection Schema** `CollectionSchema` 定义了插入到 collection 中的每个 [document](../../../concepts/data-modeling/#documents) 必须遵循的结构。
Zvec 的 schema 是**动态的**:你可以随时添加或删除标量和向量字段,而无需重建 collection。
`CollectionSchema` 包含三个部分:
1. `name`:collection 的标识符。
2. `fields`:标量字段列表。
3. `vectors`:向量字段列表。
## Collection 名称 [#collection-名称-step]
Collection 标识符。此名称用于内部引用和日志记录。
## 标量字段 [#标量字段-step]
标量字段存储非向量(即结构化)数据,如字符串、数字、布尔值或数组。
每个字段通过 `FieldSchema` 定义,包含以下属性:
1. `name`:字段在 collection 中的唯一字符串标识符。
2. [`data_type`](../../../concepts/data-modeling/#标量类型):存储的数据类型 — 如 `STRING`、`INT64` 或数组类型 `ARRAY_STRING`。
3. `nullable` (可选):是否允许该字段为**空值** (默认为 `False`)。
4. `index_param` (可选):通过 `InvertIndexParam` 创建[倒排索引](../../../concepts/inverted-index/)实现快速过滤,或通过 `FtsIndexParam` 创建[全文索引](../../../concepts/fts-index/)实现全文检索。
请为需要检索的标量字段添加索引。未索引的字段能节省存储和写入开销。
对于**倒排索引** (`InvertIndexParam`),还可以选择性地开启一些能提升性能 (但会增加存储成本) 的功能:
* `enable_range_optimization=True` → 加速范围查询 (如 `price > 100`)
* `enable_extended_wildcard=True` → 支持复杂的字符串模式匹配 (如 `name LIKE 'abc%def'`)
对于**全文索引** (`FtsIndexParam`),需要配置分词器和 Token 过滤器。详见[全文检索](../../../data-operations/query/fts/#定义全文检索字段)。
Python
Node.js
```python title="定义带倒排索引的标量字段"
import zvec
# [!code word:InvertIndexParam]
field_schema = zvec.FieldSchema( # [!code highlight]
name="string_field_example",
data_type=zvec.DataType.STRING,
nullable=True,
# 启用快速过滤;支持范围查询但未进行优化
index_param=zvec.InvertIndexParam(enable_range_optimization=False),
)
```
```ts title="定义带倒排索引的标量字段"
import { ZVecDataType, ZVecFieldSchema, ZVecIndexType } from "@zvec/zvec";
const fieldSchema: ZVecFieldSchema = { // [!code highlight]
name: "string_field_example",
dataType: ZVecDataType.STRING,
nullable: true,
// [!code word:INVERT]
// 启用快速过滤;支持范围查询但未进行优化
indexParams: { indexType: ZVecIndexType.INVERT, enableRangeOptimization: false }
};
```
Python
Node.js
```python title="定义带全文索引的字段"
import zvec
# [!code word:FtsIndexParam]
fts_field = zvec.FieldSchema( # [!code highlight]
name="content",
data_type=zvec.DataType.STRING,
nullable=False,
index_param=zvec.FtsIndexParam( # [!code highlight]
tokenizer_name="jieba",
),
)
```
```ts title="定义带全文索引的字段"
import { ZVecDataType, ZVecFieldSchema, ZVecIndexType } from "@zvec/zvec";
const ftsField: ZVecFieldSchema = { // [!code highlight]
name: "content",
dataType: ZVecDataType.STRING,
nullable: false,
// [!code word:FTS]
indexParams: {
indexType: ZVecIndexType.FTS,
tokenizerName: "jieba"
}
};
```
## 向量(Embedding) [#向量embeddingstep]
使用 `VectorSchema` 定义向量字段,包含以下属性:
1. `name`:向量在 collection 中的唯一字符串标识符。
2. [`data_type`](../../../concepts/data-modeling/#向量类型):向量的数值格式。
* [稠密向量](../../../concepts/vector-embedding/#稠密向量):`VECTOR_FP32`、`VECTOR_FP16` 等。
* [稀疏向量](../../../concepts/vector-embedding/#稀疏向量):`SPARSE_VECTOR_FP32`、`SPARSE_VECTOR_FP16`。
3. `dimension`:向量维度 (稠密向量必填项)。
4. `index_param`:用于配置向量索引的类型及相似度度量标准。
### 选择向量索引类型 [#选择向量索引类型]
`index_param` 让你能够灵活配置合适的索引策略:
* `metric_type`:`COSINE`、`L2` 或 `IP`(内积) — *请务必确保你选择的度量方式与 embedding 模型训练方式保持一致!*
* [`quantize_type`](../../../concepts/vector-index/quantization/) (可选):对向量进行压缩,以减小索引体积并加速检索 (会有轻微的 [recall](../../../concepts/vector-index/#recall衡量近似检索精度) 损失)。
* [`quantizer_param`](../../../concepts/vector-index/quantization/) (可选):量化器的附加参数,例如 `enable_rotate` (通过随机旋转减小量化recall损失)。
使用 `FlatIndexParam()` 配置 Flat 索引。
Python
Node.js
```python title="定义向量 embedding"
import zvec
vector_schema = zvec.VectorSchema( # [!code highlight]
name="dense_vector_example",
data_type=zvec.DataType.VECTOR_FP32,
dimension=768,
# [!code word:FlatIndexParam]
index_param=zvec.FlatIndexParam(metric_type=zvec.MetricType.COSINE),
)
```
```ts title="定义向量 embedding"
import { ZVecDataType, ZVecIndexType, ZVecMetricType, ZVecVectorSchema } from "@zvec/zvec";
const vectorSchema: ZVecVectorSchema = { // [!code highlight]
name: "dense_vector_example",
dataType: ZVecDataType.VECTOR_FP32,
dimension: 768,
// [!code word:FLAT]
indexParams: { indexType: ZVecIndexType.FLAT, metricType: ZVecMetricType.COSINE }
};
```
使用 [`HnswIndexParam()`](../../../concepts/vector-index/hnsw-index/#索引构建参数) 配置 HNSW 索引。
Python
Node.js
```python title="定义向量 embedding"
import zvec
vector_schema = zvec.VectorSchema( # [!code highlight]
name="dense_vector_example",
data_type=zvec.DataType.VECTOR_FP32,
dimension=768,
# [!code word:HnswIndexParam]
index_param=zvec.HnswIndexParam(
metric_type=zvec.MetricType.COSINE,
ef_construction=700,
quantize_type=zvec.QuantizeType.INT8,
quantizer_param=zvec.QuantizerParam(enable_rotate=True),
),
)
```
```ts title="定义向量 embedding"
import {
ZVecDataType,
ZVecIndexType,
ZVecMetricType,
ZVecQuantizeType,
ZVecVectorSchema,
} from "@zvec/zvec";
const vectorSchema: ZVecVectorSchema = { // [!code highlight]
name: "dense_vector_example",
dataType: ZVecDataType.VECTOR_FP32,
dimension: 768,
// [!code word:HNSW]
indexParams: {
indexType: ZVecIndexType.HNSW,
metricType: ZVecMetricType.COSINE,
efConstruction: 700,
quantizeType: ZVecQuantizeType.INT8,
quantizerParams: { enableRotate: true },
},
};
```
使用 [`HnswRabitqIndexParam()`](../../../concepts/vector-index/hnsw-rabitq-index/#索引构建参数) 配置 HNSW-RaBitQ 索引。该索引结合了 HNSW 图导航和 RaBitQ 量化,可降低内存使用。
HNSW-RaBitQ 仅在支持 AVX2 或 AVX512 的 **Linux x86\_64** 平台上可用。Zvec 会自动选择最佳运行时。
Python
Node.js
```python title="定义向量 embedding"
import zvec
vector_schema = zvec.VectorSchema( # [!code highlight]
name="dense_vector_example",
data_type=zvec.DataType.VECTOR_FP32,
dimension=768,
# [!code word:HnswRabitqIndexParam]
index_param=zvec.HnswRabitqIndexParam(
metric_type=zvec.MetricType.COSINE,
total_bits=7,
num_clusters=64,
),
)
```
```ts title="定义向量 embedding"
import { ZVecDataType, ZVecIndexType, ZVecMetricType, ZVecVectorSchema } from "@zvec/zvec";
const vectorSchema: ZVecVectorSchema = { // [!code highlight]
name: "dense_vector_example",
dataType: ZVecDataType.VECTOR_FP32,
dimension: 768,
// [!code word:HNSW_RABITQ]
indexParams: {
indexType: ZVecIndexType.HNSW_RABITQ,
metricType: ZVecMetricType.COSINE,
totalBits: 7,
numClusters: 64
}
};
```
使用 [`IVFIndexParam()`](../../../concepts/vector-index/ivf-index/#索引构建参数) 配置 IVF 索引。
Python
Node.js
```python title="定义向量 embedding"
import zvec
vector_schema = zvec.VectorSchema( # [!code highlight]
name="dense_vector_example",
data_type=zvec.DataType.VECTOR_FP32,
dimension=768,
# [!code word:IVFIndexParam]
index_param=zvec.IVFIndexParam(metric_type=zvec.MetricType.COSINE, n_list=1000),
)
```
```ts title="定义向量 embedding"
import { ZVecDataType, ZVecIndexType, ZVecMetricType, ZVecVectorSchema } from "@zvec/zvec";
const vectorSchema: ZVecVectorSchema = { // [!code highlight]
name: "dense_vector_example",
dataType: ZVecDataType.VECTOR_FP32,
dimension: 768,
// [!code word:IVF]
indexParams: { indexType: ZVecIndexType.IVF, metricType: ZVecMetricType.COSINE, nList: 1000 }
};
```
使用 [`IvfRabitqIndexParam()`](../../../concepts/vector-index/ivf-rabitq-index/#索引构建参数) 配置 IVF-RaBitQ 索引。该索引使用 IVF 缩小扫描范围,并使用 RaBitQ 压缩列表内的向量。
IVF-RaBitQ 仅在支持 AVX2 或 AVX512 的 **Linux x86\_64** 平台上可用。Zvec 会自动选择最佳运行时。
Python
Node.js
```python title="定义向量 embedding"
import zvec
vector_schema = zvec.VectorSchema( # [!code highlight]
name="dense_vector_example",
data_type=zvec.DataType.VECTOR_FP32,
dimension=768,
# [!code word:IvfRabitqIndexParam]
index_param=zvec.IvfRabitqIndexParam(
metric_type=zvec.MetricType.COSINE,
nlist=1024,
total_bits=7,
sample_count=0,
),
)
```
```ts title="定义向量 embedding"
import { ZVecDataType, ZVecIndexType, ZVecMetricType, ZVecVectorSchema } from "@zvec/zvec";
const vectorSchema: ZVecVectorSchema = { // [!code highlight]
name: "dense_vector_example",
dataType: ZVecDataType.VECTOR_FP32,
dimension: 768,
// [!code word:IVF_RABITQ]
indexParams: {
indexType: ZVecIndexType.IVF_RABITQ,
metricType: ZVecMetricType.COSINE,
nList: 1024,
totalBits: 7,
sampleCount: 0,
},
};
```
使用 [`DiskAnnIndexParam()`](../../../concepts/vector-index/diskann-index/#索引构建参数) 配置 DiskANN 索引。
Python
Node.js
```python title="定义向量 embedding"
import zvec
vector_schema = zvec.VectorSchema( # [!code highlight]
name="dense_vector_example",
data_type=zvec.DataType.VECTOR_FP32,
dimension=768,
# [!code word:DiskAnnIndexParam]
index_param=zvec.DiskAnnIndexParam(
metric_type=zvec.MetricType.COSINE,
max_degree=64,
list_size=100,
pq_chunk_num=96,
),
)
```
```ts title="定义向量 embedding"
import { ZVecDataType, ZVecIndexType, ZVecMetricType, ZVecVectorSchema } from "@zvec/zvec";
const vectorSchema: ZVecVectorSchema = { // [!code highlight]
name: "dense_vector_example",
dataType: ZVecDataType.VECTOR_FP32,
dimension: 768,
// [!code word:DISKANN]
indexParams: {
indexType: ZVecIndexType.DISKANN,
metricType: ZVecMetricType.COSINE,
maxDegree: 64,
listSize: 100,
pqChunkNum: 96
}
};
```
## 完整 Schema 示例 [#完整-schema-示例]
Python
Node.js
```python title="定义 collection schema"
import zvec
collection_schema = zvec.CollectionSchema( # [!code highlight]
name="example_collection",
fields=[ # [!code highlight]
zvec.FieldSchema(
name="string_field_example",
data_type=zvec.DataType.STRING,
nullable=True,
index_param=zvec.InvertIndexParam(enable_range_optimization=False),
),
],
vectors=[ # [!code highlight]
zvec.VectorSchema(
name="dense_vector_example",
data_type=zvec.DataType.VECTOR_FP32,
dimension=768,
index_param=zvec.HnswIndexParam(metric_type=zvec.MetricType.COSINE),
),
],
)
```
```ts title="定义 collection schema"
import { ZVecCollectionSchema, ZVecDataType, ZVecIndexType, ZVecMetricType } from "@zvec/zvec";
const collectionSchema: ZVecCollectionSchema = new ZVecCollectionSchema({ // [!code highlight]
name: "example_collection",
fields: [ // [!code highlight]
{
name: "string_field_example",
dataType: ZVecDataType.STRING,
nullable: true,
indexParams: { indexType: ZVecIndexType.INVERT, enableRangeOptimization: false }
}
],
vectors: [ // [!code highlight]
{
name: "dense_vector_example",
dataType: ZVecDataType.VECTOR_FP32,
dimension: 768,
indexParams: { indexType: ZVecIndexType.HNSW, metricType: ZVecMetricType.COSINE }
}
]
});
```
# DiskANN 索引
一种基于磁盘的图索引,专为**十亿级**向量搜索设计 — 将压缩向量保存在内存中,全精度向量存储在磁盘上,实现高 Recall 的近似最近邻搜索,同时**大幅降低内存占用**。
DiskANN 由 Subramanya 等人在 NeurIPS 2019 论文 [DiskANN: Fast Accurate Billion-point Nearest Neighbor Search on a Single Node](https://proceedings.neurips.cc/paper_files/paper/2019/hash/09853c7fb1d3f8ee67a61b6bf4a7f8e6-Abstract.html) 中提出。
**平台支持**:DiskANN 目前**仅支持 Linux** 平台。
**`libaio` 为可选依赖。** 如果系统已安装 `libaio`,DiskANN 会使用 Linux 异步 I/O 以获得更好的性能;如果未安装,DiskANN 仍可通过备用 I/O 路径正常运行,但查询性能可能略低。
不过,由于查询路径涉及磁盘 I/O,DiskANN 的 **QPS 低于纯内存索引**(如 [HNSW](../hnsw-index/)),因此更适合对吞吐和延迟不敏感、但需要在受限内存下处理超大规模数据的场景。
## 工作原理 [#工作原理]
DiskANN 在完整数据集上构建 [Vamana 图](https://proceedings.neurips.cc/paper_files/paper/2019/file/09853c7fb1d3f8ee67a61b6bf4a7f8e6-Paper.pdf),并将其与原始向量一起存储在磁盘上。搜索时,仅 PQ(乘积量化)压缩编码驻留在内存中,图和全精度向量按需从磁盘读取。
* **Vamana 图用于导航** 🪜
* 单层图结构,每个节点最多连接 `max_degree` 个邻居。
* 图的构建采用贪心搜索-剪枝策略,通过 **alpha 参数**鼓励长距离边,实现快速收敛到查询点的邻域。
* **中心点**(medoid,距数据集质心最近的点)作为每次搜索的固定入口。
* **乘积量化(PQ)用于距离估计** 🔍
* 向量空间被划分为 `pq_chunk_num` 个子空间,每个子向量被量化为 256 个质心的码本(8-bit PQ 编码)。
* 查询时,预先计算查询向量的 **PQ 距离查找表**,通过快速表查找而非全精度运算来计算候选点的近似距离。
* **带缓存的束搜索** 🔎
* 搜索从中心点开始,使用**束搜索**(beam search)策略探索图 — 多个前沿节点通过批量磁盘 I/O 并发扩展。
* 入口点附近的高频访问节点被缓存在内存中(**BFS 层级缓存**),减少热点区域的磁盘读取。
* 对于每个访问的节点,使用 PQ 编码计算近似距离,并从磁盘读取全精度向量为 top-k 候选结果计算精确距离。
## 何时使用 DiskANN 索引? [#何时使用-diskann-索引]
* ✅ **无法完全装入内存**的十亿级数据集
* ✅ 对成本敏感、需要最小化内存消耗的部署场景
* ✅ 可以容忍相比内存索引稍高延迟的批处理工作负载和离线分析
**最佳实践**:当数据集远超可用内存时使用 DiskANN。它以仅与 PQ 编码成比例的内存消耗提供出色的 Recall。如果数据集可以装入内存,建议使用 [HNSW](../hnsw-index/) 或 [HNSW-RaBitQ](../hnsw-rabitq-index/) 以获得更低延迟。
## 优势 [#优势]
1. ✨ **极低的内存占用** — 仅 PQ 压缩编码(每向量每 chunk 1 字节)驻留内存,使十亿级搜索在普通硬件上成为可能
2. ✨ **高 Recall** — Vamana 图通过基于 alpha 的剪枝保持连通性和多样性,最终候选结果重新计算精确距离
3. ✨ **可扩展的图构建** — 采用简单的贪心插入-剪枝算法,可跨线程并行化
## 权衡 [#权衡]
1. ⚠️ **较高的查询延迟** — 每次搜索需要磁盘 I/O 进行图遍历,比纯内存索引(如 HNSW)慢
2. ⚠️ **构建时 PQ 训练开销** — 索引构建前需要基于 KMeans 的 PQ 训练步骤,增加总构建时间
3. ⚠️ **不适合实时工作负载** — 磁盘访问延迟意味着 DiskANN 更适合面向可容忍延迟或 QPS 要求相对低的场景
## 关键参数 [#关键参数]
**调参建议**:
从默认值开始。先调整查询时的 `list_size` 来权衡 Recall 和延迟。仅在需要更好 Recall 时增加 `max_degree` — 但预期会增加磁盘占用和构建时间。如果需要进一步降低内存且可接受稍低 Recall,可减少 `pq_chunk_num`。
### 索引构建参数 [#索引构建参数]
| 参数 | 描述 | 调参指南 |
| -------------- | ----------------------------------- | -------------------------------------------------------------------------------- |
| `metric_type` | 用于比较向量的**相似度度量** | 根据 Embedding 模型的训练方式选择 |
| `max_degree` | **每个节点的最大邻居数** — Vamana 图中每个节点的最大边数 | • 更大的 `max_degree` →
✨ 更好的 Recall 和图连通性
⚠️ 更多磁盘占用和更长的构建时间 |
| `list_size` | **构建时候选列表大小** — 插入新向量时图构建过程中考虑的候选数量 | • 更大的 `list_size` →
✨ 更好的图质量和更高的 Recall
⚠️ 更长的索引构建时间 |
| `pq_chunk_num` | **PQ 子空间数量** — 控制向量维度如何划分以进行乘积量化 | • 更多 chunk →
✨ 更精细的距离近似和更好的 Recall
⚠️ PQ 编码占用更多内存(每向量每 chunk 1 字节) |
### 索引查询参数 [#索引查询参数]
| 参数 | 描述 | 调参指南 |
| ----------- | ------------------------------ | ------------------------------------------------------------------- |
| `list_size` | **查询时候选列表大小** — 束搜索图遍历时维护的候选数量 | • 更大的 `list_size` →
✨ 更高的 Recall
⚠️ 更多磁盘 I/O 和更高的查询延迟 |
# Flat 索引
## 工作原理 [#工作原理]
通过将查询向量与数据集中的所有向量逐一比对,实现精确相似性检索 (暴力检索)。
## 何时使用 Flat 索引 [#何时使用-flat-索引]
* ✅ 小规模数据集
* ✅ 原型设计与实验阶段
* ✅ 作为评估基准
* ✅ 对召回率要求 100% 且不可妥协的场景
**最佳实践**:在开发和测试阶段,建议先使用 Flat 索引 — 把它当作你的正确性基准。一旦方案验证通过,再考虑使用近似索引 (如 [HNSW](../hnsw-index/)) 来获得生产级别的性能。对于数据量极小 (比如30万条向量的规模) 且正确性优于速度的场景,Flat Index 也是一个完全可行的选择。
## 优势 [#优势]
1. ✨ **完美 Recall 保证** — 能找到真正的最近邻
2. ✨ **零配置** — 简单设置,无需调参
3. ✨ **即时索引** — 构建时间几乎为零
## 局限 [#局限]
⚠️ 搜索延迟随数据量大小呈线性增长 — 这意味着它难以支撑大规模的工作负载。
# HNSW 索引
## 工作原理 [#工作原理]
[HNSW](https://arxiv.org/abs/1603.09320) 构建了一个**多层图结构**,其中每个节点代表一个向量,节点间的边则根据相似度建立连接。
* 层级化的多层布局 🪜
* **上层**:结构稀疏且节点较少,充当“高速公路”,用于实现快速的长距离导航。
* **下层**:结构稠密且包含更多节点,提供细粒度的局部邻域连接。
* 搜索过程(从粗粒度到细粒度)🔍
1. 从顶层的**入口节点**开始。
2. 在当前层,以贪心策略走向距离查询向量更近的邻居节点,直到无法再接近为止。
3. 然后在该位置**下降一层**,并重复同样的贪心搜索的过程。
4. 在**最底层**,以更精细的搜索策略执行该过程 (使用候选集列表),以得到更准确的结果。
* **为什么 HNSW 既快又准** ⚡ 🎯
* **快**:上层结构可以快速跳转到目标区域,无需遍历绝大多数节点。
* **准**:底层结构稠密,能对局部邻域进行精细化搜索,从而保证高召回率。
## 何时使用 HNSW 索引? [#何时使用-hnsw-索引]
* ✅ 实时、低延迟应用 (如对话式 AI 和实时推荐系统)
* ✅ 需要在极低延迟下保持高召回率的生产系统
**最佳实践**:HNSW 是我们针对大多数生产环境**推荐的首选方案**。它在速度、准确性和稳定性之间取得了极佳的平衡。
## 优势 [#优势]
1. ✨ **近似于对数级的查询时间** — 对于大型数据集,通常能达到 **O(log n)** 的效率
2. ✨ 具备极强的适应性,在多种数据分布下**均能维持高召回率**
3. ✨ 索引**构建速度比许多替代方案都要快** (如基于 [IVF](../ivf-index/) 的方法)
## 权衡 [#权衡]
1. ⚠️ **内存占用较高** — 图结构的连接关系需要额外的存储空间 (随 [`m`](#索引构建参数) 增长)
2. ⚠️ **索引构建时间复杂度为 O(n log n)** — 构建时间比 [Flat 索引](../flat-index/)慢 (但通常比 [IVF](../ivf-index/) 快)
## 关键参数 [#关键参数]
**调参建议**:先从默认值开始,然后优先调整 `ef` 来平衡召回率和延迟。只有在必要时,才增加 `ef_construction` 或 `m` 来提升精度 — 这会降低索引构建的速度并增加内存使用。
### 索引构建参数 [#索引构建参数]
| 参数 | 描述 | 调参指南 |
| ----------------- | ----------------------------------------- | ------------------------------------------------------------------------------ |
| `metric_type` | 用于比较向量的**相似度度量** | 根据 Embedding 模型的训练方式选择 |
| `m` | **每个节点的最大邻居数** — 构建图过程中为每个节点创建的最大双向连接数量 | • 更大的 `m` →
✨ 召回率更高,图连通性更好
⚠️ 内存占用更多,索引和检索的延迟都会增加 |
| `ef_construction` | **构建索引时的候选池大小** — 决定了算法在插入新向量时会考察多少个邻居候选项 | • 更大的 `ef_construction` →
✨ 图的质量更好,召回率更高
⚠️ 索引构建时间更长 (*不影响查询速度*) |
| `quantize_type` | 向量**量化**方式
默认不开启量化 | 详见[量化](../quantization/) |
### 索引查询参数 [#索引查询参数]
| 参数 | 描述 | 调参指南 |
| ------------------ | ----------------------------------------------------------------- | ------------------------------------------------------------------------------------------------------------------------------------- |
| `ef` | **查询时的候选池大小** — 决定了在图遍历过程中每一步会探索多少个潜在邻居 | • 更大的 `ef` →
✨ 召回率更高
⚠️ 查询延迟也会增加
💡 如果发现 `ef=300` 时搜不到想要的结果,不妨试着调到 `500` 或甚至更高,以此来扩大搜索范围。 |
| `radius` | **距离(相似度)阈值**,用于范围过滤 — 只有满足该阈值的 documents 才会被返回 | 示例:
• 使用内积 `MetricType.IP` 时,设置 `radius=0.6` 仅保留分数 > 0.6 的结果
✅ 适用于:想要剔除掉低质量匹配的结果
🚫 不适用于:必须返回全部 top-K 个结果,不关心分数质量 |
| `is_linear` | 强制使用**暴力线性检索** (不使用配置的索引) | 🐌 大数据集下非常慢!
✅ 仅用于:调试、超小数据集或验证索引准确性 |
| `is_using_refiner` | 对头部候选结果**启用精排** (重新计算精确的相似度分数) — 在开启了**量化**的场景下有帮助,能挽回精度损失,提高召回质量 | ✅ 在启用量化的场景下,如需得到更高精度时开启精排
⚠️ 注意:因为要重新精确计算分数,所以会增加查询延迟 |
# HNSW-RaBitQ 索引
一种先进的基于图的索引,将 [HNSW](../hnsw-index/) 图结构与 [RaBitQ](https://arxiv.org/abs/2405.12497) 量化算法相结合 — 在保持一流搜索质量的同时**大幅降低内存使用**。
**平台要求**:HNSW-RaBitQ 目前仅支持 **Linux x86\_64**,CPU 需要支持 **AVX2 或 AVX512**。Zvec 会自动选择最佳运行时。
## 工作原理 [#工作原理]
HNSW-RaBitQ 结合两项技术实现高 Recall 和低内存占用:
* **HNSW 图用于导航** 🪜
* 与标准 [HNSW 索引](../hnsw-index/)相同的多层图结构 — 上层稀疏用于快速远距离跳转,下层密集用于细粒度局部搜索。
* **RaBitQ 用于距离估计** 🔍
* RaBitQ 先对向量进行**随机旋转**,然后将其转换为**二进制编码**(0 和 1)。这种方法允许系统通过高效的位运算来估计距离,与处理全精度数值相比,显著**降低了内存使用和计算成本**。
## 何时使用 HNSW-RaBitQ? [#何时使用-hnsw-rabitq]
* ✅ 需要快速搜索、高 Recall 且内存预算可控的生产系统
* ✅ 超大规模高维数据集 — 十亿级 1536+ 维向量在 FP32 格式下会消耗 TB 级内存
* ✅ 运行在支持 AVX2 或 AVX512 的 **Linux x86\_64** 服务器上的工作负载
**最佳实践**:当你希望获得 HNSW 级别的搜索质量而无需承担高内存开销时,使用 HNSW-RaBitQ。
`total_bits` 参数控制精度-内存的权衡。根据[论文](https://arxiv.org/abs/2405.12497),在特定数据集上,**7 位**可达约 99% Recall,**5 位**约 95%,**4 位**约 90%。最低可使用 **1 位**以最大化压缩,但会降低 Recall。
## 优势 [#优势]
1. ✨ **大幅降低内存** — 量化后的向量最多比 FP32 小 32 倍,减少活跃索引大小
2. ✨ **高效距离估计** — RaBitQ 支持基于位运算的高效相似度计算
3. ✨ **无需重排序即可获得出色 Recall** — 图构建使用原始向量,保持图质量;RaBitQ 提供渐近最优的误差界,确保排序可靠
## 权衡 [#权衡]
1. ⚠️ **平台受限** — 仅支持 Linux x86\_64,需要 AVX2 或 AVX512
2. ⚠️ **训练开销** — 索引构建前需要 KMeans 训练步骤,增加构建时间
3. ⚠️ **维度限制** — 仅支持 64 到 4095 维之间的向量
## 关键参数 [#关键参数]
**调参建议**:
从默认值开始(`total_bits=7`,`num_clusters=16`)。先调整查询时的 `ef` 来权衡 Recall 和延迟。仅在需要进一步降低内存且可接受稍低 Recall 时减小 `total_bits`。
### 索引构建参数 [#索引构建参数]
| 参数 | 描述 | 调参指南 |
| ----------------- | ------------------------------------------ | ----------------------------------------------------------------------------------- |
| `metric_type` | 用于比较向量的相似度度量 | 根据 Embedding 模型的训练方式选择 |
| `m` | **每个节点的最大邻居数** — 图构建过程中为每个节点创建的最大双向链接数 | • 更大的 `m` →
✨ 更好的 Recall 和图连通性
⚠️ 更多内存使用,索引和搜索延迟更高 |
| `ef_construction` | **索引时候选池大小** — 插入新向量时算法考虑的候选邻居数 | • 更大的 `ef_construction` →
✨ 更好的图质量和更高的 Recall
⚠️ 更长的索引构建时间(*不影响查询速度*) |
| `total_bits` | **RaBitQ 每维量化位数** — 控制二进制编码精度 | 控制精度-内存权衡。
更低的值节省更多内存但降低精度 |
| `num_clusters` | **KMeans 聚类数** — 在 RaBitQ 训练阶段用于划分向量空间 | • 更多聚类可捕获更精细的分布模式
• 更高的值可略微提升 Recall |
| `sample_count` | **训练样本数** — KMeans 训练采样的向量数量(`0` = 使用全部向量) | 默认为 `0`。在超大数据集上设置较小的值(如 5,000,000)可加速训练并减少内存使用 |
### 索引查询参数 [#索引查询参数]
| 参数 | 描述 | 调参指南 |
| ------------------ | ---------------------------------------- | --------------------------------------------------------------------------------------------------------------------- |
| `ef` | **查询时候选池大小** — 查询时图遍历每步探索的候选邻居数 | • 更大的 `ef` →
✨ 更高的 Recall
⚠️ 更高的查询延迟 |
| `radius` | **距离(相似度)阈值**,用于范围过滤 — 仅返回满足阈值的 Document | 示例:
• 使用内积 `MetricType.IP` 时,设置 `radius=0.6` 仅保留分数 > 0.6 的结果
✅ 适用于:过滤低质量匹配
🚫 不适用于:需要全部 top-k 结果时 |
| `is_linear` | 强制使用**暴力线性搜索**而非索引 | 🐌 大数据集下非常慢!
✅ 仅用于:调试、小型 collection 或验证索引准确度 |
| `is_using_refiner` | **启用精确分数精化** — 量化搜索后对候选结果重新计算精确 FP32 距离 | ✅ 开启:需要最高精度时
⚠️ 因全精度重新评分会增加延迟 |
# 向量索引
向量索引是一种专用数据结构,用于加速在大规模的向量 Embedding 数据上的相似度检索。
在没有索引的情况下,若要检索出与查询向量最相似的的项,系统必须将其与数据库中的每一个向量进行比对 — 这种方式被称为**暴力检索**或 **Flat 检索**。
暴力检索的特点:
* ✅ **精确**:能够返回严格匹配的最相似结果,不存在近似计算。
* ⚠️ **大规模下性能极低**:当面对数百万乃至数十亿的向量数据时,查询耗时可能长达数秒甚至数分钟,导致其无法满足实时应用的需求。
***
## 近似检索 vs. 精确检索 [#近似检索-vs-精确检索]
大多数向量索引都采用了**近似最近邻** (ANN) 算法。
ANN 不再执着于寻找绝对精确的“最相近匹配项”,而是转而寻找*高度准确的的近似结果*。在实际应用中,这些近似结果的质量往往与精确结果难分伯仲,但检索速度和效率却得到了质的提升。
对于语义搜索或推荐系统这类实际应用场景而言,这种策略极具价值 — 因为它仅需牺牲很小的精度,就能换来速度和扩展性的质变。简而言之:***结果够准,速度够快*** ✨。
### Recall:衡量近似检索精度 [#recall衡量近似检索精度]
**Recall** 是评估 ANN 算法结果质量的标准指标。
它量化了这样一个比例:在近似方法返回的 Top‑k 结果中,有多少是真正包含在精确搜索(暴力检索)找到的“**真最近邻**”里的。
它量化的是**真实最近邻**(通过精确暴力搜索确定的)中,出现在近似方法返回的 top-k 结果中的比例:
$$
\textcolor{#2563eb}{
\text{Recall@}k = \frac{\text{top-}k\text{ 中真实最近邻的数量}}{k}
}
$$
示例:
* 如果你请求了 top 10 的结果,其中有 9 个与精确检索得出的的真实 top 10 匹配,则 `recall@10` 为 90%。
* 通常情况下,高 Recall(例如 ≥ 96%) 意味着对于大多数应用来说,这种近似搜索的效果与精确搜索在实际体验上几乎没有区别。
通过选用不同的索引类型 (如 HNSW) 及其参数 (如 `ef_search`),你可以灵活权衡 ***Recall、查询速度和资源开销***,从而针对特定的精度与性能需求进行优化。
***
## 向量索引类型 [#向量索引类型]
Zvec 支持以下向量索引类型,各自适用于不同的使用场景、数据集规模和性能需求:
1. [Flat(暴力检索)索引](./flat-index/)
2. [HNSW(分层可导航小世界)](./hnsw-index/)
3. [HNSW-RaBitQ(HNSW + RaBitQ 量化)](./hnsw-rabitq-index/)
4. [DiskANN(基于磁盘的近似最近邻)](./diskann-index/)
5. [IVF(倒排文件索引)](./ivf-index/)
6. [IVF-RaBitQ(IVF + RaBitQ 量化)](./ivf-rabitq-index/)
根据你的数据规模、延迟要求和精度容忍度选择索引类型。始终使用与你的 Embedding 模型训练时一致的距离度量。
# IVF 索引
## 工作原理 [#工作原理]
IVF 的核心原理是**将整个向量空间划分成若干个簇 (Cluster/聚类)**。其中,簇的数量由参数 [`n_list`](#关键参数) (即 number of lists)来控制。
### 索引构建阶段 ⚙️ [#索引构建阶段-️]
1. **聚类**:算法首先会执行聚类操作,生成 `n_list` 个簇。每个簇都由一个质心 (Centroid) 来代表,这个质心是一个中心点,能够最准确地代表该簇内所有的向量。
2. **分配**:数据集中的每个向量都会被分配到离它**最近的那个质心所在的簇中**。随后,该向量会被存入与该质心关联的倒排列表 (也常被称为“桶”或 Bucket)。本质上,这个索引就构建成了一个从质心到其对应向量的映射关系。
### 查询阶段 🔍 [#查询阶段-]
1. **质心筛选**:查询阶段,系统先计算查询向量与所有 `n_list` 个质心的距离,从而找出距离最近的 `n_probe` 个质心 (`n_probe` 是一个控制要考察多少个质心的参数)。
2. **局部搜索**:系统将**搜索范围锁定在 `n_probe` 个选中的桶 (buckets) 内**,而非全量扫描整个 `N` 个向量的数据集。随后,系统仅在这些桶中执行暴力检索(或更精细的搜索),从而找出最近邻向量。
## 何时使用 IVF 索引 [#何时使用-ivf-索引]
* ✅ 向量数据集具有天然的聚类或局部性结构
* ✅ 处理超大规模数据集且内存效率至关重要
* ✅ 需要通过精细调参获得最优性能
**最佳实践**:
* IVF 索引在处理具有内在聚类结构的数据集时效果最佳。
* 若需进一步提升内存效率并支持更大规模的数据,建议将其与乘积量化 (Product Quantization) 结合使用。
* IVF 索引的性能对 `n_list` 等参数高度敏感。因此,该索引最适合那些能够针对特定数据分布以及延迟和召回率做权衡,进行系统化实验、验证并优化参数的应用场景。
## 优势 [#优势]
1. ✨ **兼容性** — 常作为复合索引 (例如 IVF-PQ) 的基础层,用于进一步的优化
2. ✨ **支撑海量数据** — 查询时间复杂度约为 **O(N / `n_list` × `n_probe`)**。当 `n_list` 较大且 `n_probe` 较小时,即使面对海量数据 (`N` 极大),其查询效率依然非常高
3. ✨ **内存高效** — 向量被存储在紧凑的倒排列表中,质心和列表指针带来的额外开销极小。与 [HNSW](../hnsw-index/) 等基于图的索引方法相比,通常能显著节省内存
## 权衡 [#权衡]
1. ⚠️ **索引构建开销大** — 建立索引需要经过聚类计算,计算密集度较高,构建速度通常比 [HNSW](../hnsw-index/) 等索引更慢
2. ⚠️ **参数敏感** — 检索的召回率和延迟高度依赖于 `n_list` 和 `n_probe` 的选择
## 关键参数 [#关键参数]
### 索引构建参数 [#索引构建参数]
| 参数 | 描述 | 调参指南 |
| --------------- | -------------------------------------------- | --------------------------------------------------------------------------------------------------------------------------------------------------------------------------- |
| `metric_type` | 用于比较向量的**相似度度量** | 根据 Embedding 模型的训练方式选择 |
| `n_list` | **聚类数** (倒排列表数) — 在索引构建阶段,整个向量空间会被划分成这个数量的聚类 | • 建议初始值 `n_list` ≈ $\sqrt{N}$,其中 `N` 为向量数
• 调大 `n_list` → ✨ 分区更精细,每个桶更小,检索速度更快 — 但 ⚠️ 索引构建成本更高,且需要管理更多的质心
• 调小 `n_list` → ✨ 索引构建速度更快 — 但 ⚠️ 每个桶的体积更大,导致检索速度变慢 |
| `n_iters` | **质心优化迭代次数** — 在索引构建阶段,用于优化聚类质心的迭代轮数 | • 更多的 `n_iters` →
✨ 聚类质量更好
⚠️ 索引构建时间更长 |
| `quantize_type` | 向量**量化**方式
默认不开启量化 | 详见[量化](../quantization/) |
### 索引查询参数 [#索引查询参数]
| 参数 | 描述 | 调参指南 |
| ----------- | ----------------------------------------------- | ------------------------------------------------------------------------------------------------------------------------------------- |
| `n_probe` | **查询时搜索的聚类数量** — 系统仅从这些距离最近的聚类中检索候选向量 | • 更大的 `n_probe` →
✨ 召回率更高
⚠️ 查询速度更慢 |
| `radius` | **距离(相似度)阈值**,用于范围过滤 — 只有满足该阈值的 documents 才会被返回 | 示例:
• 使用内积 `MetricType.IP` 时,设置 `radius=0.6` 仅保留分数 > 0.6 的结果
✅ 适用于:想要剔除掉低质量匹配的结果
🚫 不适用于:必须返回全部 top-K 个结果,不关心分数质量 |
| `is_linear` | 强制使用**暴力线性检索** (不使用配置的索引) | 🐌 大数据集下非常慢!
✅ 仅用于:调试、超小数据集或验证索引准确性 |
# IVF-RaBitQ 索引
IVF-RaBitQ 将 [IVF](../ivf-index/) 的聚类分区与 [RaBitQ](https://arxiv.org/abs/2405.12497) 量化结合起来:IVF 先缩小需要扫描的候选范围,RaBitQ 再以紧凑的二进制编码估算候选距离,从而同时降低查询计算量和索引内存占用。
**平台要求**:IVF-RaBitQ 目前仅支持 **Linux x86\_64**,CPU 需要支持 **AVX2 或 AVX512**。Zvec 会自动选择最佳运行时。
## 工作原理 [#工作原理]
### 索引构建阶段 ⚙️ [#索引构建阶段-️]
1. **训练 IVF 质心**:系统从训练数据中生成 `nlist` 个聚类质心。`sample_count` 可限制训练样本数,避免在超大数据集上使用全部向量训练。
2. **分配倒排列表**:每个向量被分配到最近的质心,并写入该质心对应的倒排列表。
3. **RaBitQ 编码**:系统对向量执行随机旋转,并围绕所属质心对向量进行量化。每个维度至少使用 1 位二进制编码;当 `total_bits` 大于 1 时,额外位用于提高距离估计精度。
4. **按批次组织编码**:同一倒排列表内的量化编码按批次布局,以便查询时并行计算。
### 查询阶段 🔍 [#查询阶段-]
1. **选择倒排列表**:系统先比较查询向量与所有质心,仅选择距离最近的 `nprobe` 个倒排列表。
2. **预处理查询向量**:查询向量经过与建库阶段一致的旋转,并生成批量距离估计所需的查询状态。
3. **批量估算距离**:系统先使用 1 位编码快速估算候选距离和误差下界,淘汰不可能进入 Top-K 的候选;再对保留下来的候选使用额外量化位提高估算精度。
4. **可选精确精化**:启用 `is_using_refiner` 后,系统扩大候选集,并使用原始 FP32 向量重新计算分数。
## 何时使用 IVF-RaBitQ? [#何时使用-ivf-rabitq]
* ✅ 数据集规模很大,希望同时减少候选扫描量和向量内存占用
* ✅ 数据具有一定的聚类结构,适合通过 IVF 缩小搜索范围
* ✅ 可以接受离线聚类训练,并愿意针对 Recall 与延迟调节 `nlist` 和 `nprobe`
* ✅ 工作负载运行在支持 AVX2 或 AVX512 的 Linux x86\_64 服务器上
**最佳实践**:先使用默认的 `total_bits=7`,主要通过 `nprobe` 调节查询时的 Recall 与延迟。只有在索引内存仍然过高且可以接受一定精度损失时,才降低 `total_bits`。
对于相同的 RaBitQ 编码,IVF-RaBitQ 通常比 HNSW-RaBitQ 使用更少的结构性内存,但对聚类质量和查询参数更敏感。如果更关注低延迟和高 Recall,且可以承担图结构内存,可优先考虑 [HNSW-RaBitQ](../hnsw-rabitq-index/);如果更关注大规模数据下的内存效率,可优先评估 IVF-RaBitQ。
## 优势 [#优势]
1. ✨ **双重缩减查询开销** — IVF 只扫描部分倒排列表,RaBitQ 再通过紧凑编码和位运算加速列表内距离估计
2. ✨ **内存效率高** — `total_bits=1` 时,单看量化向量载荷,理论上可缩小到 FP32 的约 1/32;实际索引还包含质心、文档 ID、对齐及其他元数据
3. ✨ **支持误差界剪枝** — 先使用低成本估算和下界过滤候选,仅对有机会进入 Top-K 的候选执行更精细的计算
## 权衡 [#权衡]
1. ⚠️ **平台受限** — 仅支持 Linux x86\_64,需要 AVX2 或 AVX512
2. ⚠️ **构建开销较大** — 需要训练质心、执行随机旋转并生成量化编码
3. ⚠️ **参数敏感** — `nlist` 和 `nprobe` 需要根据数据规模、分布、Recall 目标及延迟预算进行验证
4. ⚠️ **数据限制** — 仅支持 FP32 稠密向量、64–4095 维,以及 `L2`、`IP`、`COSINE` 距离度量
## 关键参数 [#关键参数]
### 索引构建参数 [#索引构建参数]
| 参数 | 默认值 | 描述 | 调参指南 |
| -------------- | --------------- | ------------------------------------ | ------------------------------------------------------------------------------------------------------------ |
| `metric_type` | `MetricType.IP` | 用于比较向量的相似度度量;支持 `L2`、`IP` 和 `COSINE` | 根据 Embedding 模型的训练方式选择 |
| `nlist` | `1024` | **聚类数(倒排列表数)** — 构建时将向量空间划分成的聚类数量 | 可从 `nlist` ≈ $\sqrt{N}$ 开始实验,其中 `N` 为向量数。更大的值会形成更小、更细的列表,但增加训练、质心比较及元数据开销。`nlist` 必须大于 `0`,并应确保训练样本数足以形成所需聚类 |
| `total_bits` | `7` | **RaBitQ 每维总量化位数** — 取值范围为 `1`–`9` | 更大的值通常能提高距离估计精度和 Recall,但占用更多内存;`1` 表示仅使用基础二进制编码 |
| `sample_count` | `0` | **训练样本数** — `0` 表示使用全部向量训练聚类质心 | 超大数据集可设置一个小于总向量数的正整数,以减少训练时间和峰值内存;不得小于 `0` |
Node.js 使用 camelCase 参数名:`metricType`、`nList`、`totalBits` 和 `sampleCount`。
### 索引查询参数 [#索引查询参数]
| 参数 | 默认值 | 描述 | 调参指南 |
| ------------------ | ------- | ------------------------------------- | ------------------------------------------------------------------ |
| `nprobe` | `10` | **查询时搜索的倒排列表数** — 系统选择距离查询向量最近的列表进行扫描 | 更大的值通常带来更高 Recall 和更高延迟。超过实际列表数时会按实际列表数处理;该值必须大于 `0` |
| `radius` | `0.0` | **距离(相似度)阈值**,用于范围过滤 | 仅返回满足阈值的 Document;如果必须获得完整 Top-K,请避免设置过严的阈值 |
| `is_linear` | `False` | 强制使用暴力线性检索,而不使用 IVF-RaBitQ 索引 | 仅用于调试、小型 Collection 或验证索引结果;大数据集下开销很高 |
| `is_using_refiner` | `False` | 使用原始 FP32 向量对量化检索候选重新计算精确分数 | 需要更高精度时启用,但会增加候选读取和精确距离计算开销 |
| `scale_factor` | `10.0` | 启用 Refiner 时的候选扩展倍数 | 更大的值为精化阶段提供更多候选,通常有利于 Recall,但会增加延迟;仅在 `is_using_refiner=True` 时生效 |
Node.js 中 `nprobe` 和 `radius` 名称不变,其余参数使用 `isLinear`、`isUsingRefiner` 和 `scaleFactor`。
# 量化
量化是一种压缩技术,***它将向量从原始格式 (如 FP32) 转换为更紧凑的表示形式***,从而减小用于搜检索的向量索引的大小。
这种转换通过减少每个维度所用的比特数,来近似原始向量,从而实现:
* ✨ 更低的**内存占用** — 尤其当索引常驻内存时;
* ✨ 更快的 I/O 速度和更低的查询延迟 — 减少了数据传输开销,还充分利用了高效的整数或半精度浮点 (FP16) 计算;
* ✨ 在资源受限的硬件上实现更好的可扩展性。
**重要**:
* 量化是一种**有损且不可逆**的压缩方法。它以**可能降低召回率为代价**,换取更高的运行时效率。请务必验证其对检索质量的影响。
* 量化仅在应用于 **FP32** 格式的向量时才能带来收益。
## 存储行为 [#存储行为]
为确保数据完整性和灵活性,**Zvec 同时存储原始向量及其量化版本**。这意味着:
* **磁盘上的总存储占用可能会增加** (因为保存了两份副本)。
* 构建索引和检索时**只需加载量化后的向量**,大幅减少内存占用。
* 用户随时都能按需取回**原始的完整向量**。
## 启用量化 [#启用量化]
你可以在创建向量索引时,**通过在 `VectorSchema` 中设置 `quantize_type` 参数** (例如 `FP16`、`INT8` 或 `INT4`) 来开启量化功能。
配置完成后,Zvec 会自动在原始向量的基础上,生成并管理对应的量化版本。
***
## 量化类型 [#量化类型]
### FP16 (半精度浮点) [#fp16-半精度浮点]
使用16位浮点数来表示向量,在大幅减少内存占用并加快计算速度的同时,依然能保持极高的数值精度。非常适合那些需要接近 FP32 精度,但又希望提升运行效率的应用场景。(需由 FP32 源数据转换而来)
### INT8 (8位整数量化) [#int8-8位整数量化]
使用8位整数来表示向量,显著降低了存储需求和内存带宽压力。对于许多相似度检索任务,提供了速度、大小和检索精度之间的良好平衡。(需由 FP32 源数据转换而来)
### INT4 (4位整数量化) [#int4-4位整数量化]
一种极致紧凑的表示方式,每个维度仅需4位。它能最大化存储密度并提升推理速度,非常适合对延迟极其敏感或硬件资源受限的环境 (前提是你能接受较多的精度损失)。(需由 FP32 源数据转换而来)
## 启用旋转 [#启用旋转]
在启用 `INT8` 或 `INT4` 量化时,你可以通过在 `VectorSchema` 中设置 `quantizer_param` 参数,**指定 `enable_rotate=True` 来开启旋转**。该功能会在量化前对向量施加一次随机正交旋转,使各维度的分布更加均匀,从而减小量化过程中的信息损失,提高量化后索引的召回率。
# 条件过滤
条件过滤允许你根据标量字段的特定条件检索 Document — 类似于 SQL 中的 `WHERE` 子句。
***
## 性能注意事项 [#性能注意事项]
* **已索引的标量字段**:可以被高效搜索。
* **未索引的标量字段**:仍然可以搜索,但性能会显著降低。
为了获得最佳性能,请确保**常用的过滤字段已建立索引**。\
更多详情请参阅[倒排索引](../../../concepts/inverted-index/)。
***
## 前提条件 [#前提条件]
本指南假设你已经打开了一个包含标量字段的 Collection。
此示例 Collection 包含以下标量字段:
1. `publish_year`:整数字段,已索引并启用范围优化
2. `category`:字符串数组字段,已索引 — 支持快速成员检查
3. `summary`:字符串字段,已存储但**未索引**(`index_param` 为 `None`)
4. `in_stock`:布尔字段,已索引以支持快速 `true/false` 查询
Python
Node.js
```python title="打开一个 Collection"
import zvec
collection_schema = zvec.CollectionSchema( # [!code highlight]
name="example_collection",
fields=[
zvec.FieldSchema(
name="publish_year",
data_type=zvec.DataType.INT32,
index_param=zvec.InvertIndexParam(enable_range_optimization=True),
),
zvec.FieldSchema(
name="category",
data_type=zvec.DataType.ARRAY_STRING,
index_param=zvec.InvertIndexParam(),
),
zvec.FieldSchema(
name="summary",
data_type=zvec.DataType.STRING,
),
zvec.FieldSchema(
name="in_stock",
data_type=zvec.DataType.BOOL,
index_param=zvec.InvertIndexParam(),
),
],
vectors=[
zvec.VectorSchema(
name="dense_embedding",
data_type=zvec.DataType.VECTOR_FP32,
dimension=768,
index_param=zvec.HnswIndexParam(metric_type=zvec.MetricType.COSINE),
),
],
)
collection = zvec.open(path="/path/to/collection") # [!code highlight]
```
```ts title="打开一个 Collection"
import { ZVecCollection, ZVecCollectionSchema, ZVecDataType, ZVecIndexType, ZVecMetricType, ZVecOpen } from "@zvec/zvec";
const collectionSchema: ZVecCollectionSchema = new ZVecCollectionSchema({ // [!code highlight]
name: "example_collection",
fields: [
{
name: "publish_year",
dataType: ZVecDataType.INT32,
indexParams: { indexType: ZVecIndexType.INVERT, enableRangeOptimization: true }
},
{
name: "category",
dataType: ZVecDataType.ARRAY_STRING,
indexParams: { indexType: ZVecIndexType.INVERT }
},
{
name: "summary",
dataType: ZVecDataType.STRING
},
{
name: "in_stock",
dataType: ZVecDataType.BOOL,
indexParams: { indexType: ZVecIndexType.INVERT }
}
],
vectors: [
{
name: "dense_embedding",
dataType: ZVecDataType.VECTOR_FP32,
dimension: 768,
indexParams: { indexType: ZVecIndexType.HNSW, metricType: ZVecMetricType.COSINE }
}
]
});
const collection: ZVecCollection = ZVecOpen("/path/to/collection"); // [!code highlight]
```
***
## 执行条件过滤 [#执行条件过滤]
通过将 `filter` 表达式传递给 `query()` 方法来应用条件过滤。
该表达式使用**类 SQL 语法**来定义搜索条件。
`topk` 参数指定返回的最大匹配 Document 数量。
如果满足过滤条件的 Document 数量超过指定的 `topk`,则只返回前 `topk` 个结果。\
结果不保证有特定顺序(通常按内部存储顺序返回)。
Python
Node.js
```python title="条件过滤"
# [!code word:filter]
import zvec
# 1. 检索最多 10 个 2000 年出版的 Document
results = collection.query(filter="publish_year = 2000", topk=10)
# 2. 检索最多 50 个 1999 年之前出版的 Document
results = collection.query(filter="publish_year < 1999", topk=50)
# 3. 检索所有有库存的项目(假设 Collection 有 ≤100 个 Document)
results = collection.query(filter="in_stock = true", topk=100)
# 4. 浪漫或悬疑类书籍(最多 20 个匹配)
results = collection.query(filter="category CONTAIN_ANY('romance', 'mystery')", topk=20)
# 5. 同时属于科学和哲学类别的书籍
results = collection.query(filter="category CONTAIN_ALL('science', 'philosophy')", topk=10)
# 6. 2015 年及之后的有库存浪漫类书籍
results = collection.query(
filter="publish_year >= 2015 AND in_stock = true AND category CONTAIN_ANY('romance')",
topk=30,
output_fields=["summary"], # 仅返回 'summary' 字段
)
```
```ts title="条件过滤"
// [!code word:filter]
// 1. 检索最多 10 个 2000 年出版的 Document
let results = collection.querySync({ filter: "publish_year = 2000", topk: 10 });
// 2. 检索最多 50 个 1999 年之前出版的 Document
results = collection.querySync({ filter: "publish_year < 1999", topk: 50 });
// 3. 检索所有有库存的项目(假设 Collection 有 ≤100 个 Document)
results = collection.querySync({ filter: "in_stock = true", topk: 100 });
// 4. 浪漫或悬疑类书籍(最多 20 个匹配)
results = collection.querySync({ filter: "category CONTAIN_ANY('romance', 'mystery')", topk: 20 });
// 5. 同时属于科学和哲学类别的书籍
results = collection.querySync({ filter: "category CONTAIN_ALL('science', 'philosophy')", topk: 10 });
// 6. 2015 年及之后的有库存浪漫类书籍
results = collection.querySync({
filter: "publish_year >= 2015 AND in_stock = true AND category CONTAIN_ANY('romance')",
topk: 30,
outputFields: ["summary"], // 仅返回 'summary' 字段
});
```
带 `filter` 的 `query()` 方法返回匹配的 `Doc` 对象列表。
每个 `Doc` 对象包括:
1. `id`:Document 标识符。
2. `vectors`:向量字段名称到对应 Embedding 值的映射。\
仅在查询中传入 `include_vector=True` 时才会填充。
3. `fields`:标量字段名称到存储值的映射。\
默认返回**所有标量字段**;可通过 `output_fields` 参数限制返回的字段。
***
## 支持的过滤语法 [#支持的过滤语法]
### 比较运算符 [#比较运算符]
| 运算符 | 描述 | 支持的数据类型 | 示例表达式 |
| ------------- | --------- | ----------------- | ------------------------------------------------ |
| `<` | 小于 | 整数, 浮点数, 字符串 | `publish_year < 2000` |
| `<=` | 小于或等于 | 整数, 浮点数, 字符串 | • `price <= 29.99`
• `author_name <= 'M'` |
| `=` | 等于 | 整数, 浮点数, 字符串, 布尔值 | • `in_stock = true`
• `name = 'Michael'` |
| `!=` | 不等于 | 整数, 浮点数, 字符串, 布尔值 | • `rating != 5`
• `status != 'active'` |
| `>=` | 大于或等于 | 整数, 浮点数, 字符串 | `score >= 85.5` |
| `>` | 大于 | 整数, 浮点数, 字符串 | `age > 12` |
| `is null` | 检查字段是否没有值 | 所有数据类型 | `email is null` |
| `is not null` | 检查字段是否有值 | 所有数据类型 | `email is not null` |
* **字符串比较**使用字典序:`'apple' < 'banana'` 的结果为 `true`
* **字符串字面量**必须用单引号(`'`)或双引号(`"`)括起来:`'hello world'`
* **布尔比较**使用关键字 `true` 和 `false`(不区分大小写)
* **范围查询**:当 `enable_range_optimization` 设置为 `true` 时,范围查询运行效率更高。如果为 `false`,它们仍然有效 — 但可能会显著变慢。
### 成员运算符 [#成员运算符]
| 运算符 | 描述 | 支持的数据类型 | 示例表达式 | 说明 |
| -------------- | ---------------- | ------------ | --------------------------------------------------------------------------- | ---------------------------------------------------------------------------------------------------------------------------------------------------------------------------- |
| `in` | 属于其中之一 | 整数, 浮点数, 字符串 | • `error_code in (400, 403, 404)`
• `user_name in ('admin', 'root')` | 如果字段值**匹配任一**列出的值,则为 `true`。
• `error_code` 是 `400`、`403` 或 `404` → `true`
• `user_name` 是 `'admin'` 或 `'root'` → `true` |
| `not in` | 不属于其中任何一个 | 整数, 浮点数, 字符串 | `status not in ('deleted', 'archived')` | 如果字段值**不匹配任何**列出的值,则为 `true`。
• `status` 不是 `'deleted'` 或 `'archived'` → `true` |
| `contain_all` | 数组包含**所有**列出的值 | 数组类型 | `tags contain_all ('urgent', 'bug')` | 仅当数组包含列表中的**每个**值时才为 `true`。
• `tags = ['bug', 'urgent', 'ui']` → `true`
• `tags = ['bug', 'ui']` → `false`(缺少 'urgent') |
| `contain_any` | 数组包含**至少一个**列出的值 | 数组类型 | `permissions contain_any ('execute', 'write')` | 如果数组包含**至少一个**列出的值则为 `true`。
• `permissions = ['admin', 'execute']` → `true`
• `permissions = ['read', 'forbidden']` → `false`(既没有 'execute' 也没有 'write') |
| `array_length` | 数组长度 | 数组类型 | `array_length(tags) > 2` | 如果数组的长度满足条件则为 `true`。
• `tags = ['bug']` → `false`(长度为 1)
• `tags = ['bug', 'urgent', 'fix']` → `true`(长度为 3) |
* 值列表周围**必须使用括号 `()`**。
* **字符串字面量**必须用单引号(`'`)或双引号(`"`)括起来:`'hello world'`
### 字符串运算符 [#字符串运算符]
| 运算符 | 描述 | 支持的数据类型 | 示例表达式 | 说明 |
| ------ | ---------- | ------- | ---------------------------------------------------------------- | ------------------------------------------------------------------------------------------------------------------------------ |
| `like` | 使用通配符的模式匹配 | 字符串 | • `product_name like 'Smart%'`
• `file_name like '%.log'` | • `'Smart%'`:匹配以 'Smart' 开头的值(例如 'SmartPhone'、'SmartWatch')
• `'%.log'`:匹配以 '.log' 结尾的值(例如 'app.log'、'debug\_2025.log') |
**性能注意事项**:\
为了获得最佳的 `LIKE` 查询性能,字段应该[已建立索引](../../../concepts/inverted-index/)。
* **未索引的字段**仍然支持过滤,但查询可能会**显著变慢**。
* 对于**高效的中缀/后缀模式**(`'abc%def'`、`'%abc'`),请配置倒排索引并设置 `enable_extended_wildcard = true` 选项。
* 包含**多个通配符**的模式(例如 `'%abc%def%'`)本质上开销较大,应谨慎使用。
### 逻辑运算符 [#逻辑运算符]
| 运算符 | 描述 | 示例表达式 | 说明 |
| ----- | --- | ---------------------------------------- | ------------------------------- |
| `and` | 逻辑与 | `status = 'active' and score > 90` | 仅当**所有**条件都为 `true` 时才为 `true`。 |
| `or` | 逻辑或 | `role = 'admin' or permission = 'write'` | 如果**至少一个**条件为 `true` 则为 `true`。 |
**提示**:使用括号 `()` 来分组表达式并控制求值顺序,例如 `expr1 and (expr2 or expr3)`。
# 全文检索
全文检索通过匹配文本内容来查找 Document,使用 [BM25](https://en.wikipedia.org/wiki/Okapi_BM25) 相关性评分进行排序。支持自然语言查询、精确短语匹配和布尔运算符。
***
## 前提条件 [#前提条件]
本指南假设你已经打开了一个 Collection,并准备好了一个 `collection` 对象。
此示例 Collection 包含一个启用了全文索引的 `content` 字段和一个标量字段 `category`。无需向量字段 — Zvec 支持纯全文检索的 Collection。
Python
Node.js
```python title="创建一个全文检索 Collection"
import zvec
# [!code word:FtsIndexParam]
# [!code word:content]
collection_schema = zvec.CollectionSchema( # [!code highlight]
name="article_collection",
fields=[
zvec.FieldSchema(
name="category",
data_type=zvec.DataType.STRING,
nullable=False,
),
zvec.FieldSchema(
name="content",
data_type=zvec.DataType.STRING,
nullable=False,
index_param=zvec.FtsIndexParam( # [!code highlight]
tokenizer_name="jieba",
),
),
],
)
collection = zvec.create_and_open(
path="/path/to/collection",
schema=collection_schema,
)
```
```python title="插入示例 Document"
collection.insert([
zvec.Doc(id="doc_0", fields={"category": "技术", "content": "向量数据库与嵌入表示入门"}),
zvec.Doc(id="doc_1", fields={"category": "技术", "content": "自然语言处理中的机器学习模型"}),
zvec.Doc(id="doc_2", fields={"category": "科学", "content": "深度学习与神经网络架构"}),
zvec.Doc(id="doc_3", fields={"category": "技术", "content": "向量搜索与精确短语匹配"}),
zvec.Doc(id="doc_4", fields={"category": "科学", "content": "机器学习基础入门"}),
])
```
```ts title="创建一个全文检索 Collection"
import { ZVecCollectionSchema, ZVecCreateAndOpen, ZVecDataType, ZVecIndexType } from "@zvec/zvec";
// [!code word:FTS]
// [!code word:content]
const collectionSchema = new ZVecCollectionSchema({ // [!code highlight]
name: "article_collection",
fields: [
{
name: "category",
dataType: ZVecDataType.STRING,
nullable: false
},
{
name: "content",
dataType: ZVecDataType.STRING,
nullable: false,
indexParams: {
indexType: ZVecIndexType.FTS, // [!code highlight]
tokenizerName: "jieba"
}
}
]
});
const collection = ZVecCreateAndOpen("/path/to/collection", collectionSchema);
```
```ts title="插入示例 Document"
collection.insertSync([
{ id: "doc_0", fields: { category: "技术", content: "向量数据库与嵌入表示入门" } },
{ id: "doc_1", fields: { category: "技术", content: "自然语言处理中的机器学习模型" } },
{ id: "doc_2", fields: { category: "科学", content: "深度学习与神经网络架构" } },
{ id: "doc_3", fields: { category: "技术", content: "向量搜索与精确短语匹配" } },
{ id: "doc_4", fields: { category: "科学", content: "机器学习基础入门" } }
]);
```
***
## 定义全文检索字段 [#定义全文检索字段]
要对字段启用全文检索,需要添加一个 `FieldSchema` 并将 `FtsIndexParam` 作为其 `index_param`。该字段的数据类型必须为 `STRING`。
Python
Node.js
```python title="定义全文检索字段"
import zvec
# [!code word:FtsIndexParam]
fts_field = zvec.FieldSchema( # [!code highlight]
name="content",
data_type=zvec.DataType.STRING,
nullable=False,
index_param=zvec.FtsIndexParam(
tokenizer_name="jieba", # 使用 Jieba 中文分词器
),
)
```
```ts title="定义全文检索字段"
import { ZVecDataType, ZVecFieldSchema, ZVecIndexType } from "@zvec/zvec";
const ftsField: ZVecFieldSchema = { // [!code highlight]
name: "content",
dataType: ZVecDataType.STRING,
nullable: false,
indexParams: {
indexType: ZVecIndexType.FTS,
tokenizerName: "jieba" // 使用 Jieba 中文分词器
}
};
```
### `FtsIndexParam` 参数 [#ftsindexparam-参数]
| 参数 | 类型 | 默认值 | 描述 |
| ---------------- | ----------- | --------------- | ---------------------------------------------------------------------------- |
| `tokenizer_name` | `str` | `"standard"` | 用于将文本拆分为 Token 的分词器。可选值:`"standard"`、`"whitespace"`、`"jieba"`。详见[分词器](#分词器)。 |
| `filters` | `list[str]` | `["lowercase"]` | 分词后按顺序应用的 Token 过滤器。详见 [Token 过滤器](#token-过滤器)。 |
| `extra_params` | `str` | `""` | 分词器和过滤器特定配置的 JSON 字符串。详见各分词器和 Token 过滤器的配置说明。 |
Zvec 支持**纯全文检索的 Collection** — 可以创建仅包含文本字段、不包含向量字段的 Collection。
***
## 执行全文检索 [#执行全文检索]
Zvec 提供两种全文检索的查询模式,均通过 `Query` 中的 `Fts` 对象使用:
1. **Match String** — 自然语言输入,自动分词
2. **Query String** — 支持布尔运算符的高级表达式语法
### Match String [#match-string]
使用 `match_string` 进行自然语言查询。输入为纯文本,无需任何特殊语法或转义。它会使用该字段配置的分词器进行分词,Token 之间使用默认运算符(默认为 `OR`)组合。
Python
Node.js
```python title="Match String 查询"
from zvec.model.param.query import Fts, Query
# [!code word:match_string]
result = collection.query( # [!code highlight]
queries=Query(
field_name="content",
fts=Fts(match_string="机器学习"), # [!code highlight]
),
topk=5,
)
print(result)
```
```ts title="Match String 查询"
// [!code word:matchString]
let result = collection.querySync({ // [!code highlight]
fieldName: "content",
fts: { matchString: "机器学习" }, // [!code highlight]
topk: 5
});
console.log(result);
```
使用默认的 `OR` 运算符时,将返回包含"机器"**或**"学习"(或两者都包含)的 Document,按 BM25 相关性评分排序。
### Query String [#query-string]
使用 `query_string` 进行高级查询,支持显式布尔运算符、必需/排除词项和精确短语匹配。
Python
Node.js
```python title="带运算符的 Query String"
from zvec.model.param.query import Fts, Query
# [!code word:query_string]
result = collection.query( # [!code highlight]
queries=Query(
field_name="content",
fts=Fts(query_string='+学习 -神经网络 "向量搜索"'), # [!code highlight]
),
topk=5,
)
print(result)
```
```ts title="带运算符的 Query String"
// [!code word:queryString]
let result = collection.querySync({ // [!code highlight]
fieldName: "content",
fts: { queryString: '+学习 -神经网络 "向量搜索"' }, // [!code highlight]
topk: 5
});
console.log(result);
```
此查询要求必须包含"学习",排除"神经网络",并匹配精确短语"向量搜索"。
`query_string` 和 `match_string` **互斥** — 每个 `Fts` 对象中必须且只能提供其中一个。
***
## 查询语法参考 [#查询语法参考]
以下运算符可在 `query_string` 表达式中使用:
| 语法 | 含义 | 示例 |
| ---------- | --------------------------- | ---------------------------------- |
| `term` | 匹配单个词项 | `vector` |
| `"phrase"` | 匹配精确短语(词序和相邻性) | `"machine learning"` |
| `+term` | 词项**必须**出现在 Document 中 | `+vector` |
| `-term` | 词项**不得**出现在 Document 中 | `-slow` |
| `a AND b` | 两个词项都必须匹配 | `vector AND search` |
| `a OR b` | 任一词项匹配即可 | `vector OR embedding` |
| `a NOT b` | 匹配 `a` 但排除匹配 `b` 的 Document | `learning NOT deep` |
| `(expr)` | 分组子表达式 | `(vector OR embedding) AND search` |
| `+(expr)` | 分组必须匹配 | `+(vector OR embedding)` |
| `-(expr)` | 分组不得匹配 | `-(slow AND outdated)` |
**运算符优先级**:`AND` / `NOT` 的绑定优先级高于 `OR`。没有显式运算符的相邻词项使用 `default_operator` 设置进行组合(默认为 `OR`)。
对于混合使用多种运算符的复杂查询,**建议使用 `()` 显式分组**以避免非预期结果。
不支持前置否定 — `NOT term` 和单独的 `-term` 都需要至少一个肯定词项。请使用 `a NOT b` 或将 `-term` 与肯定词项组合使用(例如 `a -b`)。
***
## 查询参数 [#查询参数]
| 参数 | 描述 |
| --------------- | ------------------------------------------- |
| `topk` | 返回评分最高的 Document 数量。 |
| `filter` | 可选的类 SQL 布尔表达式,用于限制结果。详见[条件过滤](../filter/)。 |
| `output_fields` | 可选的标量字段名称列表,用于指定结果中包含的字段。如果省略,返回所有标量字段。 |
### 默认运算符 [#默认运算符]
默认情况下,`match_string` 和 `query_string` 中相邻的裸词项使用 `OR` 组合。要改为 `AND`,可通过 `param` 字段传入 `FtsQueryParam`:
Python
Node.js
```python title="使用 AND 作为默认运算符"
import zvec
from zvec.model.param.query import Fts, Query
result = collection.query(
queries=Query(
field_name="content",
fts=Fts(match_string="机器学习"),
param=zvec.FtsQueryParam(default_operator="AND"), # [!code highlight]
),
topk=5,
)
```
```ts title="使用 AND 作为默认运算符"
import { ZVecIndexType } from "@zvec/zvec";
let result = collection.querySync({
fieldName: "content",
fts: { matchString: "机器学习" },
params: {
indexType: ZVecIndexType.FTS,
defaultOperator: "AND" // [!code highlight]
},
topk: 5
});
```
设置 `default_operator="AND"` 后,仅返回**同时**包含"机器"**和**"学习"的 Document。
`query_string` 中的显式运算符(`AND`、`OR`、`+`、`-`)不受 `default_operator` 影响 — 它仅控制相邻裸词项的组合方式。
***
## 结合标量过滤 [#结合标量过滤]
可以将全文检索与[标量过滤](../filter/)结合使用以缩小结果范围:
Python
Node.js
```python title="全文检索 + 标量过滤"
from zvec.model.param.query import Fts, Query
result = collection.query(
queries=Query(
field_name="content",
fts=Fts(match_string="机器学习"),
),
filter="category = '技术'", # [!code highlight]
topk=5,
)
```
```ts title="全文检索 + 标量过滤"
let result = collection.querySync({
fieldName: "content",
fts: { matchString: "机器学习" },
filter: "category = '技术'", // [!code highlight]
topk: 5
});
```
全文检索和向量检索在**单个查询路线**中互斥。同一个 `Query` / `ZVecQuery` 不应同时设置 `fts` 和 `vector` / `id`;如需结合两者,请使用多条查询路线配合重排序,或分别执行查询后在应用层合并结果。
***
## 分词器 [#分词器]
Zvec 提供三种内置分词器,通过 `FtsIndexParam` 为每个字段单独配置。
| 分词器 | 名称 | 描述 |
| ---------- | -------------- | ----------------------------------------------------------------------------------------- |
| Standard | `"standard"` | 实现 Unicode UAX #29 词边界规则,行为类似 Elasticsearch standard tokenizer。适用于大多数拉丁字母语言。**(默认)** |
| Whitespace | `"whitespace"` | 仅按空白字符(空格、制表符、换行符)拆分文本。保留 Token 内的标点符号。 |
| Jieba | `"jieba"` | 基于 [cppjieba](https://github.com/yanyiwu/cppjieba) 的中文分词。支持中英文混合文本。 |
### Standard 分词器 [#standard-分词器]
默认分词器。它实现了 Unicode UAX #29 词边界规则,行为类似 Elasticsearch standard tokenizer。对于 CJK 表意文字,`standard` 会输出单字 Token;如果需要中文词级检索,通常应使用 `jieba`。
Python
Node.js
```python title="Standard 分词器"
zvec.FtsIndexParam(tokenizer_name="standard", filters=["lowercase"])
```
```ts title="Standard 分词器"
{
indexType: ZVecIndexType.FTS,
tokenizerName: "standard",
filters: ["lowercase"]
}
```
**配置**(通过 `extra_params` JSON):
| 参数 | 类型 | 默认值 | 描述 |
| ------------------ | ----- | ----- | ------------------------------ |
| `max_token_length` | `int` | `255` | 最大 Token 长度。超过此长度的 Token 将被丢弃。 |
### Whitespace 分词器 [#whitespace-分词器]
仅在空白字符处拆分文本。适用于需要保留 Token 内标点符号的场景。
Python
Node.js
```python title="Whitespace 分词器"
zvec.FtsIndexParam(tokenizer_name="whitespace", filters=["lowercase"])
```
```ts title="Whitespace 分词器"
{
indexType: ZVecIndexType.FTS,
tokenizerName: "whitespace",
filters: ["lowercase"]
}
```
### Jieba 分词器 [#jieba-分词器]
中文分词器,同时支持中英文混合文本。
Python SDK **内置了默认的 Jieba 字典** — Jieba 分词器无需额外配置即可开箱使用。仅在需要自定义字典时才需设置 `jieba_dict_dir`。
Python
Node.js
```python title="Jieba 分词器"
zvec.FtsIndexParam(
tokenizer_name="jieba",
filters=["lowercase"],
extra_params='{"jieba_dict_dir": "/path/to/jieba/dict"}',
)
```
```ts title="Jieba 分词器"
{
indexType: ZVecIndexType.FTS,
tokenizerName: "jieba",
filters: ["lowercase"],
extraParams: '{"jieba_dict_dir": "/path/to/jieba/dict"}'
}
```
**配置**(通过 `extra_params` JSON):
| 参数 | 类型 | 默认值 | 描述 |
| ---------------- | ----- | ---------- | -------------------------------------------------------------------------------------------------------------------------------------------- |
| `jieba_dict_dir` | `str` | — | 包含 `jieba.dict.utf8` 和 `hmm_model.utf8` 的目录。也可通过 `ZVEC_JIEBA_DICT_DIR` 环境变量设置。 |
| `user_dict_path` | `str` | — | 自定义用户词典文件的路径。 |
| `cut_mode` | `str` | `"search"` | 分词模式:`"search"`(细粒度,推荐用于搜索)、`"mix"`、`"full"` 或 `"hmm"`。各模式详情请参阅 [cppjieba 文档](https://github.com/yanyiwu/cppjieba?tab=readme-ov-file#usage)。 |
**`jieba_dict_dir` 解析优先级**(使用第一个非空值):
1. `FtsIndexParam` 中的 `extra_params` 指定的路径
2. `ZVEC_JIEBA_DICT_DIR` 环境变量
3. 通过 `zvec.init(jieba_dict_dir=...)` 或 `zvec.set_default_jieba_dict_dir()` 设置的全局默认值
4. Python SDK 内置字典(`import zvec` 时自动注册)
## Token 过滤器 [#token-过滤器]
Token 过滤器在分词后按 `filters` 数组顺序应用。索引构建和查询使用同一套过滤器配置。
| 过滤器 | 描述 |
| ----------------- | --------------------------- |
| `"lowercase"` | 将 Token 转换为 Unicode 小写。 |
| `"ascii_folding"` | 将 Unicode 字符折叠为 ASCII 等价形式。 |
| `"stemmer"` | 使用 Snowball 词干提取器归一化词形。 |
英文文本通常可以使用 `lowercase`、`stemmer` 组合,让大小写和词形变化不影响匹配。类英文文本或包含重音符号的文本还可以加入 `ascii_folding`,以获得重音无关匹配。
### Lowercase 过滤器 [#lowercase-过滤器]
`"lowercase"` 将所有 Token 转换为 Unicode 小写。
### ASCII Folding 过滤器 [#ascii-folding-过滤器]
`"ascii_folding"` 将 Unicode 字符折叠为 ASCII 等价形式。
### Stemmer 过滤器 [#stemmer-过滤器]
`"stemmer"` 使用 Snowball 词干提取器归一化词形,默认语言为 `"english"`。
Python
Node.js
```python title="英文文本过滤器组合"
zvec.FtsIndexParam(
tokenizer_name="standard",
filters=["lowercase", "stemmer"],
extra_params='{"stemmer_lang": "english"}',
)
```
```ts title="英文文本过滤器组合"
{
indexType: ZVecIndexType.FTS,
tokenizerName: "standard",
filters: ["lowercase", "stemmer"],
extraParams: '{"stemmer_lang": "english"}'
}
```
**Stemmer 配置**(通过 `extra_params` JSON):
| 参数 | 类型 | 默认值 | 描述 |
| -------------- | ----- | ----------- | ----------------------------------------------------------------------- |
| `stemmer_lang` | `str` | `"english"` | Snowball 语言或算法名称。例如设置为 `"porter"` 可获得接近 Elasticsearch 默认英文 stemmer 的行为。 |
***
## 约束 [#约束]
* 全文检索和向量检索在**单个查询路线**中互斥 — 同一个 `Query` / `ZVecQuery` 不应同时设置 `fts` 和 `vector` / `id`。
* `query_string` 和 `match_string` 在单个 `Fts` 对象中**互斥**。
* 全文检索字段**不支持** [Alter Column](../../../collections/schema-evolution/)。
* 不支持前置否定(`NOT term` 或单独的 `-term`)— 至少需要一个肯定词项。
# 分组搜索
分组搜索用于按标量字段聚合向量搜索结果,并返回相关性最高的若干分组及每组内最相关的若干 Document。
例如,在商品搜索中按 `category` 分组,可以避免结果被同一类别占满,同时保留每个类别中与查询最相关的商品。
***
## 工作方式 [#工作方式]
执行分组搜索时,Zvec 会:
1. 在向量搜索过程中,根据指定分组字段的值对结果分组。
2. 根据每个分组中最相关的 Document 对分组排序,返回最多指定数量的分组。
3. 每个分组保留最多指定数量且按相关性排序的 Document。
分组字段值为 `null` 的 Document 不会出现在结果中。
***
## 前提条件 [#前提条件]
本指南假设你已经打开了一个 Collection,并满足以下条件:
* 查询字段是向量字段,并使用支持分组搜索的向量索引。
* 分组字段是非数组的标量字段,例如整数、浮点数、字符串或布尔字段。
此示例 Collection 包含一个稠密向量字段 `dense_embedding`,以及用于分组和过滤的标量字段。
Python
Node.js
```python title="打开一个 Collection"
import zvec
collection_schema = zvec.CollectionSchema(
name="product_collection",
vectors=[
zvec.VectorSchema(
name="dense_embedding",
data_type=zvec.DataType.VECTOR_FP32,
dimension=768,
index_param=zvec.HnswIndexParam(
metric_type=zvec.MetricType.COSINE,
),
),
],
fields=[
zvec.FieldSchema(name="title", data_type=zvec.DataType.STRING),
zvec.FieldSchema(name="category", data_type=zvec.DataType.STRING),
zvec.FieldSchema(
name="publish_year",
data_type=zvec.DataType.INT32,
index_param=zvec.InvertIndexParam(
enable_range_optimization=True,
),
),
],
)
collection = zvec.open(path="/path/to/collection")
```
```ts title="打开一个 Collection"
import {
ZVecCollection,
ZVecCollectionSchema,
ZVecDataType,
ZVecIndexType,
ZVecMetricType,
ZVecOpen,
} from "@zvec/zvec";
const collectionSchema = new ZVecCollectionSchema({
name: "product_collection",
vectors: [
{
name: "dense_embedding",
dataType: ZVecDataType.VECTOR_FP32,
dimension: 768,
indexParams: {
indexType: ZVecIndexType.HNSW,
metricType: ZVecMetricType.COSINE,
},
},
],
fields: [
{ name: "title", dataType: ZVecDataType.STRING },
{ name: "category", dataType: ZVecDataType.STRING },
{
name: "publish_year",
dataType: ZVecDataType.INT32,
indexParams: {
indexType: ZVecIndexType.INVERT,
enableRangeOptimization: true,
},
},
],
});
const collection: ZVecCollection = ZVecOpen("/path/to/collection");
```
***
## 执行分组搜索 [#执行分组搜索]
指定单个查询向量、分组字段名称、返回的分组数和每组 Document 数:
Python
Node.js
```python title="按类别执行向量分组搜索"
import zvec
results = collection.group_by_query( # [!code highlight]
query=zvec.Query(
field_name="dense_embedding",
vector=[0.1] * 768, # 实际使用时请替换为真实的 Embedding
param=zvec.HnswQueryParam(ef=200),
),
group_by_field_name="category", # [!code highlight]
group_count=3, # 最多返回 3 个类别
topk_per_group=2, # 每个类别最多返回 2 个 Document
filter="publish_year >= 2020",
output_fields=["title", "category", "publish_year"],
)
for group in results:
print(f"类别:{group.group_by_value}")
for doc in group.docs:
print(doc.id, doc.field("title"), doc.score)
```
```ts title="按类别执行向量分组搜索"
import { ZVecIndexType } from "@zvec/zvec";
const results = collection.groupByQuerySync({ // [!code highlight]
fieldName: "dense_embedding",
vector: Array(768).fill(0.1), // 实际使用时请替换为真实的 Embedding
params: { indexType: ZVecIndexType.HNSW, ef: 200 },
groupByFieldName: "category", // [!code highlight]
groupCount: 3, // 最多返回 3 个类别
topkPerGroup: 2, // 每个类别最多返回 2 个 Document
filter: "publish_year >= 2020",
outputFields: ["title", "category", "publish_year"],
});
for (const group of results) {
console.log(`类别:${group.groupByValue}`);
for (const doc of group.docs) {
console.log(doc.id, doc.fields?.title, doc.score);
}
}
```
如果符合条件的分组或 Document 数量不足,实际返回数量会小于 `group_count` 或 `topk_per_group`。空 Collection 或没有匹配结果时返回空列表。
### 使用已有 Document 的向量 [#使用已有-document-的向量]
Python API 除了支持直接传入 Embedding,还可以通过 `id` 使用 Collection 中已有 Document 的向量:
Python
```python title="使用已有 Document 的向量"
results = collection.group_by_query(
query=zvec.Query(
field_name="dense_embedding",
id="product_123",
),
group_by_field_name="category",
group_count=3,
topk_per_group=2,
)
```
`id` 指定的 Document 必须存在,并且包含 `field_name` 对应的向量。
Node.js API 需要通过 `vector` 显式传入查询向量。
***
## 参数 [#参数]
| 参数 | 类型 | 默认值 | 说明 |
| --------------------- | ------------------- | ------- | ------------------------------------------------------------------------------------ |
| `query` | `Query` | 必填 | 单个向量搜索条件。必须通过 `vector` 提供 Embedding,或通过 `id` 使用已有 Document 的向量。可在 `param` 中传入索引查询参数。 |
| `group_by_field_name` | `str` | 必填 | 用于分组的非数组标量字段名称,不能为空。 |
| `group_count` | `int` | `2` | 最多返回的分组数量,必须是正整数。 |
| `topk_per_group` | `int` | `3` | 每个分组最多返回的 Document 数量,必须是正整数。 |
| `filter` | `str \| None` | `None` | 查询前应用的[过滤表达式](../filter/)。 |
| `include_vector` | `bool` | `False` | 是否在返回的 Document 中包含向量字段。 |
| `output_fields` | `list[str] \| None` | `None` | 要返回的标量字段。`None` 返回全部标量字段,空列表不返回标量字段。 |
| 参数 | 类型 | 默认值 | 说明 |
| ------------------ | ----------------- | ------- | --------------------------------- |
| `fieldName` | `string` | 必填 | 要搜索的向量字段名称。 |
| `vector` | `ZVecVector` | 必填 | 查询向量。 |
| `groupByFieldName` | `string` | 必填 | 用于分组的非数组标量字段名称,不能为空。 |
| `groupCount` | `number` | `2` | 最多返回的分组数量,必须是正整数。 |
| `topkPerGroup` | `number` | `3` | 每个分组最多返回的 Document 数量,必须是正整数。 |
| `filter` | `string` | 未设置 | 查询前应用的[过滤表达式](../filter/)。 |
| `includeVector` | `boolean` | `false` | 是否在返回的 Document 中包含向量字段。 |
| `outputFields` | `string[]` | 未设置 | 要返回的标量字段。未设置时返回全部标量字段,空数组不返回标量字段。 |
| `params` | `ZVecQueryParams` | 未设置 | 向量索引对应的查询参数。 |
***
## 返回结果 [#返回结果]
`group_by_query()` 返回 `list[GroupResult]`。每个 `GroupResult` 包含:
| 属性 | 类型 | 说明 |
| ---------------- | ----------- | ----------------------------------- |
| `group_by_value` | `str` | 分组字段值的字符串表示。即使原字段是整数或布尔类型,此属性仍为字符串。 |
| `docs` | `list[Doc]` | 属于该分组的 Document,按向量相关性排序。 |
`groupByQuerySync()` / `groupByQuery()` 返回 `ZVecGroupResult[]`。每个 `ZVecGroupResult` 包含:
| 属性 | 类型 | 说明 |
| -------------- | ----------- | ----------------------------------- |
| `groupByValue` | `string` | 分组字段值的字符串表示。即使原字段是整数或布尔类型,此属性仍为字符串。 |
| `docs` | `ZVecDoc[]` | 属于该分组的 Document,按向量相关性排序。 |
分组本身按照各组第一个 Document 的相关性排序。因此,距离或相似度分数的方向取决于向量字段使用的度量方式:例如内积通常是分数越大越相关,L2 和余弦距离通常是分数越小越相关。
分组字段值独立于输出字段返回。即使没有在输出字段中包含分组字段,也可以通过该值识别分组。
***
## 限制与注意事项 [#限制与注意事项]
* 仅支持单向量搜索,不支持全文检索或多向量搜索。
* 分组字段不能是向量字段或数组字段。
* 当前不支持使用 IVF、DiskANN 或 Vamana 向量索引执行分组搜索。
* 分组搜索不能与向量精排(refiner)同时使用。
* 分组搜索采用尽力而为的策略。受数据分布和检索条件影响,实际返回的分组数量和每组 Document 数可能少于指定值;候选结果不足时,Zvec 会优先满足分组数量。
* 分组数和每组 Document 数越大,需要收集和排序的候选结果越多,通常会增加查询延迟。
# 向量 + 过滤
你可以将**向量搜索**与**标量过滤器**结合使用,将结果限制在 Document 的子集中 — 就像为相似度搜索添加一个 `WHERE` 子句。
***
## 前提条件 [#前提条件]
本指南假设你:
* 已经打开了一个 `collection` 实例。
* 熟悉[向量查询](../single-vector/)和[条件过滤](../filter/)。
此示例 Collection 包含一个稠密向量字段 `dense_embedding` 和一个标量字段 `publish_year`。
Python
Node.js
```python title="打开一个 Collection"
import zvec
# [!code word:dense_embedding]
# [!code word:publish_year]
collection_schema = zvec.CollectionSchema( # [!code highlight]
name="example_collection",
vectors=[
zvec.VectorSchema(
name="dense_embedding",
data_type=zvec.DataType.VECTOR_FP32,
dimension=768,
index_param=zvec.HnswIndexParam(metric_type=zvec.MetricType.COSINE),
),
],
fields=[
zvec.FieldSchema(
name="publish_year",
data_type=zvec.DataType.INT32,
index_param=zvec.InvertIndexParam(enable_range_optimization=True),
),
],
)
collection = zvec.open(path="/path/to/collection") # [!code highlight]
```
```ts title="打开一个 Collection"
import { ZVecCollection, ZVecCollectionSchema, ZVecDataType, ZVecIndexType, ZVecMetricType, ZVecOpen } from "@zvec/zvec";
// [!code word:dense_embedding]
// [!code word:publish_year]
const collectionSchema: ZVecCollectionSchema = new ZVecCollectionSchema({ // [!code highlight]
name: "example_collection",
vectors: [
{
name: "dense_embedding",
dataType: ZVecDataType.VECTOR_FP32,
dimension: 768,
indexParams: { indexType: ZVecIndexType.HNSW, metricType: ZVecMetricType.COSINE }
}
],
fields: [
{
name: "publish_year",
dataType: ZVecDataType.INT32,
indexParams: { indexType: ZVecIndexType.INVERT, enableRangeOptimization: true }
}
]
});
const collection: ZVecCollection = ZVecOpen("/path/to/collection"); // [!code highlight]
```
***
## 执行向量过滤搜索 [#执行向量过滤搜索]
要将向量相似度搜索与过滤器结合,请同时将[查询规范](../#query)和 `filter` 表达式传递给 `query()` 方法。
Python
Node.js
```python title="向量过滤相似度搜索"
import zvec
result = collection.query(
queries=zvec.Query( # [!code highlight]
field_name="dense_embedding",
vector=[0.1] * 768, # 请替换为真实的 Embedding
),
filter="publish_year > 1936", # 仅考虑 1936 年之后出版的书籍 [!code highlight]
topk=10,
)
print(result)
```
```ts title="向量过滤相似度搜索"
let result = collection.querySync({ // [!code highlight]
fieldName: "dense_embedding",
vector: Array(768).fill(0.1), // 请替换为真实的 Embedding
filter: "publish_year > 1936", // 仅考虑 1936 年之后出版的书籍 [!code highlight]
topk: 10
});
console.log(result);
```
这将返回满足 `publish_year > 1936` 条件的前 10 个最相似 Document,按相似度评分排序。
# 查询
`query()` 方法支持**向量相似度搜索**、**全文检索**(BM25 排序)、**条件过滤**(类似 SQL `WHERE` 子句)或**以上方式的组合查询**。
它返回一个 `Doc` 对象列表,每个对象包含匹配的 [Document](../../concepts/data-modeling/#documents) 及其相关性评分。
***
## `Query` [#query]
在 Zvec 中,`Query` 是描述搜索字段和查询来源的查询规范。查询 API 会根据单路或多路搜索场景接收一个或多个 `Query`。
单个 `Query` 可以执行向量搜索或全文检索,但不能同时执行两者。
每个 `Query` 指定:
1. `field_name`:要搜索的向量字段或全文检索字段名称
2. **查询来源**:
* 向量搜索提供显式的 `vector` 或 Document `id`(复用已有 Document 中存储的 Embedding)
* 全文检索提供 `fts` 子句
3. `param`(可选):索引特定的查询参数(例如 [HNSW](../../concepts/vector-index/hnsw-index/#索引查询参数) 的 `ef`,或[全文检索](./fts/#默认运算符)的 `default_operator`)
```python title="Query"
import zvec
from zvec.model.param.query import Fts, Query
vector_query = Query( # [!code highlight]
field_name="dense_embedding",
vector=[0.1] * 768, # 实际使用时请替换为真实的 Embedding
)
by_id_query = Query( # [!code highlight]
field_name="dense_embedding",
id="doc123", # 使用 ID 为 "doc123" 的 Document 的 'dense_embedding'
)
fts_query = Query( # [!code highlight]
field_name="content",
fts=Fts(match_string="机器学习"),
)
```
每个 `ZVecQuery` 指定:
1. `fieldName`:要搜索的向量字段或全文检索字段名称
2. **查询来源**:
* 向量搜索提供 `vector`
* 全文检索提供 `fts`
3. `params`(可选):索引特定的查询参数(例如 [HNSW](../../concepts/vector-index/hnsw-index/#索引查询参数) 的 `ef`,或[全文检索](./fts/#默认运算符)的 `defaultOperator`)
```ts title="ZVecQuery"
import { ZVecQuery } from "@zvec/zvec";
let vector_query: ZVecQuery = { // [!code highlight]
fieldName: "dense_embedding",
vector: Array(768).fill(0.1) // 实际使用时请替换为真实的 Embedding
};
// [!code word:fts]
let fts_query: ZVecQuery = { // [!code highlight]
fieldName: "content",
fts: { matchString: "机器学习" }
};
```
***
## 查询类型 [#查询类型]
***
## 快速开始示例 [#快速开始示例]
### 单向量搜索 [#单向量搜索]
Python
Node.js
```python
import zvec
result = collection.query( # [!code highlight]
queries=zvec.Query(
field_name="dense_embedding",
vector=[0.1] * 768, # 实际使用时请替换为真实的 Embedding
),
topk=10,
)
```
```ts
let result = collection.querySync({ // [!code highlight]
fieldName: "dense_embedding",
vector: Array(768).fill(0.1), // 实际使用时请替换为真实的 Embedding
topk: 10,
});
```
### 多向量搜索 [#多向量搜索]
Python
Node.js
```python
import zvec
result = collection.query( # [!code highlight]
topk=3,
queries=[
zvec.Query(field_name="dense_embedding", vector=[0.1] * 768),
zvec.Query(field_name="sparse_embedding", vector={1: 0.1, 37: 0.43}),
],
reranker=zvec.WeightedReRanker( # [!code highlight]
weights=[1.2, 1.0],
),
)
print(result)
```
```ts
let result = collection.multiQuerySync({ // [!code highlight]
topk: 3,
queries: [
{ fieldName: "dense_embedding", vector: Array(768).fill(0.1), numCandidates: 5 },
{ fieldName: "sparse_embedding", vector: { 1: 0.1, 37: 0.43 }, numCandidates: 5 },
],
rerank: { type: "weighted", weights: [1.2, 1.0] }, // [!code highlight]
});
```
### 条件过滤 [#条件过滤]
Python
Node.js
```python
# [!code word:filter]
result = collection.query(filter="publish_year < 1999", topk=50)
```
```ts
// [!code word:filter]
let result = collection.querySync({ filter: "publish_year < 1999", topk: 50 });
```
### 混合搜索 [#混合搜索]
Python
Node.js
```python
import zvec
result = collection.query( # [!code highlight]
queries=zvec.Query(
field_name="dense_embedding",
vector=[0.1] * 768, # 实际使用时请替换为真实的 Embedding
),
# [!code word:filter]
filter="publish_year < 1999",
topk=10,
)
```
```ts
let result = collection.querySync({ // [!code highlight]
fieldName: "dense_embedding",
vector: Array(768).fill(0.1), // 实际使用时请替换为真实的 Embedding
// [!code word:filter]
filter: "publish_year < 1999",
topk: 10
});
```
### 全文检索 [#全文检索]
Python
Node.js
```python
from zvec.model.param.query import Fts, Query
# [!code word:fts]
result = collection.query( # [!code highlight]
queries=Query(
field_name="content",
fts=Fts(match_string="机器学习"),
),
topk=10,
)
```
```ts
// [!code word:fts]
let result = collection.querySync({ // [!code highlight]
fieldName: "content",
fts: { matchString: "机器学习" },
topk: 10
});
```
### 分组搜索 [#分组搜索]
Python
Node.js
```python
import zvec
groups = collection.group_by_query( # [!code highlight]
query=zvec.Query(
field_name="dense_embedding",
vector=[0.1] * 768, # 实际使用时请替换为真实的 Embedding
),
group_by_field_name="publish_year", # 按出版年份分组
group_count=3, # 最多返回 3 个分组
topk_per_group=2, # 每组最多返回 2 个 Document
)
for group in groups:
print(group.group_by_value, group.docs)
```
```ts
const groups = collection.groupByQuerySync({ // [!code highlight]
fieldName: "dense_embedding",
vector: Array(768).fill(0.1), // 实际使用时请替换为真实的 Embedding
groupByFieldName: "publish_year", // 按出版年份分组
groupCount: 3, // 最多返回 3 个分组
topkPerGroup: 2, // 每组最多返回 2 个 Document
});
for (const group of groups) {
console.log(group.groupByValue, group.docs);
}
```
# 多向量
Zvec 支持**多向量查询**,允许你在单次搜索中组合不同的 Embedding。
当查询多个向量 Embedding 时,Zvec 会从每个向量空间中独立检索候选结果,再将它们融合为一个按相关性排序的列表。由于不同向量空间的评分可能无法直接比较,你需要选择合适的**重排序策略**。
***
## 前提条件 [#前提条件]
本指南假设:
* 你已经打开了一个包含多个向量字段的 `collection`
* 你已经熟悉基本的向量查询概念。如果不熟悉,请先阅读[单向量搜索](../single-vector/)指南
此示例 Collection 包含两个向量字段:
1. **`dense_embedding`** — 768 维稠密向量,使用内积距离
2. **`sparse_embedding`** — 稀疏向量,使用内积距离
它还包含两个标量字段(`publish_year` 和 `category`)。
```python title="创建并打开 Collection"
import zvec
# [!code word:dense_embedding]
# [!code word:sparse_embedding]
collection_schema = zvec.CollectionSchema( # [!code highlight]
name="example_collection",
vectors=[
zvec.VectorSchema(
name="dense_embedding",
data_type=zvec.DataType.VECTOR_FP32,
dimension=768,
index_param=zvec.HnswIndexParam(metric_type=zvec.MetricType.IP),
),
zvec.VectorSchema(
name="sparse_embedding",
data_type=zvec.DataType.SPARSE_VECTOR_FP32,
index_param=zvec.HnswIndexParam(metric_type=zvec.MetricType.IP),
),
],
fields=[
zvec.FieldSchema(name="publish_year", data_type=zvec.DataType.INT64),
zvec.FieldSchema(name="category", data_type=zvec.DataType.ARRAY_STRING),
],
)
collection = zvec.create_and_open( # [!code highlight]
path="/path/to/collection",
schema=collection_schema,
)
```
***
## 执行多向量搜索 [#执行多向量搜索]
在 Python 中,将[查询规范](../#query)列表传递给 `query()`,并通过 `reranker` 指定融合策略。在 Node.js 中,将子查询传递给 `multiQuerySync()` 或 `multiQuery()`,并配置 `rerank`。
此示例同时查询 `dense_embedding` 和 `sparse_embedding`,并使用 `WeightedReRanker` 组合结果。权重按位置与 `queries` 保持相同顺序。
Python
Node.js
```python
import zvec
result = collection.query( # [!code highlight]
topk=3, # 重排序后最终返回的 Document 数量
queries=[ # 查询规范列表 — 每个要搜索的 Embedding 空间一个
zvec.Query(field_name="dense_embedding", vector=[0.1] * 768), # [!code highlight]
zvec.Query(field_name="sparse_embedding", vector={1: 0.1, 37: 0.43}), # [!code highlight]
],
reranker=zvec.WeightedReRanker( # [!code highlight]
weights=[1.2, 1.0], # dense_embedding、sparse_embedding
),
)
print(result)
```
```ts
let result = collection.multiQuerySync({ // [!code highlight]
topk: 3, // 重排序后最终返回的 Document 数量
queries: [
{
fieldName: "dense_embedding",
vector: Array(768).fill(0.1),
numCandidates: 5, // 此子查询召回的候选数量
},
{
fieldName: "sparse_embedding",
vector: { 1: 0.1, 37: 0.43 },
numCandidates: 5,
},
],
rerank: { // [!code highlight]
type: "weighted",
weights: [1.2, 1.0], // dense_embedding、sparse_embedding
},
});
console.log(result);
```
`topk` 始终控制融合后**最终返回的 Document 数量**。
* Python 的 `Collection.query()` 目前不提供为每个子查询单独设置候选数量的参数。
* Node.js 可以通过每个子查询的 `numCandidates` 设置候选数量;省略时默认为 `max(topk, 10)`。
* `topn` 只在直接调用重排序器的 `rerank()` 方法时使用,并不是重排序器构造参数。
### 重排序策略 [#重排序策略]
Zvec 提供不同的重排序策略来组合多个向量字段的评分。
| 重排序器 | `WeightedReRanker` | `RrfReRanker`(倒数排名融合) |
| ---- | ------------------------------------------------------ | ---------------------------------------------------------------------------------------------------- |
| 方法 | 使用**自定义权重**组合归一化的相似度评分 | 仅基于**排名位置**融合结果 — 不需要评分
当 *r* 从 0 开始计数(第一名为 0)时,RRF 评分为:$\text{RRF}(r) = \frac{1}{k + r + 1}$ |
| 适用场景 | • 不同向量字段之间的评分大致可比
• 你知道每种 Embedding 类型的相对重要性 | • 评分来自不同的度量或尺度
• 你偏好简单、稳健、无需调参的方法 |
| 参数 | `weights`:与 `queries` 顺序一致的权重列表。评分归一化会使用各查询字段的 Schema。 | `rank_constant`(*k*):控制排名影响衰减的速度。更高的值会降低排名靠前结果的主导地位。 |
# 单向量
单向量搜索用于查找与单个查询 Embedding 最相似的 Document。这是向量数据库中最常见的搜索模式。
***
## 前提条件 [#前提条件]
本指南假设你已经打开了一个 Collection,并准备好了一个 `collection` 对象。
此示例 Collection 包含两个向量字段:
1. **`dense_embedding`** — 768 维稠密向量,使用余弦距离
2. **`sparse_embedding`** — 稀疏向量,使用内积距离
它还包含两个标量字段(`publish_year` 和 `category`)。
Python
Node.js
```python title="打开一个 Collection"
import zvec
# [!code word:dense_embedding]
# [!code word:sparse_embedding]
collection_schema = zvec.CollectionSchema( # [!code highlight]
name="example_collection",
vectors=[
zvec.VectorSchema(
name="dense_embedding",
data_type=zvec.DataType.VECTOR_FP32,
dimension=768,
index_param=zvec.HnswIndexParam(metric_type=zvec.MetricType.COSINE),
),
zvec.VectorSchema(
name="sparse_embedding",
data_type=zvec.DataType.SPARSE_VECTOR_FP32,
index_param=zvec.HnswIndexParam(metric_type=zvec.MetricType.IP),
),
],
fields=[
zvec.FieldSchema(name="publish_year", data_type=zvec.DataType.INT64),
zvec.FieldSchema(name="category", data_type=zvec.DataType.ARRAY_STRING),
],
)
collection = zvec.open(path="/path/to/collection") # [!code highlight]
```
```ts title="打开一个 Collection"
import { ZVecCollection, ZVecCollectionSchema, ZVecDataType, ZVecIndexType, ZVecMetricType, ZVecOpen } from "@zvec/zvec";
// [!code word:dense_embedding]
// [!code word:sparse_embedding]
const collectionSchema: ZVecCollectionSchema = new ZVecCollectionSchema({ // [!code highlight]
name: "example_collection",
vectors: [
{
name: "dense_embedding",
dataType: ZVecDataType.VECTOR_FP32,
dimension: 768,
indexParams: { indexType: ZVecIndexType.HNSW, metricType: ZVecMetricType.COSINE }
},
{
name: "sparse_embedding",
dataType: ZVecDataType.SPARSE_VECTOR_FP32,
indexParams: { indexType: ZVecIndexType.HNSW, metricType: ZVecMetricType.IP }
}
],
fields: [
{
name: "publish_year",
dataType: ZVecDataType.INT64
},
{
name: "category",
dataType: ZVecDataType.ARRAY_STRING
}
]
});
const collection: ZVecCollection = ZVecOpen("/path/to/collection"); // [!code highlight]
```
***
## 执行单向量搜索 [#执行单向量搜索]
要执行单向量相似度搜索,请使用 `query()` 方法并提供一个[查询规范](../#query)。
Python
Node.js
```python title="使用单个向量查询"
import zvec
result = collection.query( # [!code highlight]
queries=zvec.Query(
field_name="dense_embedding",
# 稠密 Embedding 是浮点数列表
vector=[0.1] * 768, # 实际使用时请替换为真实的 Embedding
),
topk=3,
include_vector=False, # 不返回向量 Embedding
)
print(result)
```
```ts title="使用单个向量查询"
// 同步版本
let result = collection.querySync({ // [!code highlight]
fieldName: "dense_embedding",
// 稠密 Embedding 是浮点数数组
vector: Array(768).fill(0.1), // 实际使用时请替换为真实的 Embedding
topk: 3,
includeVector: false // 不返回向量 Embedding
});
console.log(result);
// 异步版本
let resultAsync = await collection.query({ // [!code highlight]
fieldName: "dense_embedding",
// 稠密 Embedding 是浮点数数组
vector: Array(768).fill(0.1), // 实际使用时请替换为真实的 Embedding
topk: 3,
includeVector: false // 不返回向量 Embedding
});
console.log(resultAsync);
```
Python
Node.js
```python title="使用单个向量查询"
import zvec
result = collection.query( # [!code highlight]
queries=zvec.Query(
field_name="sparse_embedding",
# 稀疏 Embedding 是字典:{维度索引: 权重}
vector={ # 实际使用时请替换为真实的 Embedding
42: 1.25,
1337: 0.8,
1999: 0.64,
},
),
topk=3,
)
print(result)
```
```ts title="使用单个向量查询"
// 同步
let result = collection.querySync({ // [!code highlight]
fieldName: "sparse_embedding",
// 稀疏 Embedding 的格式为 {维度索引: 权重}
vector: { // 实际使用时请替换为真实的 Embedding
42: 1.25,
1337: 0.8,
1999: 0.64,
},
topk: 3
});
console.log(result);
// 异步
let resultAsync = await collection.query({ // [!code highlight]
fieldName: "sparse_embedding",
// 稀疏 Embedding 的格式为 {维度索引: 权重}
vector: { // 实际使用时请替换为真实的 Embedding
42: 1.25,
1337: 0.8,
1999: 0.64,
},
topk: 3
});
console.log(resultAsync);
```
Python
```python title="使用单个向量查询"
import zvec
result = collection.query( # [!code highlight]
queries=zvec.Query(
field_name="dense_embedding",
id="book_1", # 使用该 ID 对应 Document 的 'dense_embedding'
),
topk=100,
include_vector=True, # 返回向量 Embedding
output_fields=["publish_year"], # 返回 'publish_year' 字段
)
print(result)
```
所有查询都返回一个 `list[Doc]`,包含 **top-k** 个最相似的 Document,按相关性评分排序。
每个 `Doc` 对象包括:
1. `id`:Document 标识符。
2. `score`:相似度评分。
3. `vectors`:向量字段名称到对应 Embedding 值的映射。\
仅在查询中传入 `include_vector=True` 时才会填充。
4. `fields`:标量字段名称到存储值的映射。\
默认返回**所有标量字段**;可通过 `output_fields` 参数限制返回的字段。
此示例展示了对 `dense_embedding` 字段进行查询的结果,设置如下:
1. `topk=3`:返回 3 个最相似的 Document
2. `include_vector=False`(默认):不返回向量 Embedding,因此 `vectors` 为空
3. 返回所有标量字段
4. 使用余弦距离计算相似度评分 — 评分越低表示越相似
$$
\textcolor{#2563eb}{
d_{\text{cosine}} = 1 - \frac{\mathbf{a} \cdot \mathbf{b}}{\|\mathbf{a}\| \|\mathbf{b}\|}
}
$$
Python
Node.js
```json
[{
"id": "book_16", // [!code highlight]
"score": 0.12152397632598877,
"fields": {
"publish_year": 1866,
"category": [
"technology",
"romance"
]
},
"vectors": null
}, {
"id": "book_69", // [!code highlight]
"score": 0.12367439270019531,
"fields": {
"publish_year": 1919,
"category": [
"art",
"fiction"
]
},
"vectors": null
}, {
"id": "book_24", // [!code highlight]
"score": 0.12455785274505615,
"fields": {
"publish_year": 1874,
"category": [
"romance",
"politics"
]
},
"vectors": null
}]
```
```json
[
{
id: 'book_16', // [!code highlight]
score: 0.12152397632598877,
vectors: {},
fields: { publish_year: 1866, category: [Array] }
},
{
id: 'book_69', // [!code highlight]
score: 0.12367439270019531,
vectors: {},
fields: { publish_year: 1919, category: [Array] }
},
{
id: 'book_24', // [!code highlight]
score: 0.12455785274505615,
vectors: {},
fields: { publish_year: 1874, category: [Array] }
}
]
```
## 参数 [#参数]
执行向量搜索时,`query()` 方法接受两类参数:
1. **通用参数**,无论底层索引类型如何都适用
2. **索引特定参数**,允许根据使用的向量索引微调搜索行为
### 通用参数 [#通用参数]
| 参数 | 描述 |
| ---------------- | ---------------------------------------------------- |
| `topk` | 返回最相似 Document 的数量。 |
| `include_vector` | 如果为 `True`,返回的 `Doc` 对象包含完整的向量 Embedding(默认禁用以提升性能)。 |
| `output_fields` | 可选的标量字段名称列表,用于指定结果中包含的字段。如果省略,返回所有标量字段。 |
| `filter` | 可选的类 SQL 布尔表达式,用于限制结果。详见[过滤搜索](../filter/)。 |
`reranker` 参数是 `query()` 接口的一部分,但**仅适用于[多向量搜索](../multi-vector/)**。\
请勿在单向量查询中提供该参数。
### 索引特定参数 [#索引特定参数]
你可以通过 `Query` 对象中的 `param` 选项传递索引特定的查询参数来微调搜索行为。
这些 `param` 的确切类型和结构取决于目标向量 Embedding 所使用的向量索引。如果省略,将使用默认值。
每种索引类型在查询时都有其自己的可调选项。完整详情请参阅:
参数类不匹配会导致错误。例如,对 HNSW 索引的向量使用 `IVFQueryParam`(或反之)是不允许的。
如果 `dense_embedding` 使用 [HNSW](../../../concepts/vector-index/hnsw-index/) 索引,你可以像这样调整 `ef` 参数:
Python
Node.js
```python title="使用索引特定参数查询"
import zvec
result = collection.query( # [!code highlight]
queries=zvec.Query(
field_name="dense_embedding",
vector=[0.1] * 768,
param=zvec.HnswQueryParam(ef=600), # 设置更大的 ef 值以获得更好的 Recall [!code highlight]
),
topk=10,
)
print(result)
```
```ts title="使用索引特定参数查询"
let result = collection.querySync({ // [!code highlight]
fieldName: "dense_embedding",
vector: Array(768).fill(0.1),
params: { indexType: ZVecIndexType.HNSW, ef: 600 }, // 设置更大的 ef 值以获得更好的 Recall [!code highlight]
topk: 10
});
console.log(result);
```
如果 `dense_embedding` 使用 [HNSW-RaBitQ](../../../concepts/vector-index/hnsw-rabitq-index/) 索引,你可以像这样调整 `ef` 参数:
Python
Node.js
```python title="使用索引特定参数查询"
import zvec
result = collection.query( # [!code highlight]
queries=zvec.Query(
field_name="dense_embedding",
vector=[0.1] * 768,
param=zvec.HnswRabitqQueryParam(ef=600), # 设置更大的 ef 值以获得更好的 Recall [!code highlight]
),
topk=10,
)
print(result)
```
```ts title="使用索引特定参数查询"
let result = collection.querySync({ // [!code highlight]
fieldName: "dense_embedding",
vector: Array(768).fill(0.1),
params: { indexType: ZVecIndexType.HNSW_RABITQ, ef: 600 }, // 设置更大的 ef 值以获得更好的 Recall [!code highlight]
topk: 10
});
console.log(result);
```
如果 `dense_embedding` 使用 [IVF](../../../concepts/vector-index/ivf-index/) 索引,你可以像这样调整 `n_probe` 参数:
Python
Node.js
```python title="使用索引特定参数查询"
import zvec
result = collection.query( # [!code highlight]
queries=zvec.Query(
field_name="dense_embedding",
vector=[0.1] * 768,
param=zvec.IVFQueryParam(nprobe=100), # [!code highlight]
),
topk=10,
)
print(result)
```
```ts title="使用索引特定参数查询"
let result = collection.querySync({ // [!code highlight]
fieldName: "dense_embedding",
vector: Array(768).fill(0.1),
params: { indexType: ZVecIndexType.IVF, nprobe: 100 }, // [!code highlight]
topk: 10
});
console.log(result);
```
如果 `dense_embedding` 使用 [IVF-RaBitQ](../../../concepts/vector-index/ivf-rabitq-index/) 索引,你可以通过 `nprobe` 调节扫描的倒排列表数:
Python
Node.js
```python title="使用索引特定参数查询"
import zvec
result = collection.query( # [!code highlight]
queries=zvec.Query(
field_name="dense_embedding",
vector=[0.1] * 768,
param=zvec.IvfRabitqQueryParam(
nprobe=100, # 扫描更多列表通常能提高 Recall [!code highlight]
is_using_refiner=True,
scale_factor=10.0,
),
),
topk=10,
)
print(result)
```
```ts title="使用索引特定参数查询"
const result = collection.querySync({ // [!code highlight]
fieldName: "dense_embedding",
vector: Array(768).fill(0.1),
params: {
indexType: ZVecIndexType.IVF_RABITQ,
nprobe: 100, // 扫描更多列表通常能提高 Recall [!code highlight]
isUsingRefiner: true,
scaleFactor: 10.0,
},
topk: 10,
});
console.log(result);
```
如果 `dense_embedding` 使用 [DiskANN](../../../concepts/vector-index/diskann-index/) 索引,你可以像这样调整 `list_size` 参数:
Python
Node.js
```python title="使用索引特定参数查询"
import zvec
result = collection.query( # [!code highlight]
queries=zvec.Query(
field_name="dense_embedding",
vector=[0.1] * 768,
param=zvec.DiskAnnQueryParam(list_size=200), # 更大的 list_size = 更高 Recall、更多磁盘 I/O [!code highlight]
),
topk=10,
)
print(result)
```
```ts title="使用索引特定参数查询"
let result = collection.querySync({ // [!code highlight]
fieldName: "dense_embedding",
vector: Array(768).fill(0.1),
params: { indexType: ZVecIndexType.DISKANN, listSize: 200 }, // 更大的 listSize = 更高 Recall、更多磁盘 I/O [!code highlight]
topk: 10
});
console.log(result);
```